How To Remove Background In Illustrator

Ah, Illustrator. That magical box of digital crayons and rulers. You're probably here because you’ve got a magnificent creation, a masterpiece that deserves to shine. But then you look. Oh, the horror! A clunky, unwanted background is clinging to your star like a stubborn toddler to a cookie jar. Don’t panic. We’ve all been there. It’s like trying to get glitter off your cat. Impossible, right? Well, maybe not entirely impossible.
So, you’ve got this brilliant illustration. Perhaps it’s a majestic unicorn prancing through a field of rainbows. Or maybe it’s just your pet goldfish looking particularly philosophical. Whatever your artistic genius, you suddenly realize the background is… well, it’s an unwanted guest. Think of it as that distant relative who shows up uninvited to every family gathering, talking about their stamp collection. We love them, but sometimes we just need them to… not be there. And that’s where the noble art of background removal in Illustrator comes in.
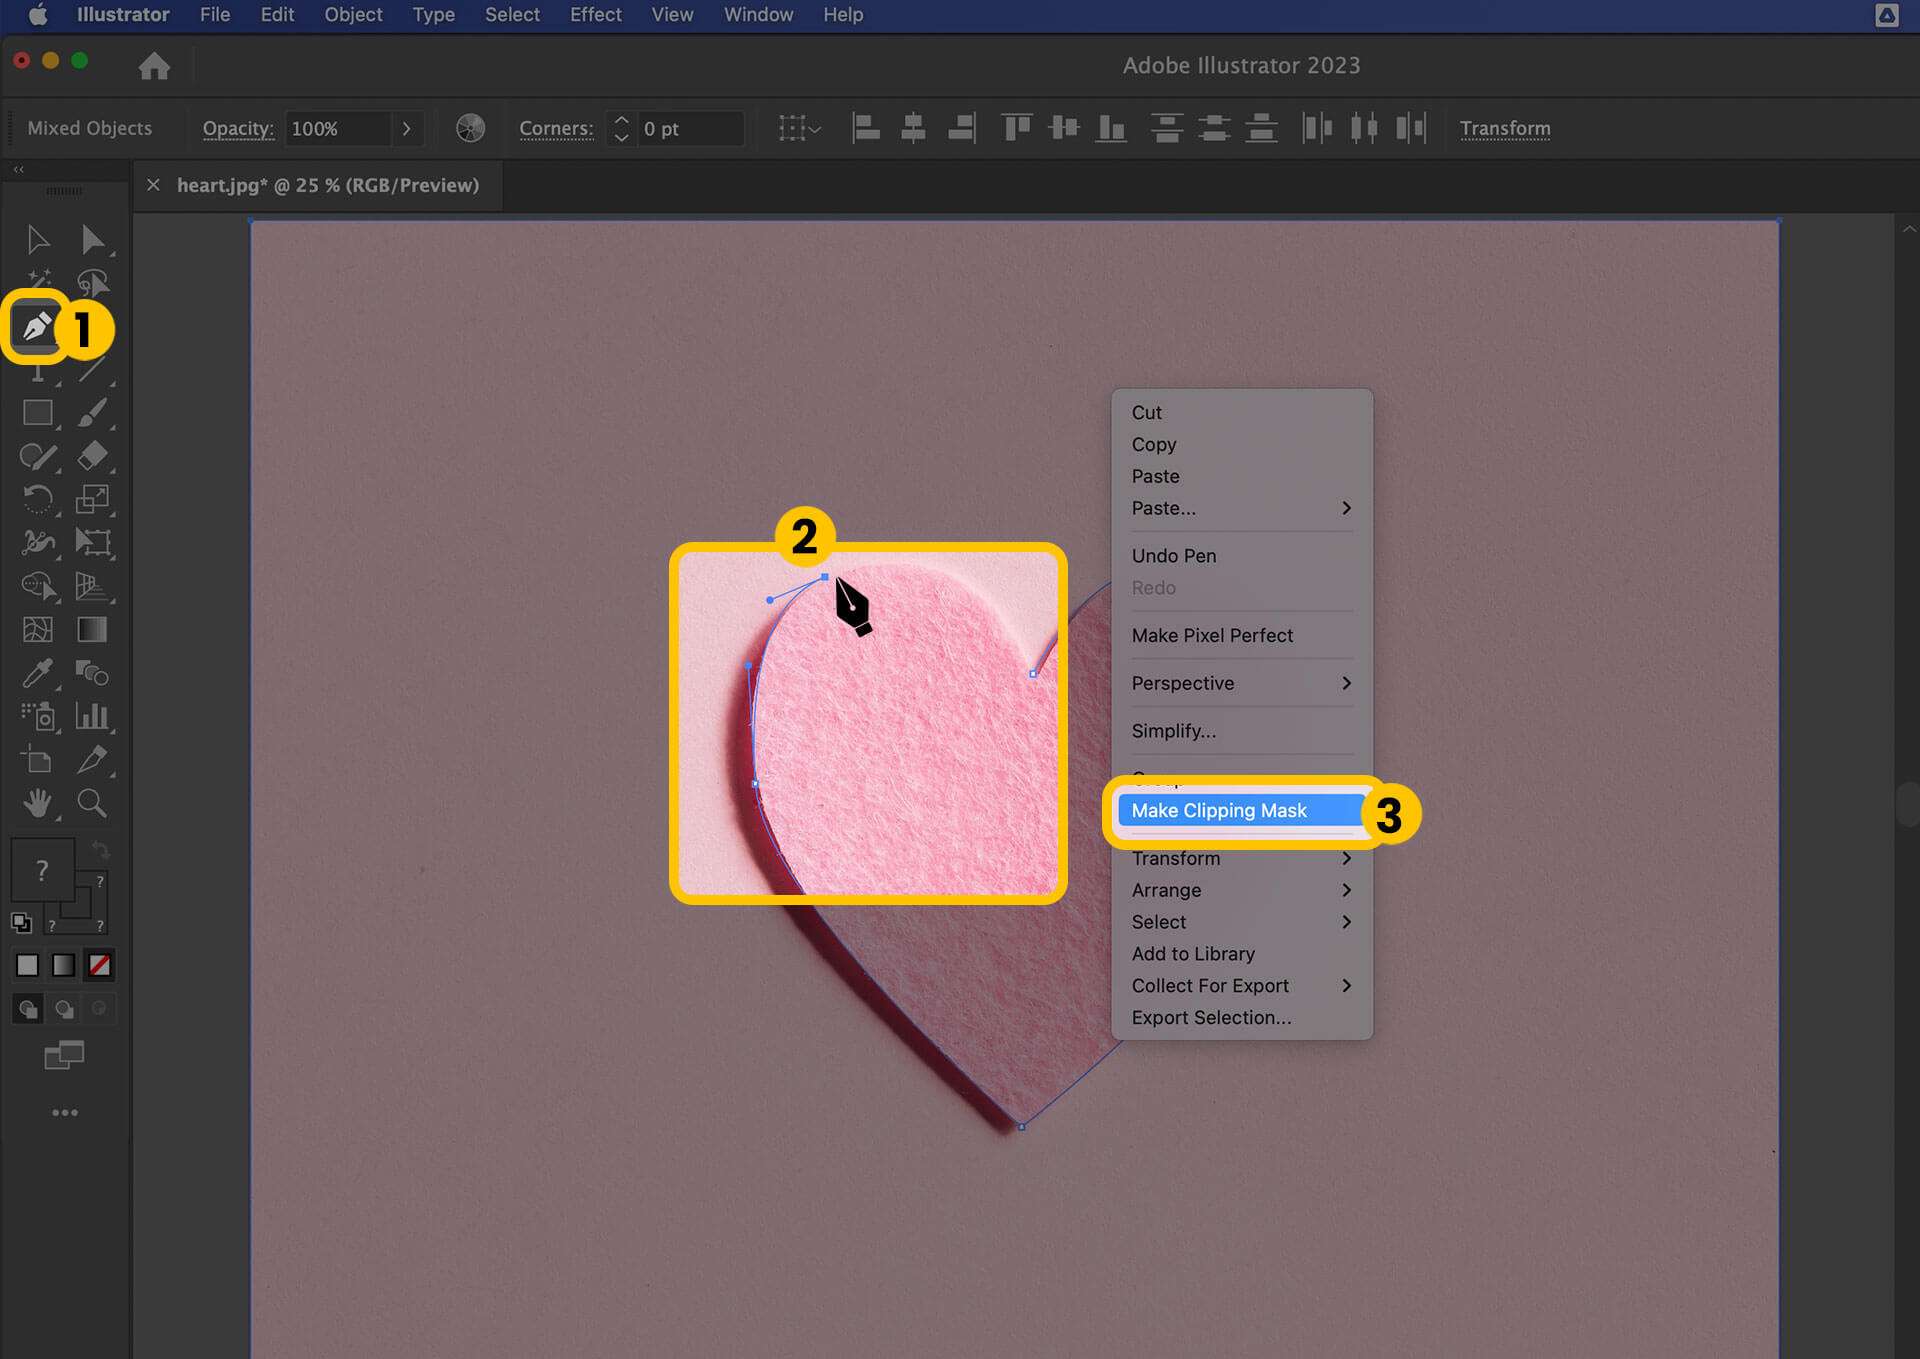
Now, some folks will tell you it's rocket science. They’ll whisper tales of arcane tools and complicated paths. They’ll speak of the Pen tool with hushed reverence, as if it were a mystical artifact. And sure, the Pen tool is powerful. It’s the Swiss Army knife of shape creation. You can trace around your subject with the precision of a brain surgeon. Click, drag, click, drag. It’s meditative. It’s also, dare I say it, a little… fiddly. Especially if your subject has more edges than a bad haircut.
Must Read
But here’s a little secret. An unpopular opinion, if you will. You don’t always need to go full neurosurgeon on it. Sometimes, the universe (and Illustrator) throws you a bone. You might find yourself staring at a simple background. A solid color. A gradient that’s less "ethereal sunset" and more "paint chip sample." In these glorious, less-complicated moments, your life can be dramatically easier.
First, let’s consider the simplest of scenarios. You’ve drawn a beautiful apple. But oops, it’s sitting on a big, fat, blue square. What do we do? Well, if that blue square is a separate object, you can just… click on it. Yes, that’s right. Click. And then? Hit the delete key. Poof! Gone. Like a magician’s rabbit, but less fluffy and significantly less likely to require a follow-up act.
What if the background isn't a separate object? What if it's part of your initial, enthusiastic stroke of genius? Imagine you've painted a fluffy cloud, and the sky behind it is also part of that brushstroke. This is where things get a tiny bit more involved. But still, not the end of the world. Not even close.
You might have heard whispers of the Shape Builder tool. This little fella is like a cosmic blender for shapes. You can combine, subtract, and intersect paths with a playful click and drag. Think of it as playing with digital playdough. You’ve got your cloud shape, and you’ve got your sky shape. You can tell the Shape Builder tool, "Hey, sky, you’re a bit too much. Let’s just… trim you down to size." And it does. It’s remarkably obedient for a piece of software.
Then there are those magical moments when your subject is clearly defined. Maybe it’s a sharp, graphic logo or a perfectly geometric shape. In these cases, you can often use the Pathfinder panel. It’s a bit like a sophisticated cookie cutter. You can punch holes in things. You can merge them. You can create some truly avant-garde silhouettes. For simple backgrounds, you can essentially "punch out" the unwanted area using a shape that perfectly encapsulates your desired subject.
And let's not forget the humble Eraser tool. Yes, it exists. It’s not just a relic of days gone by. For rougher edges, or when you’re going for a more hand-drawn, imperfect look, the Eraser can be your friend. You can just… erase. It’s intuitive. It’s direct. It’s like using a real eraser, but without the annoying smudges (usually).
Now, I know what some of you are thinking. "But my background has gradients! And textures! And tiny, pixelated dust motes that only a magnifying glass can see!" For those truly Herculean tasks, yes, the Pen tool might indeed be your destiny. And the Select > Object > Path options can be your trusty sidekicks. But for the everyday hero, the casual creator, the person who just wants their amazing artwork to be seen without the visual clutter, there are simpler paths.
Sometimes, the easiest way to remove a background is to simply draw the background you want around your subject. Think of it as framing a picture. You’ve got your amazing photo. Now, you get a nice frame. You don’t try to carve the frame out of the photo itself. You just… add it. In Illustrator, this might mean creating a new shape that sits behind your subject, or carefully constructing a new background layer.
The key, my friends, is to not overcomplicate things. Don't let the sheer power of Illustrator intimidate you. Most of the time, you’re not trying to perform open-heart surgery on your artwork. You’re just trying to get rid of a pesky blue square. So, experiment. Play. Embrace the simplicity. And if all else fails, well, just remember the magic words: delete key. It’s surprisingly effective.
And hey, if it’s still a nightmare, maybe that background was actually part of your artistic vision all along? Just kidding. Mostly.
So go forth! Create! And when the time comes to unveil your masterpiece, do it with confidence. Your amazing artwork deserves to be seen, unfettered by the tyranny of the unwanted background. Happy illustrating!