How To Move Website From One Host To Another

So, I remember this one time, way back when I was just a wee digital sprout, I decided my little blog about, uh, collecting novelty rubber chickens needed a serious upgrade. My current host was… well, let’s just say they offered about as much speed and reliability as a snail on sedatives. I’d saved up enough pocket money (from selling those aforementioned rubber chickens, obviously) for a shiny new host with all the bells and whistles. Excited doesn't even begin to cover it! I’d read all the tutorials, watched countless YouTube videos, and felt like a bona fide tech wizard. Then came the actual moving part. Oh boy. It was less “smooth transition” and more “digital car crash with a side of existential dread.” I ended up with a website that looked like a Jackson Pollock painting after a minor earthquake, and I was pretty sure I’d accidentally deleted half my precious rubber chicken photos. Spoiler alert: I had.
But fear not, brave adventurer of the internet! That traumatic experience, while scarring, taught me a lot. And since then, I've moved countless websites, from tiny personal blogs to, dare I say it, slightly more professional-looking ventures. So, consider this your friendly, slightly-less-terrifying guide to hopping hosts. Think of me as your digital sherpa, guiding you through the perilous peaks of data migration.
So, You've Decided to Ditch Your Current Host?
This is a big step! And usually, it's a good one. Maybe your current host is:
Must Read
- Slow as molasses in January. Nobody likes waiting for a website to load. Nobody.
- Buggy and unreliable. Downtime is the enemy of engagement.
- Overpriced for what they offer. You’re probably paying for features you don't even use.
- Just… not cutting it anymore. Growth happens, and sometimes your hosting needs to grow with you.
Whatever your reason, taking the plunge is totally doable. Let’s break it down into manageable chunks, shall we? Because trust me, staring at a giant wall of code can feel incredibly overwhelming. We’re going to tackle this like a delicious, multi-layered cake. Slice by slice.
Step 1: The Pre-Flight Checklist (Don't Skip This!)
Before you even think about signing up for a new host, let’s do some vital prep work. This is where you avoid the rubber chicken photo disaster I mentioned earlier. Seriously.
1. Back It Up. Then Back It Up Again. And Maybe Just One More Time for Good Measure.
This is the golden rule. The absolute, non-negotiable, paramount, most important rule of moving a website. If you don’t have a solid backup, you’re basically playing with fire. And not the fun, cozy campfire kind. The raging inferno kind.
Most hosts offer a way to download your entire website. This usually includes your website files (think HTML, CSS, images, scripts) and your database (where all your content, user info, settings, etc., live). Look for options like “File Manager” or “Backup/Restore” in your cPanel or hosting control panel. Download everything. Put it somewhere safe. Like, really safe. A cloud storage service, an external hard drive, a secure folder on your computer – wherever makes you feel most comfortable. My grandma’s attic isn’t recommended, though. Probably too dusty.
2. Document Everything (No, Seriously)
What are your current hosting settings? What’s your database name, username, and password? What about your FTP credentials? What plugins are you using on your WordPress site? What are your DNS settings?
Jot it all down. Take screenshots. Make a little digital notepad. This information will be incredibly useful when you’re setting up your new environment. It’s like having a cheat sheet for your own website. Nobody needs to know you’re using it.

3. Assess Your Current Setup
Are you on shared hosting? VPS? Dedicated? Knowing your current plan helps you choose a suitable new one. If you’re a small blog, you probably don’t need a super-powered dedicated server. If you’re a bustling e-commerce site, you definitely don’t want to be crammed onto a cheap shared plan.
Also, consider your website platform. Is it WordPress? Joomla? A custom-built monstrosity? This will influence the type of hosting you need and the migration process.
Step 2: Choosing Your New Digital Mansion
This is the fun part! Researching and selecting a new host can feel like shopping for a new apartment. You want it to be in a good neighborhood (fast servers, reliable uptime), have enough space (storage and bandwidth), and come with all the amenities you need (support, SSL certificates, backups).
When you're looking, keep these in mind:
- Reputation and Reviews: What are other people saying? Look for hosts with consistently good reviews for speed, uptime, and customer support.
- Features: Do they offer one-click installs for your CMS (like WordPress)? Do they have good security features? What about a free SSL certificate? (These are practically mandatory these days!)
- Support: How can you reach them? Live chat? Phone? Email? 24/7 support is a lifesaver when your site goes down at 3 AM on a Sunday.
- Price: While you don't want to break the bank, the cheapest option is rarely the best. Look for value for money.
- Scalability: Can you easily upgrade your plan if your site grows?
Don't be afraid to shop around! There are tons of great hosting providers out there. Do your homework, and don't rush into the first attractive offer you see. Unless it involves unlimited free pizza with every hosting plan. Then maybe consider it.
Step 3: The Big Move – Getting Your Stuff Over There
Okay, deep breaths. This is where the actual migration happens. There are a few ways to do this, depending on your technical comfort level and your new host’s offerings.

Option A: The "My New Host Does It For Me!" Approach
Many reputable hosting providers offer a free website migration service. This is, hands down, the easiest and most stress-free option. You basically hand over your old hosting account details, and their team of experts handles the rest.
Seriously, if your new host offers this, take them up on it! It's like hiring a professional mover instead of trying to cram your entire life into your tiny hatchback.
Here’s generally how it works:
- Sign up for your new hosting account.
- Contact their support team and let them know you want to migrate your website.
- They'll ask for your old hosting credentials (username, password, control panel access, etc.).
- They'll then copy your website files and database to your new server.
- They’ll usually handle the DNS updates for you too.
It’s pure magic. You might have a brief period of downtime, but usually, it's minimal. I’ve even had them migrate sites while I was sleeping! Talk about service.
Option B: The "I'm Feeling Brave (and Have a Good Backup)" Manual Migration
If your new host doesn't offer free migrations, or you're feeling a bit more adventurous, you can do it yourself. This involves manually uploading your files and importing your database.
1. Setting Up Your New Hosting Environment
Once you've signed up for your new hosting, you'll get access to your new control panel (usually cPanel, Plesk, or a custom dashboard). You'll need to:
- Create a database: Go to your database tools and create a new database, a new database user, and assign that user to the database. Make sure to record the database name, username, and password – you'll need these later!
- Upload your files: Use the File Manager in your control panel to upload your website files. This is typically done in the `public_html` or `www` folder. If your site is large, using an FTP client (like FileZilla) might be faster.
This is where those screenshots and notes from Step 1 come in handy. No more frantic searching for that tiny piece of paper you scribbled on.
2. Editing the Configuration File
This is a crucial step for many CMS platforms, especially WordPress. You’ll need to find your website’s configuration file (e.g., `wp-config.php` for WordPress) and update it with your new database details (name, username, password, and host, which is usually `localhost`).
This tells your website how to connect to its new database home. It’s like giving your website the new address for its brain. Don’t mess this up, or your website will have a serious case of amnesia.
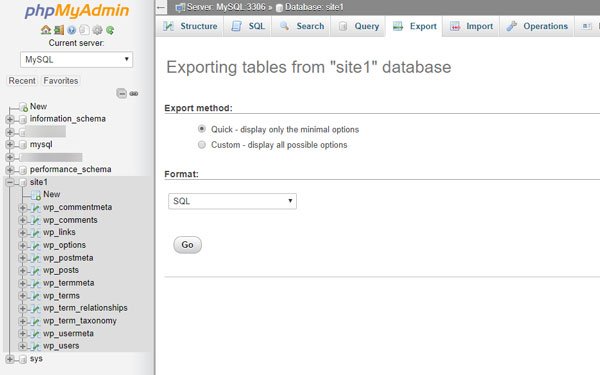
3. Importing Your Database
Now, you need to get your saved database file into your new database. You’ll typically use a tool called phpMyAdmin (usually accessible from your control panel) for this. Select your newly created database, then click on “Import,” and upload your `.sql` file.
This can take a little while, especially for larger databases. Patience is a virtue, especially in web development. Grab a coffee, do some stretches, admire your new hosting dashboard.
Step 4: Pointing Your Domain to the New Home (The DNS Dance)
This is the moment of truth! Your website files and database are on the new server, but your domain name (your `yourwebsite.com`) is still pointing to your old host. We need to tell the internet to send visitors to your new location.
This is done through your Domain Name System (DNS) settings. You’ll usually manage your DNS records through your domain registrar (where you bought your domain name) or sometimes through your hosting provider if they also handle your domain registration.
Here’s the general idea:
- Find your new host's nameservers: Your new hosting provider will give you a set of nameserver addresses (e.g., `ns1.newhost.com`, `ns2.newhost.com`).
- Update your domain's nameservers: Log in to your domain registrar’s control panel and find the section for managing your domain’s DNS. You’ll typically see an option to “Change Nameservers” or “Update DNS.” Replace your old nameserver details with the new ones from your hosting provider.
Important Note: DNS changes can take some time to propagate across the internet. This can be anywhere from a few minutes to 48 hours. During this time, some visitors might still see your old site, while others will see your new site. This is normal! It's like the internet is having a little debate about where your website lives.
While you're waiting for DNS to propagate, you can often preview your site on the new server by editing your computer’s hosts file. This is a bit more technical, but it allows you to see your site on the new server before the public DNS changes are complete. Your new host can usually guide you through this if you need it.
Step 5: Post-Migration Checks (The Final Tidy-Up)
Once DNS propagation has had a chance to do its thing, it’s time for a thorough check.
- Test everything: Browse every page of your website. Click on every link. Test your contact forms. Test your checkout process if you have an e-commerce site. Make sure all your images are loading correctly. No more rogue rubber chickens disappearing!
- Check for broken links: Use a broken link checker tool to find any links that might have gone awry during the migration.
- Test your email: If you use email addresses associated with your domain (e.g., `info@yourwebsite.com`), make sure they’re still working and receiving/sending emails correctly.
- Check your SEO: Ensure your search engine rankings haven't plummeted. If you used a migration service, they often handle this carefully, but it’s always worth a double-check.
- Monitor performance: Keep an eye on your website’s speed and uptime to ensure your new host is living up to its promises.
If you find any issues, don’t panic! Go back to your backups, refer to your documentation, and reach out to your new host’s support. They’re there to help!
And That's It! You've Migrated!
See? Not so scary, right? It’s a process that requires patience, attention to detail, and a good sense of humor (especially when you think you’ve accidentally nuked your entire digital existence). But the reward of a faster, more reliable website is absolutely worth it.
So go forth and migrate! May your internet connection be strong, your backups be plentiful, and your new hosting provider be as awesome as they claim. And if all else fails, remember the rubber chickens. They’re always there for you. Or at least, they will be, once you’ve successfully moved them to their new digital home.