How To Dry Chilis In The Oven
So, you've gone and done it. You've somehow ended up with a ridiculous abundance of chili peppers. Maybe you had a rogue plant that decided to go supernova in your garden, or perhaps you scored a sweet deal at the farmer's market and your eyes were bigger than your stomach (and your fridge). Whatever the reason, you're now staring at a pile of vibrant, fiery little guys, and you're thinking, "Now what?"
Fear not, fellow pepper enthusiast! We're about to embark on a journey to transform those fresh fellas into dried beauties, ready to add a punch of flavor to your culinary creations for ages. And the best part? We're going to do it in the comfort of your own kitchen, using that trusty oven of yours. Think of it as giving your chilies a spa day, but instead of cucumber slices and soothing music, they get a gentle bake and a bit of dehydration. Much more exciting, right?
The "Why" Behind the Drying Game
Before we get our hands dirty (or, well, slightly warm from the oven), let's quickly chat about why you'd even want to dry these bad boys. Honestly, it's all about flavor preservation and convenience. Fresh chilies are fantastic, don't get me wrong. But they have a shelf life that's shorter than a celebrity marriage. Drying them turns them into little flavor bombs that you can stash away and deploy whenever the mood strikes.
Must Read
Imagine this: You're making a hearty chili, a spicy curry, or maybe just some scrambled eggs that need a little "oomph." Instead of rushing to the store for fresh chilies (and potentially finding the only ones available are bruised and sad), you can just reach into your pantry, grab a handful of your dried gems, and voilà! Instant flavor. It's like having your own personal spice rack, but with a much more satisfying DIY backstory.
Plus, let's be real, sometimes you just have too many. Drying is the ultimate "I told you so" to that overzealous chili plant. It's you, in control, making sure no deliciousness goes to waste. It's like a culinary win for the ages, a testament to your foresight and your ability to conquer even the most aggressive of vegetable harvests.
Gathering Your Drying Crew: What You'll Need
Alright, time to assemble our crack team for this drying mission. It's not exactly a high-stakes heist, but a little preparation goes a long way. Think of it as getting your ingredients ready for a surprisingly simple baking project, minus the sugar and the inevitable flour explosion.
First up, obviously, are your chili peppers. Any kind will do, from the mild bell pepper's gentle cousin to the tongue-tingling inferno that makes you question all your life choices. Just make sure they're ripe and relatively firm. No one wants to dry mushy chilies; that's just setting yourself up for disappointment, like ordering a salad and getting a side of fries instead.
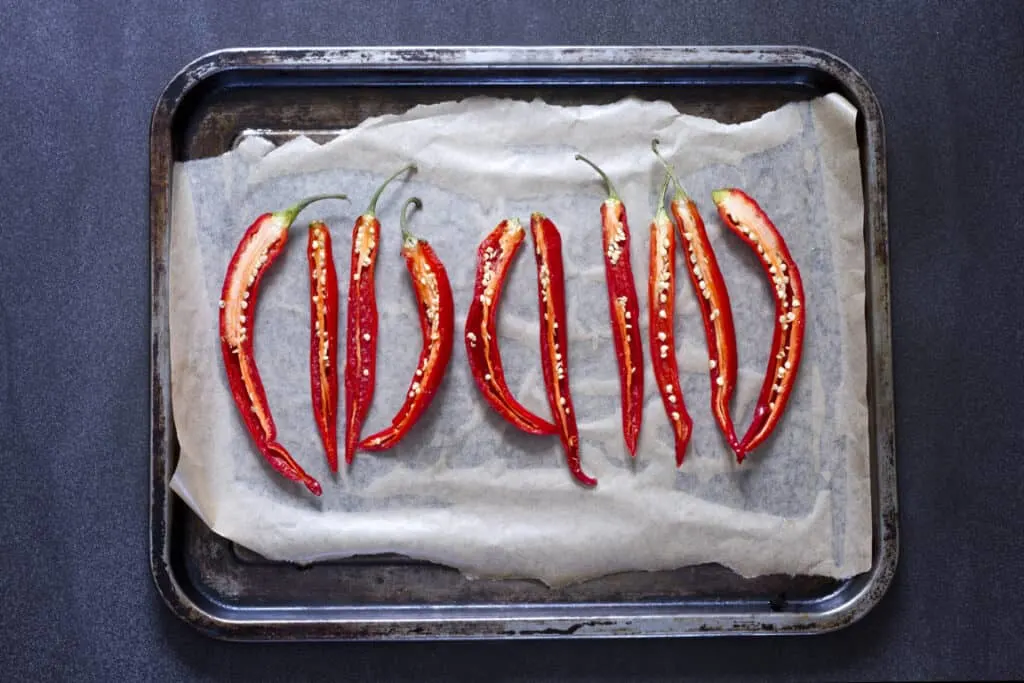
Next, you'll need a baking sheet. The bigger, the better, especially if you've got a veritable chili mountain to tackle. Think of it as a landing strip for your peppers. Parchment paper is your best friend here. It makes cleanup a breeze. Trust me on this one. Cleaning burnt-on chili bits is a special kind of purgatory you want to avoid.

And, of course, your trusty oven. We'll be talking temperatures and times shortly, so make sure it's in good working order. No one wants an oven that decides to go rogue and turn your kitchen into a sauna. That's not drying, that's just…unpleasant.
Gloves are a good idea, especially if you're dealing with anything above a jalapeño's heat level. Trust me, you do not want to touch your eyes after handling super-hot peppers. That's a recipe for a fiery ER visit, and frankly, nobody has time for that kind of drama.
The Pre-Game: Preparing Your Peppers for Their Big Moment
Before we pop them into the oven, we need to give our chilies a little pre-game prep. This is where we get them ready for their transformation. Think of it as a quick pep talk before a big game, or maybe a gentle massage before a marathon.
First things first: Wash your chilies. Just a quick rinse under cool water to get rid of any dirt or rogue garden critters. We're aiming for dried peppers, not dried garden bugs. Though, I suppose that's a form of protein… but let's not go there.
Now, the decision: whole or sliced? For most chilies, slicing them in half lengthwise is the way to go. This exposes more surface area to the air and heat, speeding up the drying process. It's like opening up a book to let the pages dry faster. If you're drying tiny peppers like bird's eye chilies, you might get away with leaving them whole, but even then, a little slit can help.
If you're dealing with really large peppers, you might even want to deseed them. This isn't strictly necessary for drying, but it can reduce the overall heat if you're not aiming for volcanic levels. Plus, fewer seeds means less chance of them getting stuck to your parchment paper and burning into oblivion.

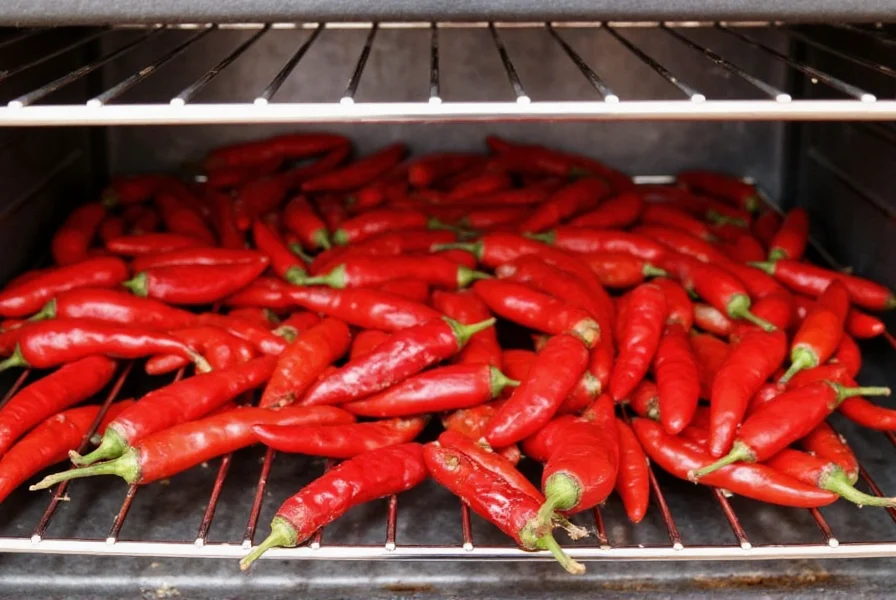
Arranging them on the baking sheet is also important. Give them some breathing room. Don't pile them on top of each other like a chili avalanche. They need to be in a single layer, with a little space between each one. Think of it as a chili convention, where everyone gets their own little booth.
The Oven Spa Day: Let the Drying Commence!
Okay, the moment of truth! It's time to get these peppers into their warm, cozy oven. This is where the magic (and a little bit of patience) happens.
The key here is low and slow. We're not trying to roast these bad boys into oblivion; we're gently coaxing the moisture out. So, set your oven to a nice, low temperature. Think around 150-175°F (65-80°C). If your oven doesn't go that low, don't panic. Just use the lowest setting it has, and keep a close eye on them.
Now, here's a pro tip that will make your life so much easier: prop the oven door open slightly. You can do this with a wooden spoon or even a rolled-up dishtowel. This allows the moisture that's being released from the chilies to escape. If that moisture gets trapped in the oven, it's like trying to dry clothes in a steamy bathroom – it just won't work effectively.
This is where the "patience is a virtue" mantra really comes into play. Drying time can vary wildly, depending on the size and thickness of your chilies, and how much moisture they have to begin with. We're talking anywhere from 4 to 12 hours, or even longer. Yes, it sounds like a long time, but think of it as background activity. You can still live your life, binge-watch that show, or even go to work (if you're feeling ambitious).
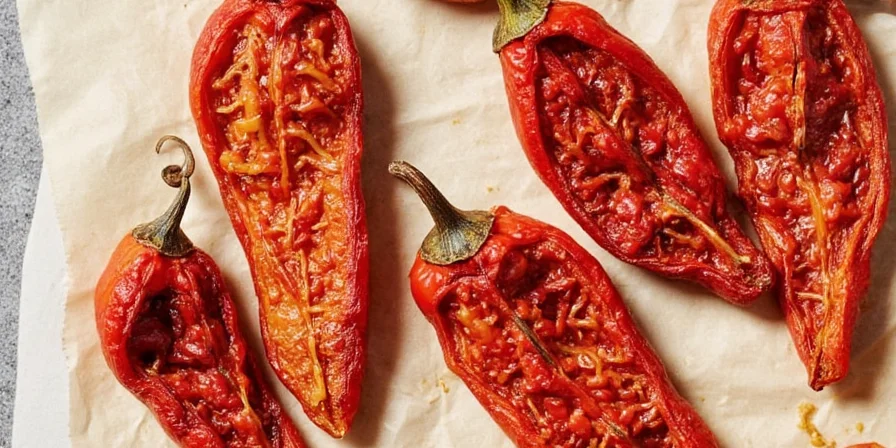
What are you looking for? You want your chilies to be leathery and brittle. They should feel dry to the touch, with no signs of softness or pliability. When you bend a piece, it should snap or crack, not bend like a piece of cooked pasta. If they're still a bit floppy, they need more time. It's like waiting for a pie to cool; you can't rush perfection!
Check on them periodically. Give them a gentle stir or flip every hour or so. This ensures even drying and prevents any sneaky corners from staying stubbornly moist. You're basically the diligent gardener, tending to your precious crop.
The "Are They Ready Yet?" Test
This is the part where you start getting a little antsy. You'll be peeking into the oven like a hawk, convinced you've found the perfect moment. But how do you really know when they're done?
The primary indicator, as mentioned, is the texture. They should feel completely dry, almost like a brittle leaf. If you can still feel any give or squishiness, they're not quite there yet. Imagine trying to snap a dry twig; that's the kind of resistance you're aiming for.
Another good test is to try and crumble a small piece. If it crumbles easily into dusty fragments, you're golden. If it clumps or forms a paste, it's still too moist. This is the ultimate, definitive test. It's the chili's final exam, and you're the stern but fair judge.
If you're really unsure, you can always turn off the oven and leave them inside to cool completely. Sometimes, the residual heat can finish the job. Just make sure they're truly cool before you do your final assessment. Hot peppers can feel deceptively pliable.
Don't be afraid to take a few out and let them sit on the counter for a bit. Sometimes, they'll continue to dry slightly as they cool. It’s like letting a steak rest; it just enhances the final product.
Cooling and Storing: The Victory Lap
Hooray! Your chilies are officially dried! Now, before you go tossing them into a grinder and making your own chili powder like a culinary alchemist, we need to let them cool down completely.
Take them out of the oven and spread them out on a wire rack or a clean plate. Let them sit at room temperature until they are totally cool to the touch. This is crucial. Storing warm chilies is a recipe for mold, and nobody wants moldy chilies. That's like finding a hair in your soup – a culinary tragedy.
Once they're cool, you can store them in a few ways. The simplest is to just put them in an airtight container. Glass jars are great for this. You can store them whole, or you can break them up a bit if you prefer. They'll keep like this for a good several months, even up to a year, as long as they're kept in a cool, dark place.
If you're feeling fancy, you can turn them into chili flakes or chili powder. For flakes, just break them up with your hands or a rolling pin. For powder, a spice grinder or a clean coffee grinder works wonders. Be warned, though: grinding dried chilies can create a surprisingly potent airborne chili dust, so perhaps invest in some decent ventilation or a sturdy mask. It's like a mini volcanic eruption in your kitchen, but with less lava and more sneeze-inducing particles.
And there you have it! You've successfully transformed a bounty of fresh chilies into a versatile, long-lasting ingredient. You've conquered the chili mountain, and your pantry is now a testament to your kitchen prowess. So go forth, my friend, and spice up your life!

