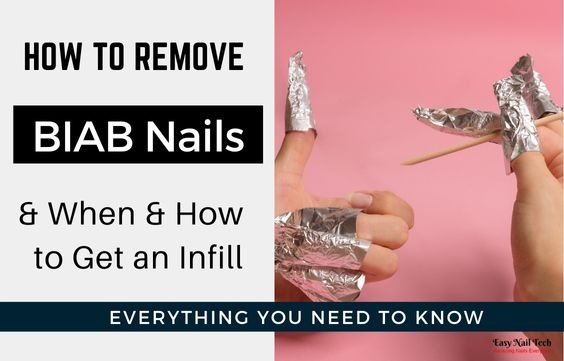
How To Take Off Biab At Home
So, you've been rocking those gorgeous BIAB (Builder In A Bottle) nails. They're strong, they're chic, and they've probably survived more than a few accidental door slams or enthusiastic keyboard typing sessions. You love them! But, like a favorite pair of jeans that's seen better days, eventually, even the most perfect BIAB needs to come off. And guess what? You don't always need to trek back to the salon for a quick removal. You can totally tackle this at home, saving yourself a bit of time and, let's be honest, a few precious dollars.
Why should you even care about taking off BIAB at home? Well, think of it like this: you wouldn't let your car's tires get completely bald before replacing them, right? Your nails are kind of the same. Leaving BIAB on for too long, or just letting it grow out unevenly, can sometimes lead to lifting or even damage. Plus, sometimes you just fancy a change! Maybe you've got a wedding to attend and want a different color, or maybe you're just ready to let your natural nails breathe for a bit. Knowing how to safely remove it gives you that freedom. It's like having a secret superpower for your fingertips!
Let's get down to the nitty-gritty. The most common and generally accepted way to remove BIAB at home is through a process involving soaking. Now, I know what you might be thinking: "Soaking? Like, with a cuppa and a good book?" Well, almost! We're going to be soaking those nails in a special kind of liquid, and it requires a little more focus than your average bubble bath.
Must Read
The magic ingredient here is acetone. Yes, that's the stuff. You've probably seen it in nail polish remover, but for BIAB removal, you'll want 100% acetone. It's a bit more potent and gets the job done more efficiently. Think of it as the heavy-duty cleaner for your nail art. You can find this at most beauty supply stores or online. Just make sure you're getting the pure stuff, not a diluted formula.
Gathering Your Arsenal: What You'll Need
Before you dive in, let's make sure you have your tools ready. It’s like prepping for a baking marathon – you need all your ingredients and utensils laid out. This ensures a smooth, stress-free removal process.
- 100% Acetone: As we mentioned, this is your star player.
- Cotton Pads or Balls: You'll need enough to cover each nail.
- Aluminum Foil: The shinier side facing inwards, please!
- A Nail File: Preferably a medium grit (around 100-180 grit).
- A Cuticle Pusher or Orangewood Stick: For gently nudging off the softened BIAB.
- A Buffer: To smooth out any rough patches.
- Cuticle Oil: Your nails will thank you later!
- Optional: A Small Bowl or Basin: If you're not a fan of wrapping individual fingers.
Step 1: The Prep - Giving Your Nails a Little "Heads Up"
This is where we gently disrupt the surface of the BIAB. Imagine you're lightly sanding down a piece of wood before you paint it – you're creating a bit of an entry point for the acetone. You don't need to go crazy here; just a few gentle strokes with your nail file across the entire surface of the nail should do it. Focus on removing any top coat shine. This allows the acetone to penetrate the BIAB more effectively. Think of it as opening a tiny, helpful window for the solvent.
Step 2: The Soak - Getting Cozy with Acetone
Now for the main event! There are a couple of ways to do this:
The Foil Wrap Method (The Classic):
This is the most popular and often the most effective method. Take a cotton pad or ball and saturate it with 100% acetone. Place the saturated cotton onto your nail, making sure it covers the entire BIAB application. Then, take a piece of aluminum foil (about 3-4 inches square) and wrap it tightly around your fingertip, securing the cotton in place. The foil acts like a mini-sauna, trapping the heat from your hands and helping the acetone to work its magic. Repeat for all your nails.
You'll want to let these sit for about 10-15 minutes. During this time, you can do a few things. Maybe scroll through your phone, listen to a podcast, or just enjoy a moment of quiet contemplation. It’s a little bit of "me time" that also happens to be super productive for your nails.
The Bowl Method (For the Eager Beaver):
If wrapping individual fingers feels like too much fuss, you can use a small bowl or basin. Pour enough acetone into the bowl to submerge your fingertips. This method can be a bit faster as all your nails are soaking at once. However, it can also be a little drying to the skin around your nails if you're not careful. Ensure the bowl is clean and that you're in a well-ventilated area, as acetone fumes can be strong.
If you choose this method, you’ll still want to soak for about 10-15 minutes. You might need to add a little more acetone if it starts to evaporate too quickly.
Step 3: The Gentle Nudge - Releasing the BIAB
After the soaking time is up, it's time for the reveal! Unwrap one finger at a time. You should find that the BIAB has softened and started to lift from your nail. Now, grab your cuticle pusher or orangewood stick. Gently push away the softened BIAB. The key word here is gently. You do not want to scrape or dig into your natural nail. If the BIAB isn't coming off easily, don't force it! It just means it needs a little more soaking time. Wrap it back up and give it another few minutes.
Think of this step like peeling a perfectly ripe banana. It should come away smoothly. If you're having to yank or pull, something's not quite right. Patience is your best friend here. Forcing it can lead to lifting your natural nail plate, and nobody wants that! It's like trying to pull off a sticker that's stuck too well – you end up with a ripped mess. We’re going for a clean, effortless lift.
Step 4: The Buff and Polish - Restoring Your Natural Glow
Once all the BIAB has been gently removed, your nails might look a little dull or have some residual product. This is where your buffer comes in! Gently buff the surface of your natural nails to smooth them out and restore their natural shine. Again, be gentle! You're not trying to file down your natural nail, just polish it to a healthy sheen.
This is also a good time to check for any unevenness or lingering bits of BIAB. If you find any, you can go back to Step 1 and reapply a small piece of soaked cotton for a targeted soak on that specific area.

Step 5: The TLC - Pampering Your Nails
After all that acetone action, your nails and the surrounding skin might be feeling a little dry. This is the most important step for happy, healthy nails. Generously apply cuticle oil to your nails and the skin around them. Massage it in well. This replenishes moisture and helps to keep your natural nails strong and flexible. It's like giving your nails a comforting hug after a long day.
You can also apply a good hand lotion to complete the pampering session. Your nails will feel so much better, and you’ll feel like a nail-care guru!
A Few Extra Tips for Success:
- Ventilation is Key: Acetone fumes can be strong. Make sure you're in a well-ventilated area, like next to an open window.
- Protect Your Surfaces: Acetone can damage some surfaces. Lay down some old towels or newspaper to protect your table.
- Don't Over-Soak: While you want the BIAB to soften, leaving your nails in acetone for too long can dry them out excessively.
- Listen to Your Nails: If you feel any discomfort or your nails feel overly sensitive, stop the process.
- Patience, Young Padawan: Rushing the process is the quickest way to damage your nails.
Taking off BIAB at home can be a really empowering and satisfying experience. It’s not as daunting as it might seem, and with a little practice, you’ll be a pro in no time. You get to control when your nails get a refresh, keeping them healthy and looking fabulous. So go forth, embrace your inner nail technician, and enjoy the freedom of a perfectly removed BIAB!

