How To Know If Yeast Is Active

Hey there, fellow baker! So, you've got a recipe calling for yeast, and you're staring at that little packet or jar like it holds the secrets to the universe. You're probably thinking, "Is this stuff even alive anymore?" Don't worry, you're not alone! Many of us have been there, nervously wondering if our bread will rise or if we're just about to bake a very expensive, very dense brick. But fear not, my friend! Today, we're going to demystify the magical world of yeast and learn how to tell if yours is ready to party.
Think of yeast as tiny, microscopic little critters. They're actually fungi, but let's not get too technical. These little guys are basically hungry and when they're happy and fed, they get really excited. They eat sugars and, as a lovely byproduct, they release carbon dioxide gas and alcohol. That carbon dioxide is what makes your dough puff up like a fluffy cloud, and the alcohol? Well, that's part of what gives baked goods that amazing aroma. So, in short, active yeast = happy yeast = dough that rises!
The easiest and most reliable way to check if your yeast is alive and kicking is the good old "proofing" method. It's super simple, and honestly, it's kind of fun to watch. It's like a little science experiment in your kitchen. You'll need a few things to get started:
Must Read
What You'll Need for the Yeast Party Prep:
- Your yeast (duh!)
- A little bit of warm water (not hot, not cold, just pleasantly warm!)
- A pinch of sugar (their favorite snack!)
- A small bowl or a mug
Okay, let's get down to business. Grab that small bowl. We're talking about something like a teacup or a small jam jar. Now, you're going to measure out about 1/4 cup of warm water. The temperature is key here. Think of it like a nice, lukewarm bath. If it's too hot, you'll shock and kill your little yeasties. Too cold, and they'll be too sleepy to wake up. You can test it on your wrist; it should feel comfortable, not burning or chilling. It's like Goldilocks and the three bowls of water – just right!
Next up, it's snack time for the yeast! Add a pinch of sugar to that warm water. Just a little bit, maybe half a teaspoon. This is their breakfast, their energy boost. It gives them something to munch on right away so they can show you their true colors. Stir it gently to dissolve the sugar. No need for a fancy whisk; a spoon will do just fine.
Now for the main event: add your yeast! If you're using active dry yeast, you'll typically use about 1 teaspoon for this test. If you're using instant yeast, you can actually skip this whole proofing step and often add it directly to your dry ingredients. But hey, if you're unsure, or if your instant yeast has been hanging out in your pantry for a while, proofing it is never a bad idea. It’s like a little insurance policy for your baking dreams.
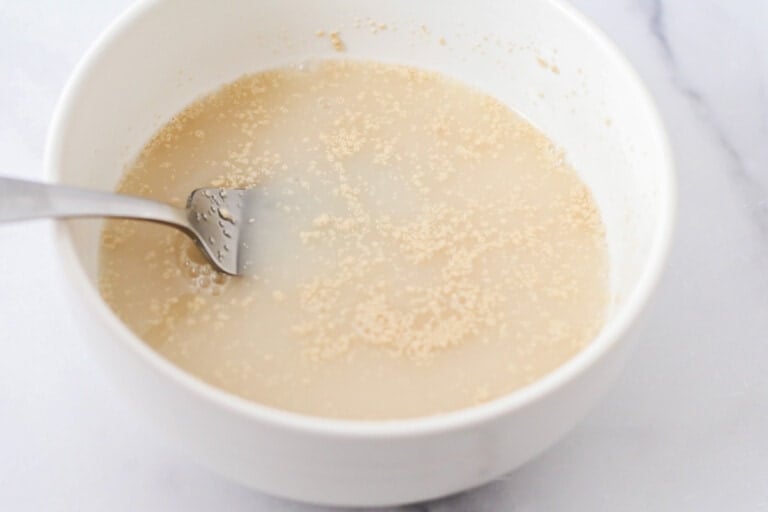
Gently stir the yeast into the sugary water. Don't go crazy with the stirring; just a gentle swirl to make sure it's all incorporated. Now, here's the crucial part: let it sit for about 5 to 10 minutes. This is where the magic happens, or doesn't happen, depending on your yeast's mood. It's like waiting for a kettle to boil – you know something exciting is about to happen, or you're just staring at hot water.
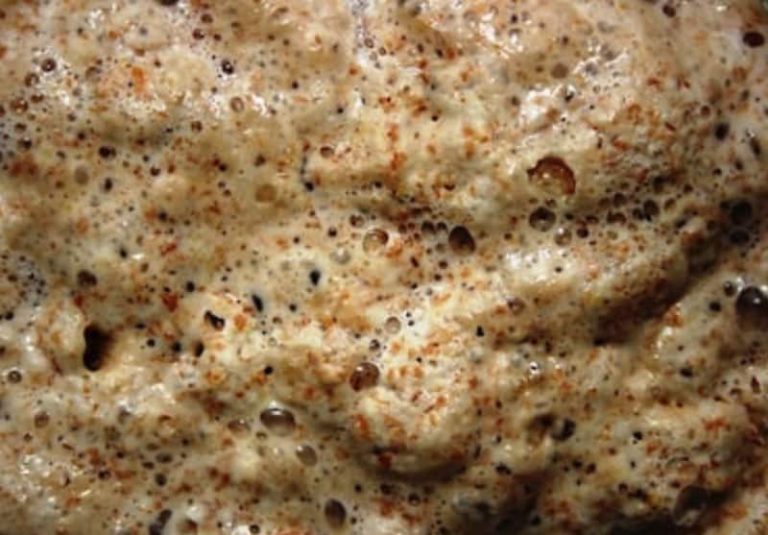
So, what are you looking for during this waiting period? You're looking for bubbles! After those 5 to 10 minutes, you should see a foamy, bubbly layer form on top of the water. It might look a bit like a tiny, yeasty cappuccino. If you see that beautiful froth, congratulations! Your yeast is alive and kicking! It's ready to get to work and make your dough rise like a champion.
This foamy layer is the visible evidence of those tiny yeast organisms feasting on the sugar and happily burping out carbon dioxide. The more bubbles you see, the more active your yeast is. It's basically a tiny party happening in your bowl, and you’re invited!

Now, what if you don't see any bubbles? Uh oh. Does this mean your baking dreams are officially crushed? Not necessarily, but it's a strong indication that your yeast might be past its prime. If you wait the full 10 minutes and all you have is cloudy water with no foam or bubbles, it's likely that your yeast is dead or very sluggish. In this case, it's probably best to discard it and grab a fresh packet. It’s a bummer, I know, but better to find out now than after you’ve spent hours kneading dough!
A few other things to consider about your yeast. First, check the expiration date. This is probably the most obvious tip, but it's easily overlooked in the excitement of baking. Most yeast packets have a "best by" date. If yours is long past that date, the odds of it being active are pretty slim. It’s like looking at a concert ticket from five years ago – probably not going to get you in.
Also, think about how it's been stored. Yeast, especially active dry yeast, needs to be stored properly to maintain its viability. Ideally, it should be kept in a cool, dry place. Once a packet is opened, it’s a good idea to store the remaining yeast in an airtight container in the refrigerator or even the freezer. This slows down the aging process. If your yeast has been left out on the counter for weeks or has been exposed to heat, it might have lost its mojo.
Another clue can be the smell. Active yeast has a pleasant, slightly yeasty, almost bready smell. If your yeast smells sour, musty, or just plain funky, it's probably not a good sign. Trust your nose! If it smells off, it's probably best to let it go and get some fresh stuff.
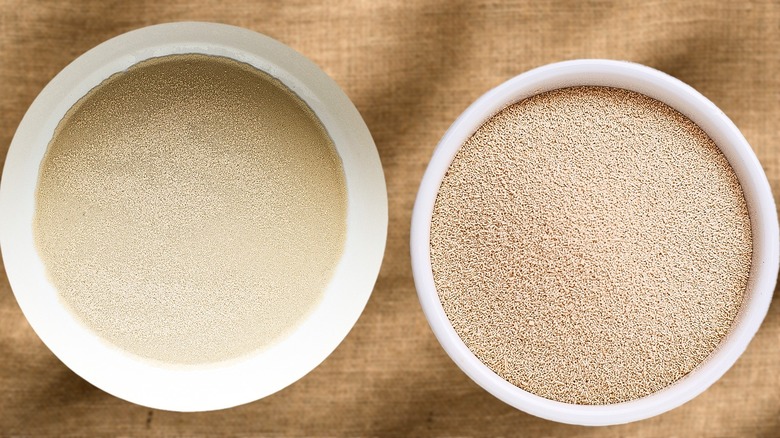
Let's talk about different types of yeast for a sec, just to avoid any confusion. The most common ones you'll encounter are active dry yeast and instant yeast (sometimes called rapid-rise or bread machine yeast). Active dry yeast granules are larger and have a protective coating that needs to be dissolved in warm liquid before the yeast becomes active. That's why proofing is so important for active dry yeast.
Instant yeast granules are smaller and have a more porous structure, meaning the protective coating is less robust. This allows them to absorb liquid more quickly and start working almost immediately. So, for instant yeast, you can often skip the proofing step and mix it directly with your dry ingredients. However, if you’re unsure about its freshness, a quick proof is still a great way to be certain.
There's also fresh yeast, also known as cake yeast or compressed yeast. This comes in little blocks and needs to be refrigerated. It's more perishable than dry yeast. To use it, you typically crumble it into a small amount of warm liquid with a bit of sugar. It should dissolve and become frothy fairly quickly if it's active.

So, to recap, the proofing method is your golden ticket to yeast-readiness. It's simple, it's visual, and it gives you peace of mind. Don't skip it, especially if you're using active dry yeast or if your yeast is on the older side. It's the difference between a glorious, puffed-up loaf and a dense, sad disc.
Think of it this way: you wouldn't send a soldier into battle without checking their equipment, right? Yeast is your tiny, edible soldier in the war against bland bread, and proofing is its readiness check. A little bit of effort upfront saves a whole lot of potential disappointment later on.
And what if your yeast isn't active? Don't despair! Baking is a journey, and sometimes, even the best bakers have a dud ingredient. The important thing is that you're trying, you're learning, and you're embarking on the wonderful adventure of creating something delicious with your own two hands. Think of it as a chance to practice your problem-solving skills in the kitchen, or an excuse to pop to the store for some fresh yeast and maybe even a little treat for yourself while you're there. 😉
So go forth, my fellow baker! Grab your yeast, perform your little bubbly ritual, and get ready to create some magic. Whether it's a crusty sourdough, a fluffy focaccia, or sweet cinnamon rolls, the satisfaction of baking with active, happy yeast is truly unmatched. The smell of freshly baked bread filling your home is a reward in itself, and knowing you helped make it happen? That's pure joy. Happy baking, and may your dough always rise!