How To Get Oil Off Block Paving

Ah, the humble block paving! It’s the unsung hero of many a driveway, patio, and garden path. It’s sturdy, it’s stylish, and it offers a fantastic foundation for all sorts of outdoor living. But let's face it, life happens. Whether it’s a leaky car, a barbecue mishap, or just the general oily fingerprints of a busy household, oil stains on your lovely block paving can be a real buzzkill. Don’t despair, though! Tackling these unsightly blemishes isn't a chore to dread; it’s actually a surprisingly satisfying mini-project. Imagine the transformation: from dull, oily patches to pristine, inviting surfaces. It’s like a mini-makeover for your home’s exterior, and who doesn't love a good transformation?
The Power of a Pristine Patio
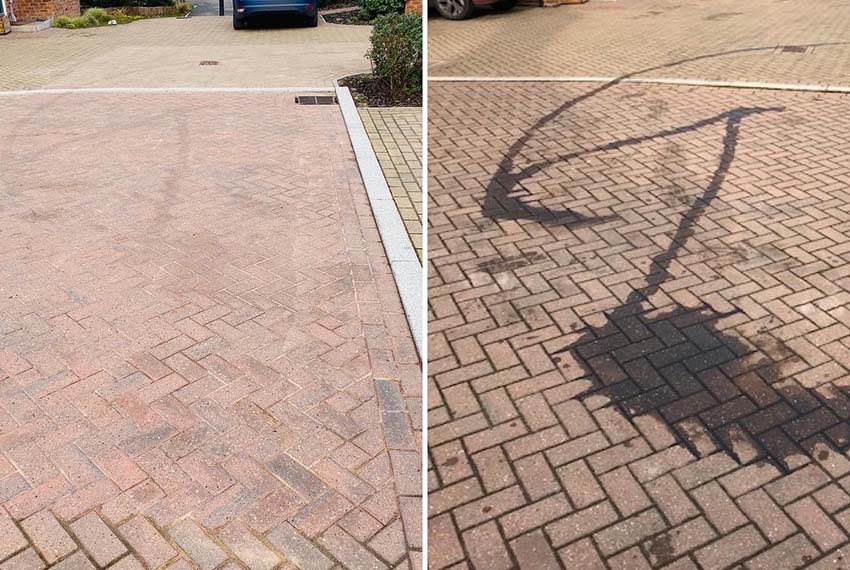
Why bother with oil stains? Well, it’s all about reclaiming the beauty and functionality of your outdoor spaces. Clean block paving isn't just about curb appeal – though that’s a biggie! It’s about creating an environment you can truly enjoy. Imagine inviting friends over for a garden party without worrying about them tracking oil further into your home. Think about the pride you’ll feel when your driveway looks as good as new, reflecting positively on your entire property. Plus, some sealants that protect block paving can be compromised by oil, so regular cleaning can actually extend the life of your investment.
The benefits extend beyond aesthetics. Oil stains can become slippery, creating a safety hazard, especially for children or the elderly. Removing them ensures your paving remains a safe and welcoming area. It’s also a fantastic way to maintain the value of your home; a well-kept exterior is always a plus. So, let’s dive into the fun world of oil stain removal and get your block paving looking its best!
Must Read
Your Oil-Busting Toolkit
Before we embark on our stain-busting adventure, it’s good to know what you’ll need. Think of it as assembling your very own superhero kit for tackling these greasy villains. You won't need anything too fancy or expensive, just a few trusty items:
- Absorbent materials: This is your first line of defense. Think cat litter (the unscented, clay kind is best!), sawdust, or even baking soda. These are fantastic for soaking up fresh spills.
- Cleaning solutions: This is where the magic happens. You’ve got a few great options:
- Dish soap: Yes, the same stuff you use for your dishes! A good degreasing dish soap is surprisingly effective on oil.
- Specialized block paving cleaner: There are many excellent products on the market designed specifically for this job. They often contain powerful degreasers and are formulated to be safe for your paving.
- Degreaser: A general-purpose degreaser can also work wonders. Make sure it's suitable for outdoor use and won't damage your paving.
- White vinegar: A natural and eco-friendly option that can help break down grease.
- Tools for application and scrubbing:
- Stiff-bristled brush: A scrubbing brush or even an old toothbrush can be perfect for working the cleaning solution into the stain.
- Bucket: For mixing your cleaning solutions.
- Hose or watering can: For rinsing.
- Gloves: To protect your hands.
- Eye protection: Especially if using stronger cleaning agents.
Tackling Fresh Oil Spills: The Swift Strike!
The sooner you act on a fresh oil spill, the easier it will be to remove. Think of it as a race against time! The moment you notice that tell-tale slick, grab your absorbent materials.

Step 1: Absorb, Absorb, Absorb! Immediately cover the fresh spill with a generous layer of cat litter, sawdust, or baking soda. Don't be shy – you want to create a thick blanket of absorbent goodness. The goal here is to draw as much of the oil out of the porous paving as possible before it has a chance to soak in deeply.
Step 2: Let it Work. Leave the absorbent material on the spill for at least a few hours, or even overnight if possible. You’ll see the material start to darken as it soaks up the oil. Resist the urge to wipe it away too soon!
Step 3: Sweep and Dispose. Once the absorbent material has done its job, carefully sweep it up and dispose of it in a sealed bag. Don't put oily waste in your regular recycling bin; check your local guidelines for proper disposal of oily materials.
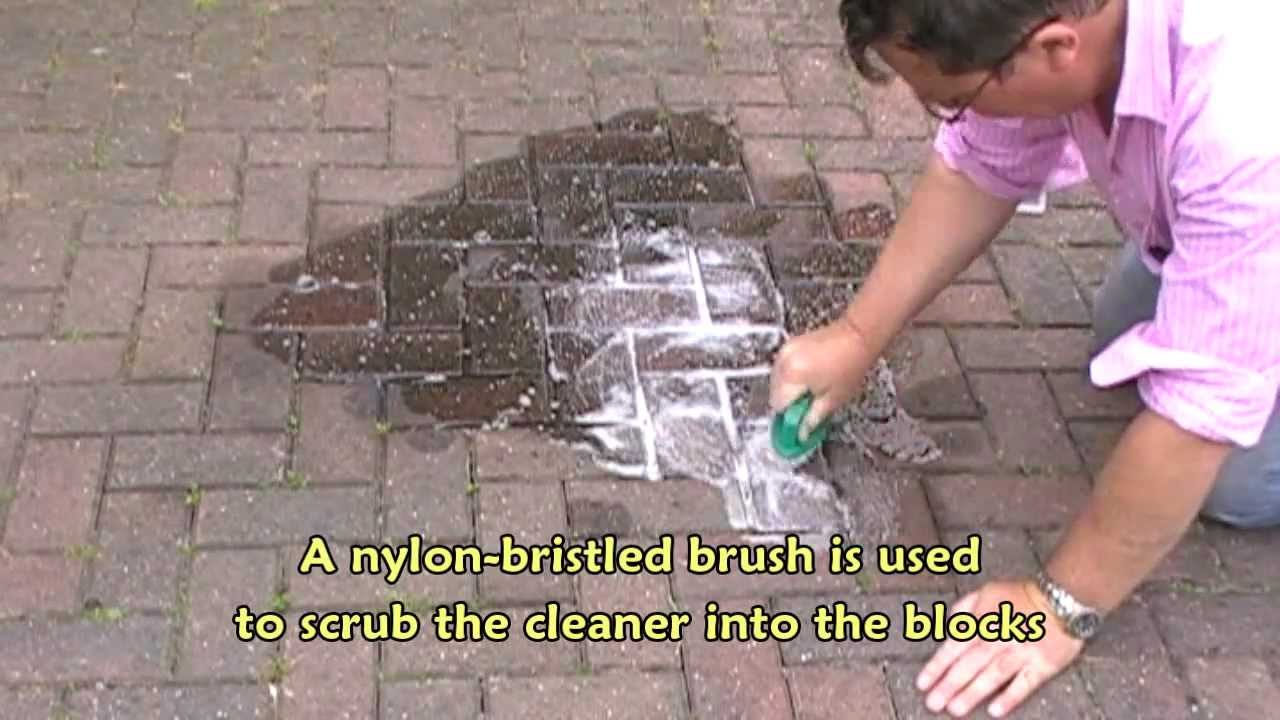
Dealing with Stubborn, Set-In Stains: The Deep Clean
For older, dried-in oil stains, you'll need to bring out the heavier artillery. These require a bit more elbow grease and a good cleaning solution.
Step 1: Prepare Your Cleaning Solution. Choose your weapon of choice from the toolkit above. A good starting point is a mixture of warm water and a generous squirt of degreasing dish soap. For tougher stains, you might consider a specialized block paving cleaner or a diluted solution of a general-purpose degreaser. Always follow the manufacturer’s instructions for any commercial product.
Step 2: Apply the Solution. Pour or spray the cleaning solution directly onto the oil stain. Make sure to saturate the area.
Step 3: Let it Dwell. This is crucial! Allow the cleaning solution to sit on the stain for at least 10-15 minutes, or even longer for very stubborn marks. This gives the degreaser time to break down the oil.
Step 4: Scrub Away! Grab your stiff-bristled brush and get to work. Scrub the stained area vigorously in a circular motion. You want to really work the cleaning solution into the pores of the block paving. You might see the oil stain start to lift and emulsify – that’s a good sign!

Step 5: Rinse Thoroughly. Once you've scrubbed to your satisfaction, rinse the area thoroughly with a hose or watering can. Make sure to wash away all the cleaning solution and any loosened oil residue. You might need to repeat the scrubbing and rinsing process a few times for particularly tough stains.
Extra Tips for Extra Sparkle
Don't forget these little nuggets of wisdom:
- Test in an inconspicuous area: Before applying any new cleaner to your entire driveway, test it on a small, hidden section to ensure it doesn't discolour or damage your paving.
- Work in sections: For larger driveways, tackle one section at a time to keep your cleaning solution from drying out.
- Patience is a virtue: Some oil stains are more stubborn than others. Don't get discouraged if the stain doesn't disappear immediately. You might need to repeat the process or try a different cleaning solution.
- Consider sealing: Once your block paving is clean and dry, consider applying a good quality sealant. This will help protect against future stains and make cleaning much easier.
And there you have it! With a little know-how and some readily available supplies, you can banish those unsightly oil stains and restore your block paving to its former glory. It’s a rewarding process that leaves you with a cleaner, safer, and more beautiful outdoor space to enjoy. Happy cleaning!

