How Do You Make A Gas Mask Box
Hey there, folks! Ever found yourself staring at an old, dusty box and wondering, "What's its story?" Maybe it's the one your grandma kept her knitting needles in, or the cardboard fortress that once housed your favorite childhood toy. Well, today, we're diving into the wonderfully practical world of making a box for a gas mask. Now, before you start picturing yourself in a Hazmat suit, let's take a deep breath (the regular kind, for now!) and remember that preparedness doesn't have to be scary or complicated. Think of it less like doomsday prepping and more like having a sturdy lunchbox for your important stuff, just in case.
Why should you even care about a gas mask box? Good question! It’s not just about the mask itself. It’s about keeping that mask in tip-top condition. Imagine needing your trusty umbrella and finding it all ripped and creased because you just tossed it in a corner. Not ideal, right? A gas mask, especially one you might want to keep for a long, long time, deserves a cozy, safe home. This box is its personal sanctuary, protecting it from dust, bumps, and whatever else life might throw its way. It's like giving your favorite pair of sunglasses a nice, protective case so they don't get scratched.
So, how do you actually make one of these magical boxes? Well, it’s not rocket science, and you don’t need a PhD in engineering. Think of it like building a really, really sturdy fort for your imagination, but for practical purposes. We're aiming for something that’s protective, organized, and maybe even a little bit stylish (in a purely functional way, of course!).
Must Read
The Humble Beginnings: What Kind of Box Are We Talking About?
First things first, what are we working with? You could be lucky and find a pre-made metal tin that’s perfect. These are often the crème de la crème, offering excellent protection. Think of those old, sturdy biscuit tins your Nan used to have – they held treasures and lasted forever! If you can get your hands on something like that, fantastic!
But what if you can't? No worries! We can build our own from good ol' cardboard. Yes, the same stuff your online shopping deliveries arrive in! It's versatile, readily available, and surprisingly strong when you know a few tricks. We're not talking about flimsy cereal boxes here; we're talking about the sturdy kind, like those from electronics or heavier shipments. You know, the ones that feel like they could survive a minor earthquake?
Gathering Your Super-Secret Supplies (It’s Easier Than You Think!)
Before we get our hands dirty, let’s gather our tools. It’s like preparing your ingredients before baking a cake – you wouldn’t want to be halfway through and realize you’re out of flour, would you?

- Sturdy Cardboard Boxes: The bigger, the better for our initial stage. We'll be cutting these down.
- A Sharp Craft Knife or Box Cutter: Be careful with these, folks. Treat them like a very enthusiastic puppy – they can be a bit unpredictable if not handled with respect.
- Strong Tape: Packing tape, duct tape, or even reinforced paper tape. The kind that sticks.
- A Ruler or Straight Edge: For making those nice, crisp lines.
- A Pencil: To mark our cutting lines.
- Optional, but Nice: Some foam padding or bubble wrap for extra cushioning, and maybe even a desiccant pack (those little silica gel packets that keep things dry, like the ones in shoe boxes) to keep moisture at bay.
The Art of the Cardboard Reinvention: Making Your Box
Alright, let’s get down to business. Imagine you’re a master origami artist, but instead of delicate paper cranes, we're folding robust protection.
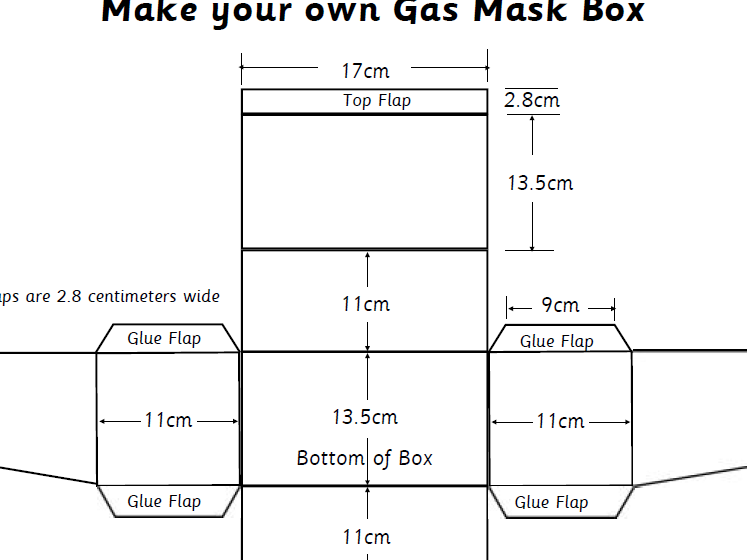
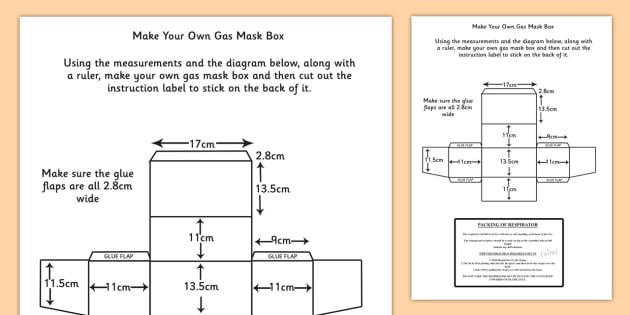
Step 1: Measure Twice, Cut Once (The Golden Rule!)
First, take your gas mask out of its current, likely less-than-ideal, resting place. Measure its dimensions: length, width, and height. Now, think about a little extra room. You don't want to jam it in like a clown car. Give it about an inch or two of wiggle room on all sides. This is important for ease of use and to prevent the mask from being squashed by the box itself.
Next, grab your sturdy cardboard. We're going to "unfold" a larger box or cut sections from different boxes to create our new, custom-sized container. Think of it like deconstructing an old puzzle to make a new, perfectly shaped picture frame. Lay your cardboard flat and start marking out the pieces you’ll need: a bottom, four sides, and a lid. You can get fancy and design a single piece that folds into a box, or you can make separate panels and tape them together. For simplicity, let’s aim for separate panels.
Step 2: Precision Cutting (Where the Magic Happens!)
Now, using your ruler and that sharp craft knife, carefully cut out your marked pieces. Always cut away from yourself. Imagine you're shaving a really, really thick piece of cheese. Slow and steady wins the race here. Make sure your cuts are as straight as possible. Jagged edges can lead to weak spots later on.
If you’re making a lid that opens, you can either have a separate lid piece or create a hinged lid from one of the side panels. A separate lid is often simpler for beginners. Just make sure it’s slightly larger than the opening of your box to allow for a snug fit.
Step 3: The Taping Tango (Making it Strong!)
This is where your box goes from flat pieces to a sturdy fortress. Start by taping the sides together. Use plenty of tape, both on the inside and the outside of the seams. Think of it like giving your box a big, warm hug with tape! Overlap your tape generously. Don't be shy! We want this thing to be bomb-proof (metaphorically speaking, of course!).
Next, attach the bottom. Again, tape all the way around, making sure there are no gaps. For extra strength, you can even reinforce the bottom by adding another layer of cardboard underneath and taping it securely. This is like putting an extra mat under your favorite rug to prevent wear and tear.

Now, let’s do the lid. If it’s a separate lid, you can reinforce its edges with tape too. If you’re going for a hinged lid, carefully score (don’t cut all the way through!) along the hinge line on your cardboard, then tape the inside and outside of the hinge to make it strong and flexible.
Adding the Finishing Touches: The Comforts of Home
Your box is looking pretty good! But we can make it even better. Think of this as decorating your new apartment.
Padding for Protection
To prevent the gas mask from rattling around and getting damaged, especially if you’re going to be moving the box, add some padding. You can use pieces of foam, old rags, bubble wrap, or even crumpled newspaper. Line the inside of the box with this material. It's like giving your precious cargo a soft, cozy bed.
Fighting the Fuzz: Desiccants!
If you live in a humid area, or you're storing the mask for a very long time, moisture can be a real enemy. Those little silica gel packets you find in new shoes or electronics? They’re your best friends! Pop one or two inside the box. They absorb moisture and help keep things dry. Just make sure they’re not touching the mask directly if you’re worried about any potential chemical reactions, though they are generally very safe.
Labeling for Clarity
Don’t forget to label your box! What’s inside? When was it made or last checked? A clear label, perhaps with the date you assembled the box, is super helpful. It’s like writing your name on your lunchbox so no one accidentally takes it!
Why This Matters (Beyond Just Having a Box)
So, why go through all this effort? It boils down to a few key things:
- Preservation: A good box keeps your gas mask safe from damage, dust, and the elements, ensuring it's functional when you might need it. It's about longevity.
- Organization: Having a dedicated box means you know exactly where your mask is. No more frantic searching when you think you might need it.
- Peace of Mind: Knowing that your essential gear is properly stored gives you a sense of calm and preparedness. It's like having a well-stocked first-aid kit – you hope you never need it, but you're glad it's there.
- Respect for the Gear: This is equipment designed for safety. Treating it with care shows respect for its purpose.
Making a gas mask box is a surprisingly satisfying DIY project. It’s a tangible way to take a small step towards being prepared. It’s about taking a bit of control, being resourceful, and creating something useful with your own two hands. And who knows, your well-made, sturdy box might even become a talking point, a testament to your practical ingenuity. So, grab some cardboard, get your tape ready, and create a safe haven for your gas mask. It’s a simple act with significant benefits, ensuring your safety gear is always ready for its close-up, whenever that may be.