How Do You Make A Garden Gate
So, you're thinking about a garden gate, huh? Smart move! It's like the official welcome mat for your backyard. You know, that little something that says, "Psst, come on in, the good vibes are inside!"
Honestly, who doesn't want a garden gate? It’s the handshake of your outdoor space. Without one, your yard just feels… a little naked. Like it's missing its best accessory. And let’s be real, we all want our yards to be fabulous, right?
You've probably seen them in your mind already. Swinging open with a gentle creak, maybe a little vine crawling up it. Or perhaps it’s more of a modern, sleek number. Whatever your vibe, making one yourself is totally doable. And way more satisfying than buying some flimsy thing that’ll blow over in the first stiff breeze.
Must Read
Okay, deep breaths. Making a garden gate. Sounds fancy, doesn't it? Like something a master carpenter with a ridiculously impressive beard would do. But really, it’s more about planning and a little bit of wiggling with some wood. You’ve got this. We’ve got this!
First Things First: What’s Your Gate Dream?
Before we even think about lumber or hinges, let’s talk aesthetics. What kind of gate are we aiming for? Is it a charming cottage garden gate, all rustic and slightly wonky (in the best way)? Or are we going for something more contemporary, clean lines and all that jazz?
Think about your garden’s personality. Is it wild and untamed, like a friendly hedgehog’s den? Or is it meticulously organized, like a tiny, perfect fairy kingdom? Your gate should totally match. It’s like picking out an outfit for your house!
And the size! This is crucial. You don’t want a gate that’s too small to get your wheelbarrow through, or one so massive it looks like it belongs on a castle. Measure, measure, measure. Seriously, grab that tape measure and get friendly with your fence line. A quick sketch is your best friend here, trust me.
The "Why" Behind the Gate
Besides looking super cool, what’s the point? Is it to keep the neighborhood dog from treating your petunias like a buffet? Is it for a bit of privacy? Or is it just to make your entrance feel extra special? Knowing your why will help shape your design. A gate for serious security will look and be built differently than one just for show.
Maybe you’re looking for a way to divide your garden into zones. A gate between your veggie patch and your chill-out zone? Genius! It’s like creating secret passages in your own backyard. Who wouldn’t want that?
Let’s Talk Materials: Wood vs. Metal vs. The Wild Card
Wood is probably the most popular choice, and for good reason. It’s natural, it’s versatile, and you can stain it, paint it, or let it age gracefully. Think cedar, redwood, or even pressure-treated pine. These guys are built to last, which is what we want, right? We don’t want to be building gates every year. That’s a one-way ticket to itchy sawdust heaven.
Metal gates are super durable and can look really chic. Wrought iron, for example, has that timeless elegance. But, let’s be honest, they can be a bit trickier (and pricier!) to DIY. Unless you’re secretly a blacksmith, you might want to stick to wood for your first gate adventure. No shame in that game!
And then there are the wild cards! Recycled materials? Old pallets? A bit of creative upcycling? Those can be amazing, but sometimes a bit more challenging to make sturdy. For a beginner’s gate, sticking with solid wood is probably your safest bet. Less chance of it looking like it’s about to stage a jailbreak.
Wood Wisdom: What Kind of Wood to Use?
If you go the wood route (and I highly recommend it for your first go!), you’ll want something that can handle the elements. Cedar is fantastic because it’s naturally resistant to rot and insects. It smells amazing too, like a fancy spa for your garden. Redwood is another champion for the same reasons.
Pressure-treated pine is a budget-friendly option. Just make sure you’re comfortable with the treatment process. It’s designed to last, which is a definite plus. Whatever you choose, look for wood that’s straight, free of major knots, and feels solid. No wobbly bits!
The Design Deets: Simple is Often Best
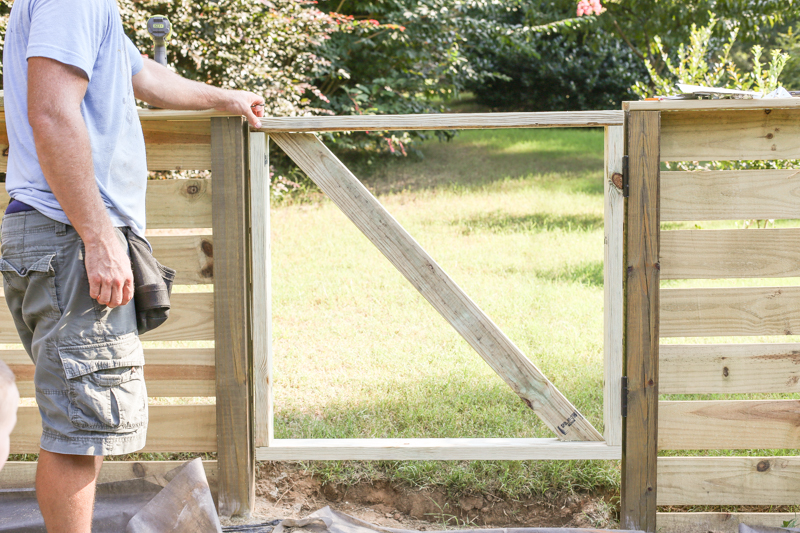
For your first gate, keep it simple. Seriously. You don’t need to be Leonardo da Vinci to make a great gate. A basic rectangular frame with a few vertical slats is a classic for a reason. It works!
You can add a diagonal brace for extra strength. This is your gate’s superhero cape, holding everything together. It’s not just for looks, folks! It’s for structural integrity.
Consider the height and width again. Make sure it’s wide enough for comfortable passage. You don’t want to be doing a sideways shuffle every time you go in or out. Unless you want to impress your neighbors with your fancy footwork. That’s your call.
Adding Flair: What if I Want More?
Once you’ve mastered the basic rectangle, you can get creative. Fancy post caps? A decorative arch at the top? A little peek-a-boo window? Go for it! But start with the solid foundation. A beautiful gate that falls apart is just… sad.
You could even think about a wider gate if you have a driveway or want to easily move bigger things. But for a pedestrian gate, the standard size is usually around 3-4 feet wide. Enough room to pass, not so wide it feels like you’re opening the gates to Narnia.
Tools of the Trade: Don't Be Scared!
Okay, the scary part. Tools. You don’t need a full workshop to build a gate. A good handsaw (or a circular saw if you’re feeling ambitious!), a drill, some screws, a measuring tape, a pencil, and maybe a level. That’s a pretty solid starting point.
Safety gear is non-negotiable. Safety glasses are a must. Seriously, the thought of a rogue splinter flying into your eye is enough to make anyone wear them. Gloves are good too, especially when handling rough wood. And if you're using power tools, a dust mask can save your lungs from a lifetime of sawdust!
Essential Tools for Gate-Making Glory
A measuring tape is your new best friend. Seriously, you’ll be wielding it like a wizard’s staff. A pencil for marking your cuts. A saw – a handsaw is totally fine if you’re patient, but a circular saw will speed things up considerably. Screws are better than nails for holding things together long-term. Get outdoor-rated screws so they don't rust away.
A drill is essential for pre-drilling holes (prevents splitting!) and driving screws. A level will ensure your gate isn't leaning like it's had one too many martinis. And a clamping system can be super helpful to hold pieces steady while you work. Even a couple of sturdy C-clamps can make a world of difference.
Let's Build This Thing! Step-by-Step (ish)
Alright, let’s get our hands dirty. Imagine the gate laid out on a flat surface, like your driveway or a nice clear patch of lawn. This is where the magic starts to happen.
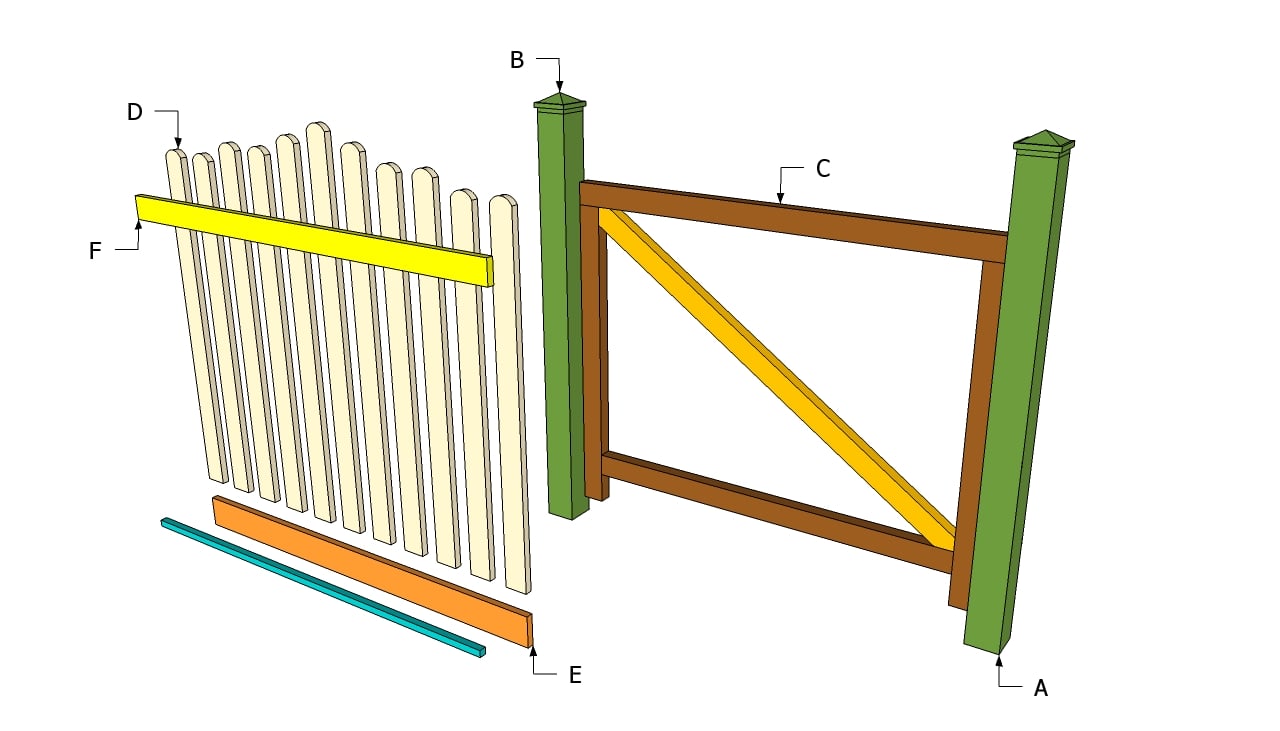
First, you’ll build your frame. This is usually two vertical pieces (the stiles) and two horizontal pieces (the rails). Think of it like a big rectangle. Cut your wood to size. Measure twice, cut once, remember?
Now, assemble that frame. Pre-drill holes to avoid splitting the wood, especially near the ends. Use those outdoor-rated screws. Make sure it’s square and sturdy. This is the backbone of your gate. If the backbone is weak, the whole thing… well, you get the idea.
Adding the Strength: The Brace of Bravery
Next up, the diagonal brace. This is usually a piece of wood running from one corner of the frame to the opposite corner. It’s like the gate's guardian angel. Cut it to fit. You might need to angle the ends so it sits flush against the frame.
Attach that brace securely with screws. This is what stops your gate from sagging over time. Trust me, a sagging gate is not a good look. It’s like a sad, tired mouth. We want a perky, proud gate!
Now, add your vertical slats (or horizontal, or whatever your design dictates). Space them out evenly. You can use a scrap piece of wood as a spacer for perfect consistency. This is where your gate starts to look like… well, a gate!
Hinges and Latches: The Gate's Personality
You’ve built the gate itself. Ta-da! But it needs to actually open and close, right? This is where hinges and latches come in. They’re the gate’s manners. They allow it to greet visitors and say goodbye.
For a wooden garden gate, strap hinges are a popular choice. They’re strong and look good. You’ll need to decide if your gate swings one way or both. Most garden gates swing outwards. For a double gate, you’ll obviously need hinges on both.
Attaching hinges requires precision. Make sure they’re aligned and screwed in securely to both the gate and your gate posts. This is not the time for being a bit loosey-goosey. A wobbly hinge is a recipe for frustration.
Choosing the Right Hardware
Think about the weight of your gate. Heavier gates need sturdier hinges. For a standard wooden garden gate, a couple of 12-inch strap hinges should do the trick. Make sure they’re galvanized or stainless steel to prevent rust. Nobody wants rusty gate juice dripping down their new paint job.
For latches, there are tons of options. A simple gravity latch is easy to operate. A bolt latch offers more security. Or you could go for a more decorative handle. Consider how you want to open and close it. Do you want something you can flip easily with one hand? Or something more robust?

Installing Your Masterpiece: The Grand Finale
This is the moment of truth. You’ve built it, you’ve got the hardware, now you have to actually put it up. This is often the trickiest part, but with patience, you can nail it.
First, you need sturdy gate posts. These are the anchor points for your gate. They need to be strong and set deep in the ground, ideally in concrete. If you’re replacing an old gate, you might be able to reuse existing posts if they’re in good shape. If not, set new ones. This is a crucial step for a long-lasting gate.
With your posts in place, you can start attaching the hinges to the gate and then to the post. This is where having a helper is highly recommended. Trying to hold a gate up while also screwing in hinges is a recipe for dropped gates and bruised egos.
Getting It Hung Just Right
Use your level religiously. You want your gate to hang straight, not at an angle. Adjust the hinges as needed until it swings freely without dragging on the ground or binding against the frame. It might take a bit of fiddling, but it’s worth it!
Once the gate is hanging perfectly, install your latch. Make sure it catches securely and that the gate closes properly. Test it a few times. Open, close, open, close. Feel the satisfaction!
Finishing Touches: Seal the Deal
You’ve done it! You’ve made a garden gate! Now, let’s make it last. If you used wood, you’ll want to protect it from the elements. A good quality exterior stain or paint will do wonders.
Stain will bring out the natural beauty of the wood. Paint can add a pop of color and personality. Whatever you choose, make sure it’s designed for outdoor use. And reapply it every few years as needed. It’s like giving your gate a little spa treatment to keep it looking its best.
Don’t forget to oil your hinges and latch occasionally too. A little bit of maintenance goes a long way. Your gate will thank you for it with smooth operation for years to come. And you'll have the immense satisfaction of knowing you built it yourself. High fives all around!