Can You Put A Shed On Gravel
So, picture this: it’s a gloriously sunny Saturday. You’ve finally decided it’s time. Time to conquer that backyard chaos, that overflowing garage, that… well, that general stuff accumulation that seems to have taken over your life. You’ve scouted the perfect spot for that shed, the one that’s going to hold all your gardening tools, your kid’s forgotten bikes, and maybe even that questionable collection of vintage lawn gnomes. But then, a little voice of doubt, or maybe it’s just your pragmatic neighbor Barry whispering in your ear, pipes up: “Can you even put a shed on gravel?” Cue the internal debate, the frantic Googling, and the general existential dread about foundations. Sound familiar?
Yeah, I’ve been there. Staring at a pile of lumber and a patch of slightly uneven ground, wondering if I’m about to embark on a DIY disaster of epic proportions. The idea of a perfectly level concrete slab seemed… well, like a lot of effort. And money. And let's be honest, my enthusiasm for digging trenches is inversely proportional to the amount of sunshine available. So, the question hangs in the air, as weighty as a sack of potting soil: can you, in fact, put a shed on gravel? The short, sweet, and potentially wallet-saving answer is: sometimes. But like most things in life, the devil is in the details. Or, in this case, the aggregate.
The Gravel Gambit: Is it a Solid Bet?
Let’s dive into this gravelly business, shall we? The idea of using gravel for shed foundations is appealing. It’s relatively inexpensive, easy to source, and you don’t need to be a master mason to spread it around. Plus, it offers some pretty decent drainage, which is a big win for preventing rot and keeping your tools rust-free. Think of it as nature’s little helper, wicking away moisture and keeping things drier. Pretty neat, right?
Must Read
But here’s where we need to get a little nerdy, because not all gravel is created equal. Just tossing a few handfuls of pea gravel under your shed is probably not going to cut it. We’re talking about a specific type of base, often called crushed stone or compacted gravel, that provides a stable, level surface. This isn't just decorative landscaping stuff, folks. This is the structural backbone of your shed’s future.
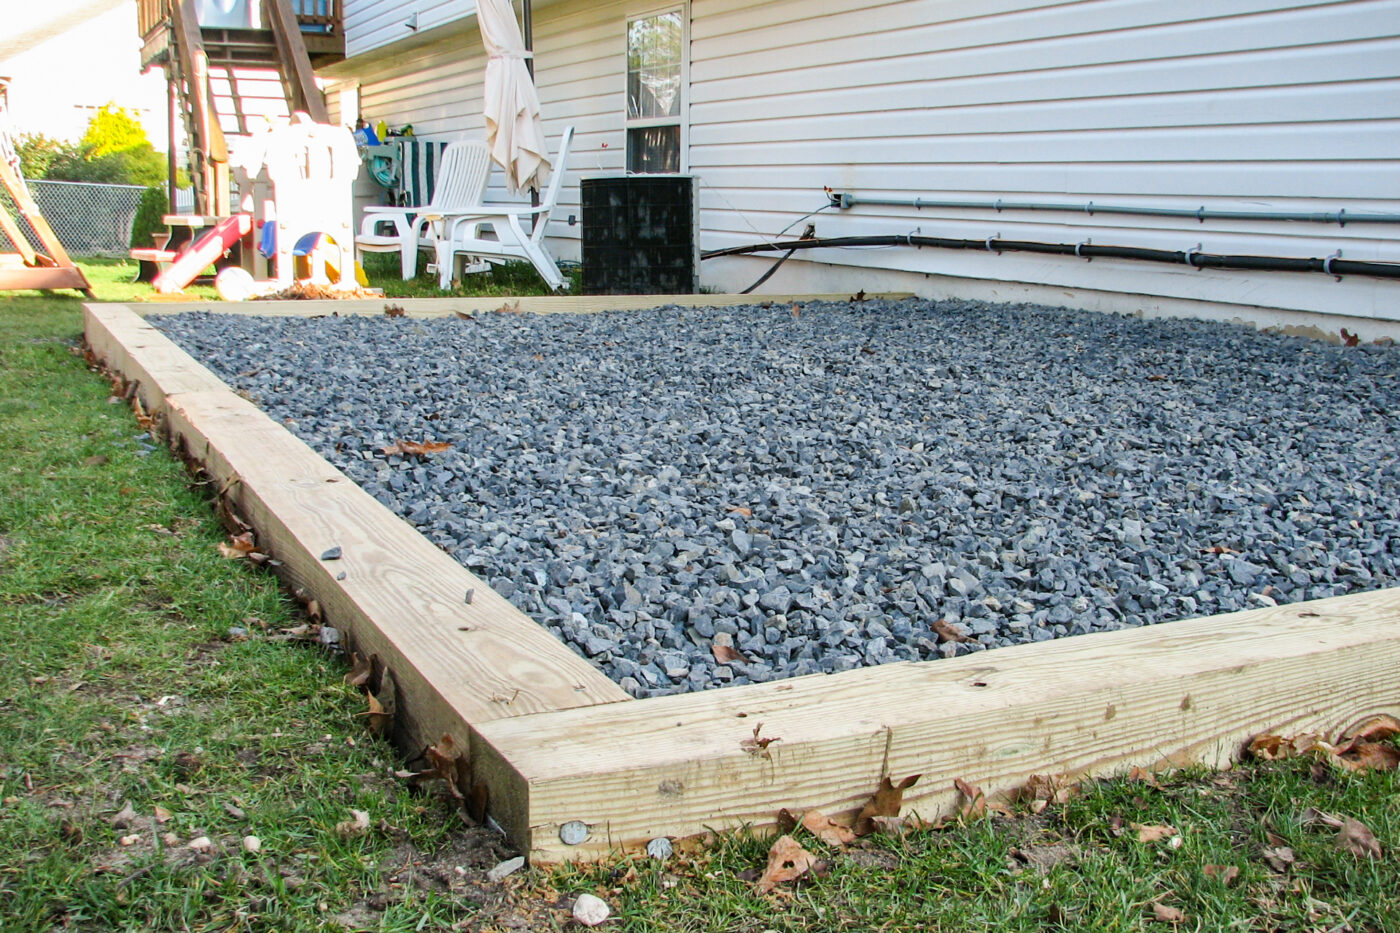
The Foundation of the Matter (Literally!)
So, what makes a gravel foundation good? It all comes down to stability and drainage. A well-prepared gravel base acts like a sturdy, permeable platform. It distributes the weight of your shed evenly, preventing it from sinking into the soil, especially when it gets wet. And as we all know, wet ground can be as uncooperative as a toddler refusing to nap.
The key is to have a sufficiently deep layer of compacted gravel. We’re talking several inches, often four to six inches, depending on your climate and soil type. This depth is crucial for providing that solid footing. You can’t just wing it and hope for the best. This is where the actual work comes in. No one said building a shed was going to be entirely effortless, even with a gravel base!
The ‘How-To’ of the Gravelly Goodness
Alright, so you’re leaning towards the gravel route. Excellent! Now, how do you actually do it? It’s not as complicated as it might sound, but it does require some elbow grease and a bit of planning. First things first: site preparation. You need to clear the area where your shed will sit. Remove any grass, weeds, rocks, and definitely any of those rogue garden gnomes. You want a clean slate.

Next, you’ll need to excavate. This means digging down to a depth that will accommodate your gravel base. Think about how much gravel you’ll need, plus a little extra to ensure it’s well below the surrounding ground level. This helps with drainage and prevents the gravel from washing away. Digging is never my favorite part, but it’s essential. Imagine it as creating a cozy, stable bed for your shed to rest on. A bed it won’t sink into!
Once you’ve got your hole, it’s time for the gravel. You’ll want to use a material specifically designed for foundations, like crushed stone or compacted gravel. This stuff is angular, not round, which means it locks together better when compacted. Pea gravel is too smooth and won’t provide the stability you need. So, ditch the decorative stuff for this job.
Now comes the fun (or not-so-fun, depending on your outlook) part: compaction. You’ll lay down a layer of gravel, spread it out evenly, and then compact it. You can do this with a hand tamper, or for a larger area, a plate compactor (which you can often rent). You’ll repeat this process, adding gravel in layers and compacting each one. This is what creates that solid, stable base that your shed needs. Think of it as building up layers of muscle for your shed's foundation. It needs to be strong!
Leveling Up: The Importance of a True Surface
This is where your trusty level comes in. You must ensure your gravel base is perfectly level. Even a slight slope can cause problems down the line. Your shed’s doors might not close properly, water could pool, and the whole structure could end up stressed. So, take your time, check with your level frequently, and make adjustments as needed. It’s a small step that makes a huge difference in the long run.

Some people also like to add a layer of landscape fabric before adding the gravel. This helps prevent weeds from growing up through the gravel and keeps the gravel from mixing with the soil below. It’s an extra step, but many find it’s worth the effort for long-term weed control. You know, those sneaky little green invaders!
When Gravel Might Not Be the Best Choice
Okay, so gravel sounds pretty good, right? But there are definitely situations where it’s not the ideal solution. Let’s talk about those.
Soil Type: If you have really soft, clay-heavy soil, gravel alone might not be enough. Clay soil can become very saturated and expand, putting pressure on your foundation. In these cases, a more robust foundation, like a concrete slab or concrete piers, might be necessary to prevent sinking or shifting. You don’t want your shed to become a very expensive, very sad, partially submerged ornament.
Climate: Areas with extreme freeze-thaw cycles can also pose a challenge for gravel foundations. When water in the ground freezes, it expands, and when it thaws, it contracts. This constant movement can destabilize a gravel base over time. If you live somewhere that gets serious winters, you might need to consider a more permanent, frost-resistant foundation.

Shed Size and Weight: For a small, lightweight garden shed, a well-prepared gravel base is usually perfectly fine. But if you’re planning on a large, heavy-duty shed, perhaps one that you intend to use as a workshop or to store heavy equipment, you might need something more substantial. The weight of the structure and its contents needs to be properly supported. Think of it as a skyscraper needing a deeper, more robust foundation than a garden shed.
The Concrete Alternative: Is it Worth the Hassle?
Now, the elephant in the room: concrete. Concrete slabs are undeniably the most stable and long-lasting option for a shed foundation. They provide a rock-solid, level surface that can support immense weight. They’re also excellent for preventing moisture from seeping up from the ground. The downside? They are significantly more expensive, require more labor (and potentially professional help), and are a much bigger commitment.
Pouring a concrete slab involves excavation, forming, ordering concrete, and curing. It's a process. And let's not forget the mess. If your goal is a quick and relatively easy shed installation, concrete might feel like overkill. However, if you're building a shed to last for decades, or if you have particular site challenges, the extra investment might be well worth it. It's a trade-off, as always!
A Happy Medium: Blocks and Piers
But wait! There’s hope for those who want something sturdier than gravel but less involved than concrete. Enter the humble concrete blocks or piers. You can use these to create a level base for your shed, supporting the floor joists directly. You’ll still need to excavate and prepare the ground, often with a layer of compacted gravel beneath the blocks or piers to ensure stability and drainage.

This method offers a good balance between stability and affordability. It elevates the shed slightly off the ground, improving airflow and reducing moisture issues. It’s a popular choice for many shed owners because it’s practical, effective, and less daunting than a full concrete pour. Plus, you can often level things up pretty well with a bit of care.
Checking the Regulations: Don’t Get Caught Out!
Before you get too excited and start ordering gravel by the ton, a quick word of caution: check local building codes and regulations. Yes, even for a shed! Depending on the size and location of your shed, you might need a permit. Some areas have specific requirements for foundations, even for smaller structures. It’s always better to be safe than sorry, and a quick call to your local planning department can save you a lot of headaches later on. Nobody wants to have to move their brand-new shed because it's in violation of something!
The Verdict: Can You Put A Shed On Gravel?
So, to circle back to our original burning question: Can you put a shed on gravel? The answer is a resounding yes, but with important caveats. If you’re building a smaller shed, have reasonably stable soil, and live in a climate without extreme freeze-thaw cycles, a well-prepared, compacted gravel foundation can be an excellent and cost-effective solution.
The key is preparation, using the right materials, and ensuring the base is perfectly level and stable. Don’t skimp on the excavation and compaction steps. They are the backbone of your gravel foundation’s success. Think of it as investing in your shed’s future comfort and longevity. A little extra effort now can save you a lot of trouble down the road. And who doesn't want a shed that stands tall and proud for years to come? Happy building!