Types Of Microscope Objective Lenses

So, I was tinkering around in my little home lab the other day, you know, the one where my cat occasionally supervises my experiments by shedding on everything? Anyway, I was trying to get a clearer look at some pond water I’d collected. Pretty standard stuff, right? I’d seen those amazing videos of paramecia doing their little jig, and I was determined to catch some action. I had my trusty microscope, a decent eyepiece, and… well, a rather basic objective lens. I was zooming in, expecting microscopic fireworks, and all I got was a blurry, washed-out mess. It was like looking at a really bad, low-res photograph of something potentially fascinating. My cat, bless her furry little heart, yawned and went back to sleep. Clearly, she’d seen better microscopy. It got me thinking, you know? Why was my grand pond water adventure turning into such a visual disappointment? It turns out, not all objective lenses are created equal. Not even close. It’s like trying to build a skyscraper with Lego bricks versus actual steel beams – the result is going to be… different.
And that, my friends, is how we stumble into the wonderfully, sometimes bafflingly, complex world of microscope objective lenses. These little guys, screwed onto the revolving nosepiece of your microscope, are the real workhorses, the heroes of our microscopic quests. They're the first point of contact for the light bouncing off or passing through your specimen, and what they do with that light determines everything you see. So, if you’ve ever felt like your microscope is holding back its full potential, or if you’re just plain curious about what’s actually happening up there, stick around. We’re about to dive deep into the different types of objective lenses, and trust me, it’s way more interesting than watching paint dry. Or, in my case, watching a blurry paramecium.
The Mighty Objective: Your First Look at the Tiny Universe
Think of the objective lens as the gatekeeper to the microscopic world. It’s the lens closest to your specimen, and its job is to gather light and create the initial, magnified image. This image is then further magnified by your eyepiece, the part you look through. So, the objective lens sets the stage, and if the stage is poorly lit or the actors are out of focus, well, the whole show’s a flop. It’s a pretty crucial bit of kit, wouldn’t you say?
Must Read
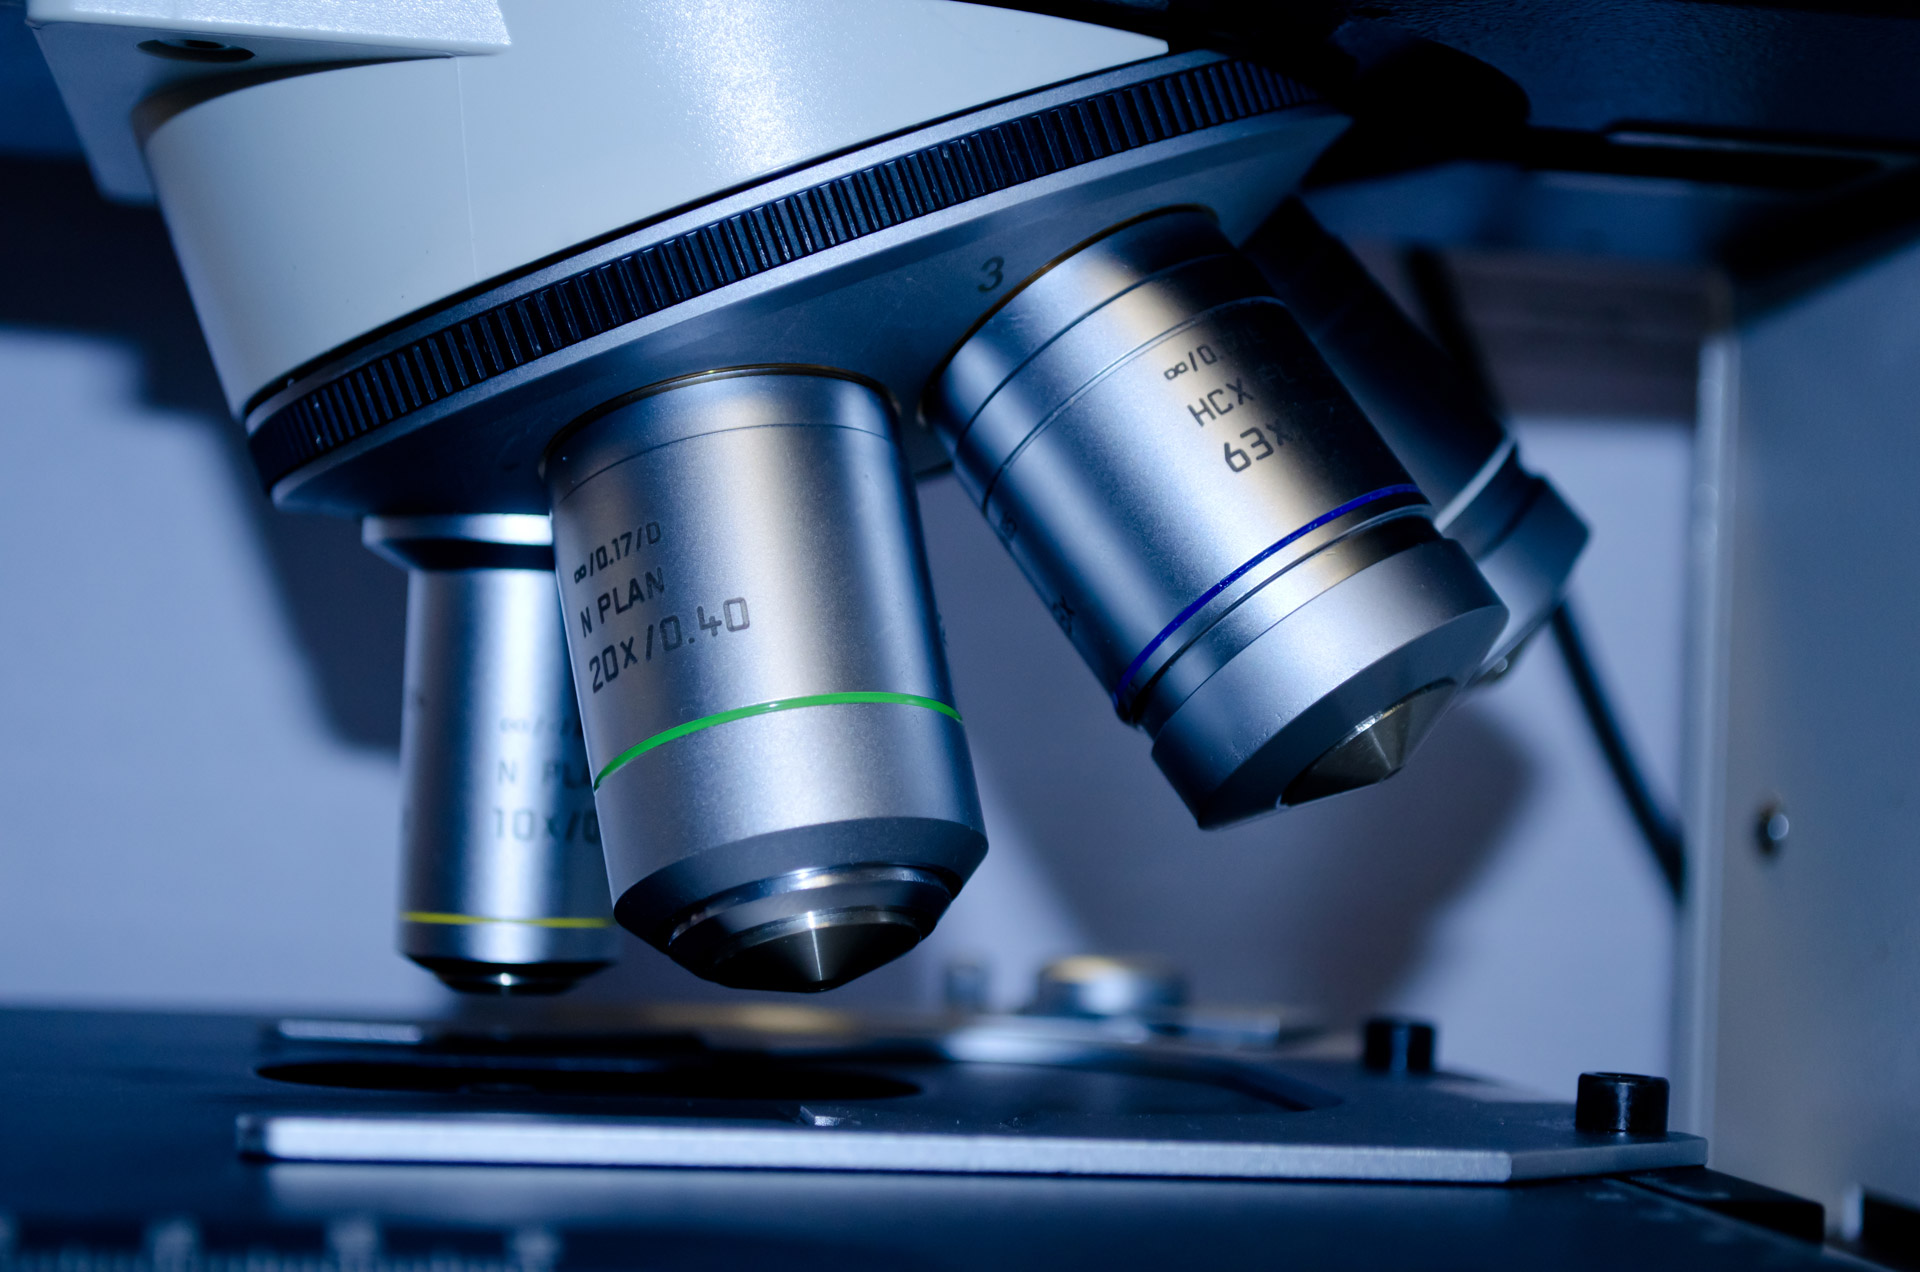
The two most important numbers you'll usually see printed on an objective lens are its magnification and its numerical aperture (NA). Magnification is straightforward: a 10x objective makes things look 10 times bigger. Simple enough, right? But the numerical aperture? Ah, that’s where the real magic, and the complexity, begins. It’s not about how much bigger you can make something, but rather how much detail it can resolve. Think of it as the lens's ability to distinguish between two very close points. A higher NA means you can see finer details, sharper edges, and generally, a much clearer, more informative image. This is why my cheap objective was failing me; it likely had a pathetic NA. It’s all about that resolution, baby!
A Taxonomy of Tiny Titans: Unpacking the Different Types
Okay, so objective lenses aren't just one-size-fits-all. They're designed for specific tasks, and understanding these differences can seriously up your microscopy game. Let’s break down the main players:
Achromatic Objectives: The Reliable Workhorse
These are the most common and generally the most affordable objective lenses you'll find. Think of them as the reliable Toyota Camry of the microscope world. They’ve been corrected for chromatic aberration for two colors (usually red and blue) and spherical aberration for one color (usually green).
What does that even mean, you ask? Well, lenses, being made of glass, can bend light in ways that cause colors to spread out, like a prism. This is chromatic aberration, and it makes your image look fringed with color, which is super annoying. Spherical aberration happens because of the curved surface of the lens, causing light rays passing through the edges to focus differently than those passing through the center. This makes the image blurry. Achromats do a decent job of fixing these issues for a couple of key colors, making them perfectly adequate for a lot of general observation and educational purposes. They offer good, clear images for their price point.
If you’re just starting out, or if your budget is a bit tight, an achromat is probably what you’ll have, and it's a perfectly good place to begin. Don't underestimate them! They get the job done.

Semi-Apochromatic (Semi-Plan) Objectives: Stepping Up the Game
These guys are like the slightly fancier, more comfortable sedan. They offer an improvement over standard achromats. Semi-apochromatic objectives are corrected for chromatic aberration in three colors (red, green, and blue) and spherical aberration in two colors. You’ll often see them called plan achromats or just plan objectives, though “plan” more accurately refers to flatness of field, which we’ll get to!
The main benefit here is a flatter field of view. This means that more of your image, from the center to the edges, will be in focus simultaneously. With a basic achromat, you often have to adjust the fine focus knob as you scan across your specimen to keep everything sharp. Semi-plan objectives reduce this need, which is a huge relief, especially when you’re looking at larger areas. The color correction is also better, leading to more vibrant and accurate colors in your image. They’re a nice upgrade if you’re doing more detailed work or simply want a more pleasant viewing experience.
Apochromatic Objectives: The High-Performance Sports Car
Now we're talking serious optics. Apochromatic objectives are the top-tier, performance-enhanced lenses. They are corrected for chromatic aberration in three colors (red, green, and blue) and spherical aberration in three colors. This means they offer the best possible color rendition and sharpness.
These lenses are expensive, but oh boy, are they worth it if you need the absolute best. The color accuracy is incredible, and the detail you can resolve is astonishing. They are essential for critical work like advanced research, histology, or photomicrography where every subtle nuance of the specimen needs to be captured. If you see an apo objective, you know you're looking at something special. They bring out the subtle blues of a stained cell or the delicate structures of a microorganism with breathtaking clarity. These are the lenses that make you go "Wow!"
Plan Objectives: The Wide-Screen TV
The term "plan" (short for planachromatic or planapochromatic) refers to how well the lens corrects for field curvature. Remember how I mentioned that with achromats, you often have to refocus as you move across the slide? That's field curvature. A plan objective is designed to produce a flat image across the entire field of view.
![Types of Microscope Lenses [How they Work] - Microscope Crew](https://microscopecrew.com/wp-content/uploads/2020/08/Objective-Lens.jpg)
So, a plan achromat is an achromat with a flatter field. A plan apochromat is an apochromat with an even flatter field. If you see "Plan" on a lens, it’s a good indicator that you'll have a more even focus across your view. This is a massive advantage for examining larger samples or when you’re trying to capture images. You don’t want the edges of your beautiful, focused specimen to suddenly blur into oblivion, do you? Plan objectives prevent that optical heartbreak.
These are often the preferred choice for many serious hobbyists and professionals because they offer a great balance of performance and usability. They deliver sharp images from edge to edge, making your observations much more enjoyable and informative.
Specialty Objectives: For When Standard Isn't Enough
Beyond the main categories, there are also specialized objective lenses designed for specific techniques or specimens. These are the highly customized, niche vehicles for very particular jobs.
Phase Contrast Objectives: Seeing the Invisible
Some specimens, like living cells, are almost transparent. They don't stain well, and when you look at them under a standard brightfield microscope, they’re like ghosts – you can barely see them. Phase contrast microscopy is a technique that turns these transparent structures into visible ones by exploiting differences in the refractive index of various parts of the cell.
Phase contrast objectives have a special ring (called an annulus) in them that, when used with a corresponding phase contrast condenser annulus, creates interference patterns. This makes transparent structures appear brighter or darker against a lighter or darker background, revealing incredible detail in unstained, living specimens. It's a game-changer for cell biology. Suddenly, those ghostly cells have internal structures you can actually see! You don't need to kill and stain them, which is a huge plus for studying them alive.

Differential Interference Contrast (DIC) Objectives: The 3D Effect
DIC, also known as Nomarski microscopy, is another advanced technique that provides a pseudo-3D or topographical view of transparent specimens. It uses polarized light and prisms to create subtle shading that highlights surface features and internal structures. DIC objectives are designed to work with the specialized DIC prisms.
The resulting images are stunning, with a relief-like appearance that makes even the most delicate structures pop. It’s like looking at a finely sculpted miniature. This is fantastic for observing details like cell membranes, cilia, or the fine texture of tissue. It’s not true 3D, but it gives you a sense of depth that’s incredibly helpful for understanding the specimen's morphology. Think of it as the microscope giving you little shadows to show you the bumps and curves.
Long Working Distance (LWD) Objectives: Clearing the Path
Sometimes, the specimen isn’t on a standard slide, or you need to perform manipulations under the microscope. Long working distance objectives have a much larger gap between the front lens element and the specimen. This increased distance allows you to use thicker coverslips, work with samples in dishes, or even insert probes or tools into the viewing area.
They are crucial in fields like materials science or when working with samples that aren't easily mounted on a slide. The trade-off is usually a slightly lower NA compared to their short working distance counterparts, meaning slightly less resolution, but for the tasks they’re designed for, they’re indispensable.
Water Immersion and Oil Immersion Objectives: Getting Closer
We touched on Numerical Aperture (NA) earlier. The maximum NA of a lens is limited by the refractive index of the medium between the lens and the coverslip. Air has a refractive index of about 1.0. Water has a higher refractive index (around 1.33), and immersion oil has an even higher refractive index (around 1.515).

Using oil immersion objectives (typically 100x) is essential for achieving the highest magnifications and resolutions. The immersion oil fills the gap, allowing more light rays from the specimen to enter the objective lens, thus increasing the NA and the detail you can resolve. It's like filling in the gaps to capture more of the faint light signals. You’ll see these lenses with a little droplet of oil on them, and you must use the correct immersion oil (don't try using cooking oil, please!). It’s a bit fiddly, but the results are phenomenal.
Water immersion objectives are less common but are used in specific applications, particularly in live-cell imaging, where immersion oil might be toxic or interfere with the experiment. They offer a higher NA than air objectives but a lower one than oil objectives.
Putting It All Together: What Lens for What?
So, you've got all these choices. How do you pick the right one? It really depends on what you're trying to look at and your budget. Here's a rough guide:
- Beginner/General Use: Start with a good set of achromatic objectives (4x, 10x, 40x) and perhaps a 100x oil immersion if you get serious about high magnification. Consider a plan achromat for the 40x and 100x if your budget allows; the flatter field is a big improvement.
- Serious Hobbyist/Undergraduate: Aim for plan achromats or even entry-level plan apo objectives. A set including 4x, 10x, 40x, and 100x plan objectives will serve you very well for a wide range of samples.
- Advanced Research/Professional: This is where plan apochromats and specialized objectives like phase contrast or DIC become essential. You'll likely be buying lenses individually to suit very specific needs.
Don't forget to check the magnification and the NA! For looking at fine details, a higher NA is often more important than sheer magnification. A high-magnification lens with a low NA will just give you a big, blurry blob. It's that simple. And remember, your objective is only as good as the light source and the quality of your specimen preparation. Garbage in, garbage out, as they say!
The Bottom Line: Upgrade Your View!
My little pond water adventure was a stark reminder that the objective lens is where the microscopic magic truly begins. If you’ve been struggling with blurry images or limited detail, it might be time to look at upgrading your objectives. Even a modest upgrade from a basic achromat to a plan achromat can make a world of difference to your viewing experience.
It's a bit of an investment, sure, but for anyone who finds themselves captivated by the hidden worlds under the microscope, the clarity, detail, and sheer joy of seeing things as they truly are is absolutely priceless. So go forth, explore those tiny universes, and may your images be ever sharp and your paramecia ever lively!