Remove Background Illustrator

Ever stared at a photo, maybe of your cat looking particularly regal, or a perfectly placed coffee cup that you just know would make your latest social media post pop, only to find yourself battling a stubborn background? It's like trying to unwrap a particularly clingy gift – you know what you want is inside, but there's just… stuff… in the way. This, my friends, is where our trusty friend, Adobe Illustrator, waltzes in, ready to be your background-removing fairy godmother.
Think of it this way: Illustrator is like that super handy friend who can fix anything. You know the one – they can mend a wobbly chair, whip up a gourmet meal from leftovers, and, crucially for our purposes, perform digital miracles. And one of the most satisfying miracles? Zapping away unwanted backgrounds.
We’ve all been there. You’re creating a flyer for your neighborhood bake sale, and you’ve got this amazing picture of your prize-winning cookies. But oh dear, the background is a chaotic symphony of dirty dishes and a slightly bewildered-looking dog. It’s like trying to appreciate a diamond necklace against a backdrop of crumpled tissues. Not exactly the dazzling effect you’re going for, right?
Must Read
Illustrator, bless its digital heart, is going to help you isolate that cookie perfection. It's not just about removing backgrounds; it's about liberating your subject. It’s like giving your subject a much-needed breath of fresh air, letting it shine without the visual noise.
Let’s get real, though. Sometimes, the idea of using professional software like Illustrator can feel a bit like trying to assemble IKEA furniture without the instructions. You see all those buttons and panels, and your brain starts doing the "spinning wheel of death" emoji. But trust me, removing a background in Illustrator is surprisingly less daunting than it sounds. It’s more like learning a few key dance moves than mastering the entire ballet.
The "Uh Oh, What's That Blob?" Moment
You’ve got your image. It’s great. The subject is chef's kiss. But then you notice it. That weird shadow that looks suspiciously like a disgruntled squirrel. Or that half-eaten sandwich that’s somehow photobombed your masterpiece. These are the visual equivalent of that one annoying lyric in a song that you just can’t get out of your head. Illustrator is here to hit the "mute" button on those distractions.
It’s like having a virtual pair of super-sharp scissors. You’re not actually cutting anything, of course, but you’re making precise cuts in the digital realm. You’re defining the boundaries of your subject, saying, "You, beautiful subject, are the star of the show, and you, shadowy squirrel, are politely asked to leave the stage."
And the best part? Illustrator gives you a lot of control. It’s not a blunt instrument. It’s more like a surgeon’s scalpel, but one that’s surprisingly easy to wield. You can refine edges, smooth out imperfections, and generally make your background removal look so natural, people will wonder if the photo was taken in a pure white void from the start. (Shhh, we’ll keep that our little secret.)
Meet Your New Best Friends: The Tools
So, how do we actually do this magic? Illustrator offers a few nifty tools that are going to become your go-to buddies. Think of them as your background-slaying squad.
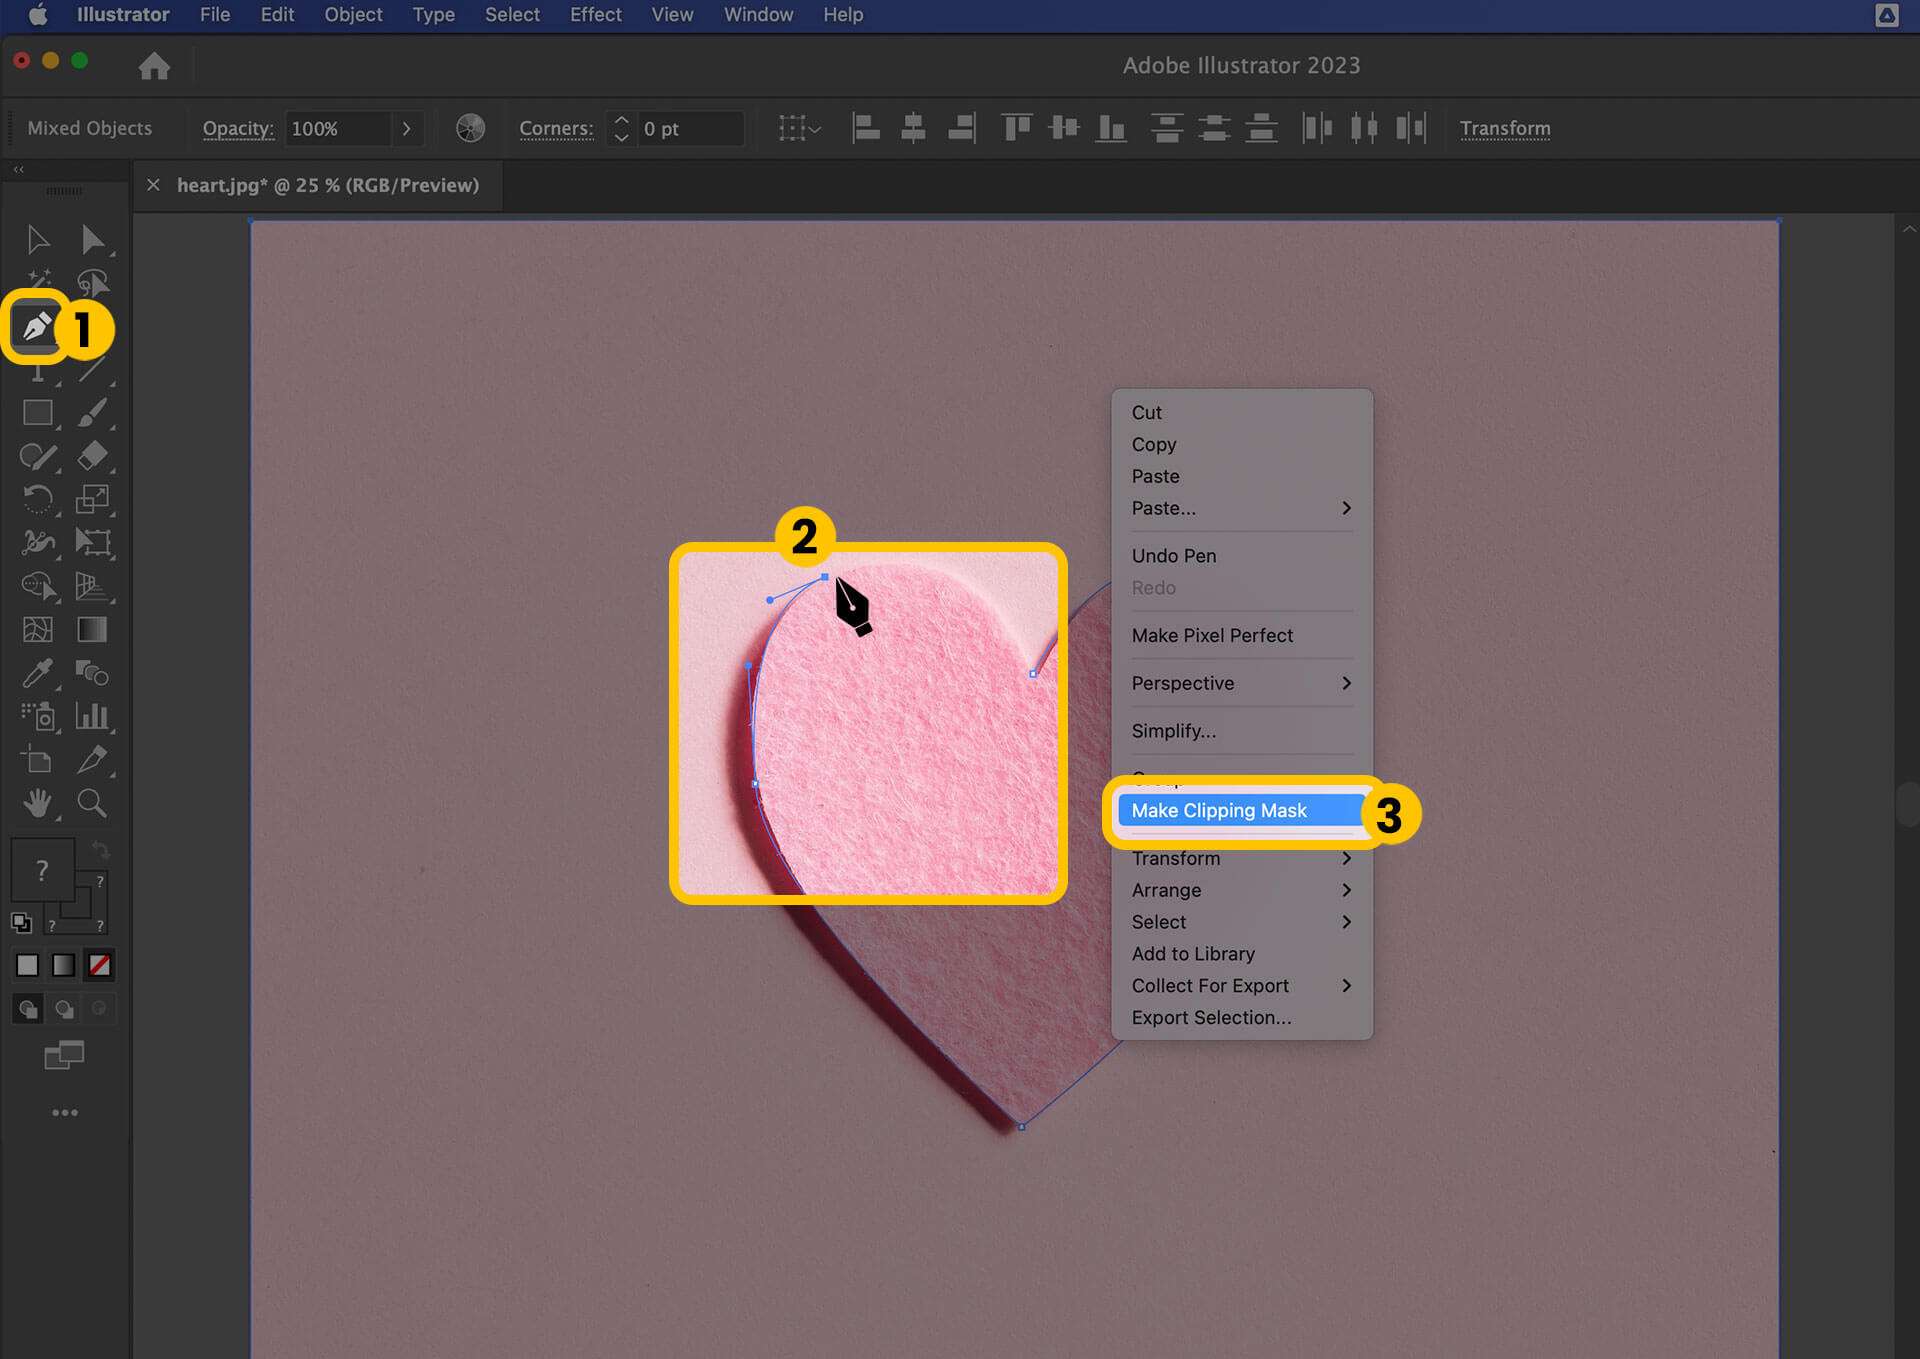
First up, we have the Pen Tool. Now, I know what you’re thinking. "The Pen Tool? That sounds complicated! Like trying to write calligraphy with your non-dominant hand while juggling." But hear me out! The Pen Tool is actually your most precise friend. It allows you to draw vector paths, essentially tracing around your subject with pinpoint accuracy. It’s like drawing a super-neat outline of what you want to keep.
Imagine you're outlining a perfectly shaped cookie. You click here, drag there, and voila! You've got a clean, crisp line. It takes a little practice, sure, but once you get the hang of it, you’ll feel like a digital Michelangelo. You can create smooth curves for a flowing dress or sharp angles for a geometric object. It’s all about those anchor points, those little points of control.
Then there’s the Magic Wand Tool and the Quick Selection Tool. These are your speed demons. They're like those helpful friends who can point out all the things that look similar. If your background is a solid, uniform color (like a studio backdrop that accidentally got a coffee stain), these tools can grab all those similar pixels in a jiffy. It’s like magic, hence the name! You click, and a whole chunk of the background just… disappears. Pretty neat, huh?
Think of it like this: if your background is a field of identical daisies, the Magic Wand is like a friendly gust of wind that picks up all the daisies, leaving your lone, magnificent sunflower (your subject) standing tall. It’s not always perfect, especially if your subject and background have similar colors, but for simple backgrounds, it's a lifesaver. It’s the express lane to background removal.
We also have the Background Eraser Tool. This one is pretty self-explanatory, but it's like a more intelligent eraser. Instead of just wiping away everything, it tries to figure out what's foreground and what's background. You can sample colors and tell it, "Hey, get rid of anything that looks like this color, but be careful around my subject." It’s like a super-focused cleaner, meticulously wiping away only the smudges.
Let’s say you have a photo where your subject is standing in front of a bunch of balloons. The Background Eraser Tool can be a lifesaver here. You’re telling it, "Okay, anything that looks like a balloon, go bye-bye. But this person? They’re staying right here." It’s about being discerning, a quality we all admire, even in our software.
Making It Look Good
Once you’ve got your subject isolated, the real fun begins. You can now place it on any background you like! Want your cat to be floating in space? Done. Need your coffee cup to be chilling on a tropical beach? Easy peasy. It’s like having a digital passport to anywhere you can imagine.
But sometimes, even with the best tools, the edges can look a little… rough. Like you’ve just awkwardly cut a sticker out of a magazine. Illustrator has ways to smooth things out. You can use the Smooth Tool to refine those wobbly lines, making them look as if they were always meant to be that way. It’s like having a secret makeup artist for your digital creations.
Think of it as polishing a gemstone. You've done the hard work of carving it out, and now you're just buffing it to a perfect shine. You want those edges to be clean and crisp, not jaggy and pixelated. Illustrator's smoothing tools are your digital buffer, bringing out the natural beauty of your subject.
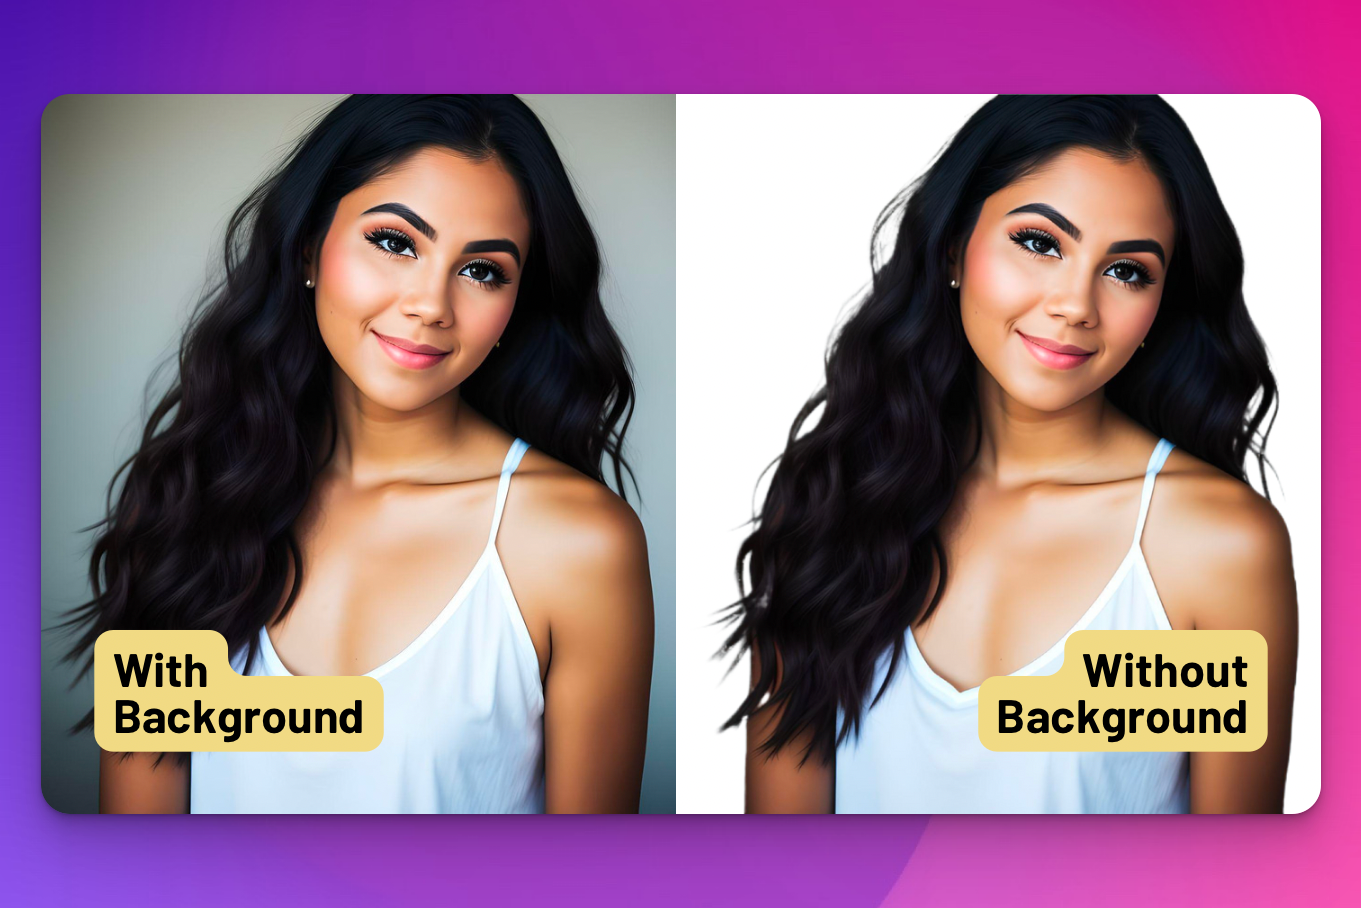
And if you’re working with images that have intricate details, like wisps of hair or fuzzy fur, Illustrator has even more advanced features. You can use the "Select and Mask" feature (though that's more in Photoshop, but the concept of refining edges is similar in Illustrator's workflow when you're preparing for export). Essentially, you can tell Illustrator to pay special attention to those tricky areas, ensuring no stray pixels are left behind. It’s like having a tiny, incredibly patient crew of digital cleanup artists meticulously going over every strand of hair.
When Things Get a Bit… Hairy
Now, let’s be honest. Not all backgrounds are created equal. Some are a breeze, like a simple white wall. Others are a tangled mess, like a bowl of spaghetti that’s been attacked by a toddler. Those are the moments where you might feel like you’re wrestling an octopus.
If your background has a lot of complex patterns or textures that are very similar to your subject, you might need to do a bit more manual work with the Pen Tool. It’s not the fastest, but it’s the most reliable. Think of it as a slow burn versus a quick fix. Sometimes, the slow burn is worth it for that perfectly smooth finish.
This is where patience becomes your best friend. Imagine you're knitting a complex pattern. You can't rush it, or you'll end up with a wonky mess. Illustrator's intricate background removals are a bit like that. You meticulously place each stitch (or anchor point), and the result is a beautiful, seamless creation.
Don’t get discouraged if your first few attempts aren’t magazine-cover ready. We’ve all had those moments where we accidentally delete the wrong part, or the mask looks like a badly drawn cloud. It’s part of the learning curve! Just remember to undo (Ctrl+Z or Cmd+Z – your best friend ever!) and try again.
The "Why Bother?" Question
So, why go through all this digital fuss? Well, imagine you’re designing a website for your band. You’ve got this awesome, moody photo of the band members. But the background is a blurry mess of a dingy pub. It just doesn’t scream "rock stars on the rise," does it? It screams "we played an open mic night last Tuesday."
By removing that background and placing your band on a sleek, modern backdrop (or even a cool abstract design), you’re instantly elevating the image. You’re taking it from "meh" to "wow!" It’s about controlling the narrative, making your visuals work for you, not against you. It’s like giving your subject a makeover, but in the digital world.
Or consider creating product mockups. You’ve got a killer new logo for a t-shirt. You want to show it off, but you don’t want to pay for an expensive photoshoot. Illustrator lets you easily place your logo onto a t-shirt mockup, with a clean background. It’s efficient, cost-effective, and makes your designs look professional. You’re essentially creating your own digital showroom.
It’s about versatility. Once you have an object with a transparent background (that's what you're aiming for – a background that's see-through), you can do anything with it. You can layer it on top of other images, use it in animations, or simply place it on a new, perfectly chosen background. It’s like having a building block that fits anywhere.
Saving Your Masterpiece
Finally, when you’re all done and have successfully banished that pesky background, you need to save your work correctly. This is crucial! If you save it as a standard JPEG, you’ll find that the background reappears, looking smug and victorious.
You need to save your file in a format that supports transparency. The most common and best option for this is a PNG (.png) file. When you export or save as a PNG, you’ll have an option to preserve transparency. Make sure you check that box!
Think of it like this: you’ve spent ages carefully unwrapping your gift. Now, you don’t want to rewrap it in newspaper, do you? You want to keep it pristine and ready to be displayed. The PNG format is your elegant, transparent wrapping paper. It preserves all your hard work and ensures your subject is ready to shine on any digital canvas.
So, there you have it. Removing backgrounds in Illustrator might seem like a daunting task at first, but with a little practice and the right tools, it’s a skill that can truly elevate your designs. It’s about taking something that’s just "okay" and making it extraordinary. So go forth, experiment, and happy background removing!