How To Use Chroma Key In Imovie

Hey there, budding filmmakers and aspiring backyard movie stars! Have you ever watched a movie and thought, "Wow, how did they make that actor appear to be floating on a cloud?" Or perhaps you've dreamed of stepping onto the set of your favorite blockbuster, complete with aliens and intergalactic vistas? Well, what if I told you that you, yes YOU, have the power to whip up some serious movie magic right from your own living room, using a tool you probably already have? I'm talking about iMovie's fantastic Chroma Key feature! Buckle up, buttercups, because we're about to dive into the wonderfully wacky world of green screens!
So, what exactly is chroma keying? Don't let the fancy name scare you. Think of it like this: it's a special effect that allows you to make a specific color (usually green or blue, hence "chroma") transparent in your video. This transparency then lets whatever footage you've placed underneath show through. Mind-blowing, right? It's the secret sauce behind all those amazing scenes where characters seem to defy gravity or interact with environments that definitely aren't real.
And the best part? iMovie, that friendly video editing software that comes standard on your Apple devices, makes it surprisingly easy to wield this power. You don't need a Hollywood budget or a team of wizened VFX wizards. All you need is a bit of green (or blue!) fabric and some imagination. Seriously, get ready to unleash your inner Spielberg, or maybe your inner Wes Anderson. The possibilities are as endless as a Pixar movie marathon!
Must Read
Your Green Screen Adventure Begins Now!
Okay, okay, so you're intrigued. How do we actually do this? It's simpler than you might think. First things first, you'll need a subject to film against a uniformly colored background. This is where your trusty green or blue screen comes in. Think of it as a blank canvas for your creativity. You can buy a dedicated green screen backdrop, or for a more DIY approach, you can use a large piece of green or blue fabric. Heck, even a painted wall can work in a pinch, as long as the color is consistent and doesn't have any distracting patterns.
Now, the key (pun intended!) to a successful chroma key is good lighting. You want to light your subject evenly, and then you want to light your green screen separately and evenly. This helps the software distinguish your subject from the background more effectively. Imagine trying to paint a detailed portrait in a dimly lit room with shadows dancing everywhere – it’s not going to be easy! Good lighting is your friend here, folks. It’s the difference between a slick, professional-looking effect and something that looks like it was made by a caffeinated squirrel.

Once you've got your subject filmed against that glorious green or blue backdrop, it's time to bring in iMovie. You'll want to have two clips ready: your main footage (the one with the green screen) and the footage you want to layer behind it. This could be a majestic mountain range, a bustling city street, or even just a cool, abstract pattern. Get creative!
The Magical Chroma Key Dance in iMovie
Here’s where the magic happens. Open up iMovie and start a new project. Import both of your video clips. Drag your background footage onto the timeline first. This is the foundation of your scene. Now, here’s the super-duper, extra-special step: drag your green screen footage directly on top of the background clip. Don't just place it next to it; we want it layered!
You'll see a little icon pop up above your green screen clip. It looks like a square with a couple of overlapping shapes. Click on that icon, and you’ll see a dropdown menu. Find and select the option that says "Green/Blue Screen." Poof! Like a magician's handkerchief, the green (or blue) should disappear, revealing your background! Isn't that just the coolest thing ever? You’ve just literally peeled away a layer of reality to reveal something new!
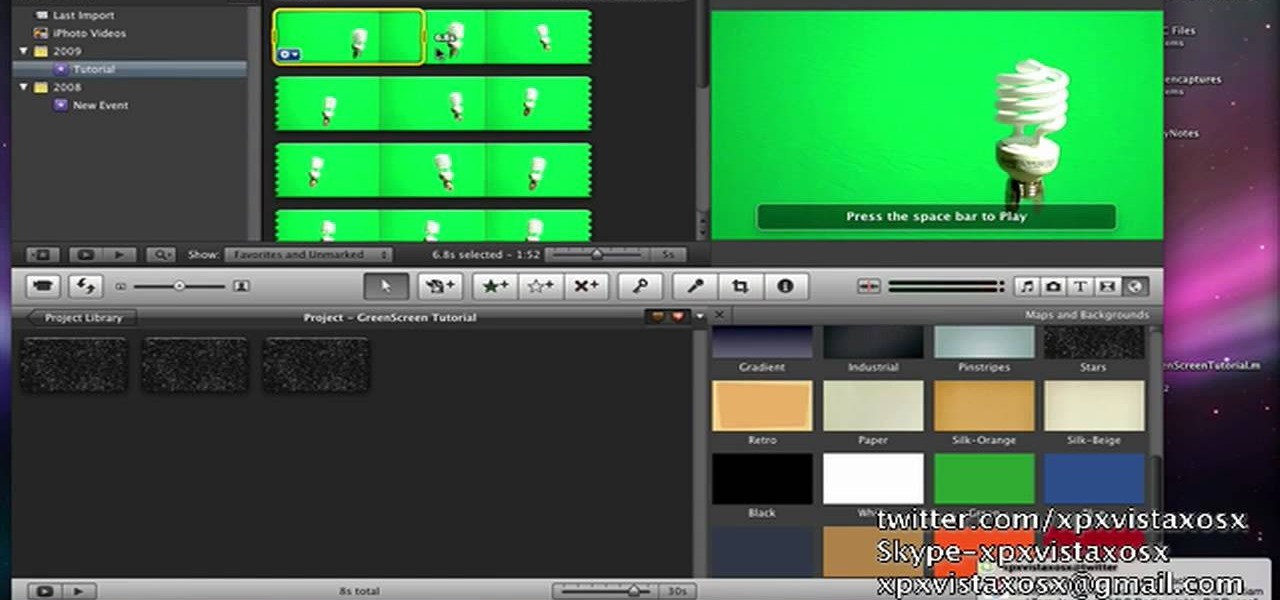
Now, here’s the fun part: tweaking! Sometimes, the edges might look a little fuzzy, or maybe some of the green is still stubbornly hanging around. No worries! iMovie gives you little sliders and controls right there to fine-tune your effect. You can adjust the intensity and the edge feathering to make the transition seamless. Think of it as a digital eraser and softener all rolled into one. Play around with it! Don't be afraid to experiment. That's how you discover the really awesome, unexpected results!
Beyond the Basics: Making it Shine!
Once you've mastered the basic chroma key, the world of video creation opens up in a whole new dimension. Imagine interviewing a historical figure on your couch, or having your pet "fly" through the sky like a superhero. Want to teach your kids about dinosaurs? Now you can have them standing right next to a T-Rex (a digital one, of course!). The educational possibilities are also HUGE!

You can use chroma key to create hilarious memes, funny skits, or even short, dramatic films that rival the big studios. Think about creating a scene where you're giving a speech from the steps of the Eiffel Tower, or making a music video where you're performing on a vibrant alien planet. The only limit is your imagination, and let's be honest, yours is probably pretty spectacular!
Remember, practice makes perfect. Your first few attempts might be a little… experimental. And that’s perfectly okay! Every great filmmaker started somewhere, and often, those early experiments lead to the most innovative ideas. Don't get discouraged if it's not perfect right away. Just keep playing, keep learning, and keep having fun.
This isn't just about making cool videos; it's about unlocking a new way to express yourself, to tell stories, and to bring your wildest ideas to life. It's about adding a little bit of that movie magic to your everyday life. So go ahead, grab a green sheet, fire up iMovie, and let the creativity flow! You've got the power to make the unbelievable, believable. Go forth and create something spectacular!


![[How To] Come eseguire un chroma key e editor di precisione in iMovie](https://i.ytimg.com/vi/ogz4FsUBcLU/maxresdefault.jpg)