How To Set Up A Pool Triangle

Hey there, pool shark (or soon-to-be pool shark!)! So, you've got your shiny new pool table, you've probably spent way too much time admiring its green felt (or whatever awesome color you picked), and now you're ready to do some serious racking. But wait, what's this mysterious contraption? It's the pool triangle, also known as a rack, and it's your ticket to a perfectly set up game. Don't sweat it, it's not rocket science. In fact, it's way easier than trying to figure out how your cat manages to fit into that tiny box. We're gonna break this down, step by step, and soon you'll be racking like a pro. Ready to dive in? Let's get this ball rolling!
First things first, what is this thing we're talking about? The pool triangle is that cool, usually wooden or plastic, triangular frame that helps you arrange your billiard balls in that neat little pyramid shape. Think of it as the ultimate ball organizer. Without it, you'd be there all day, meticulously placing each ball, probably with a ruler and a level. Okay, maybe not a ruler, but you get the idea. It's designed to make your life easier, so let's embrace the magic of the triangle!
The Anatomy of a Rack
Before we get our hands dirty (metaphorically speaking, of course – nobody wants sticky billiard balls!), let's quickly chat about the balls themselves. For a standard game of 8-ball, you'll be using 15 balls, plus the cue ball. You've got your solid colored balls (1 through 7) and your striped balls (9 through 15). Then there's the infamous 8-ball, which is, you guessed it, black. The cue ball, the one you're going to be whacking around, is usually plain white. Easy peasy, right?
Must Read
Now, the triangle itself. Most triangles are designed for a 15-ball rack, meaning they'll have 5 balls along the back row, 4 in front of that, then 3, then 2, and finally, one ball at the very front point. Some might be for 9-ball, which is a different setup altogether, but for now, let's focus on the classic 8-ball rack. The important thing is that it’s shaped like a triangle, hence the name. Revolutionary, I know.
Getting Your Balls in a Row (or a Triangle!)
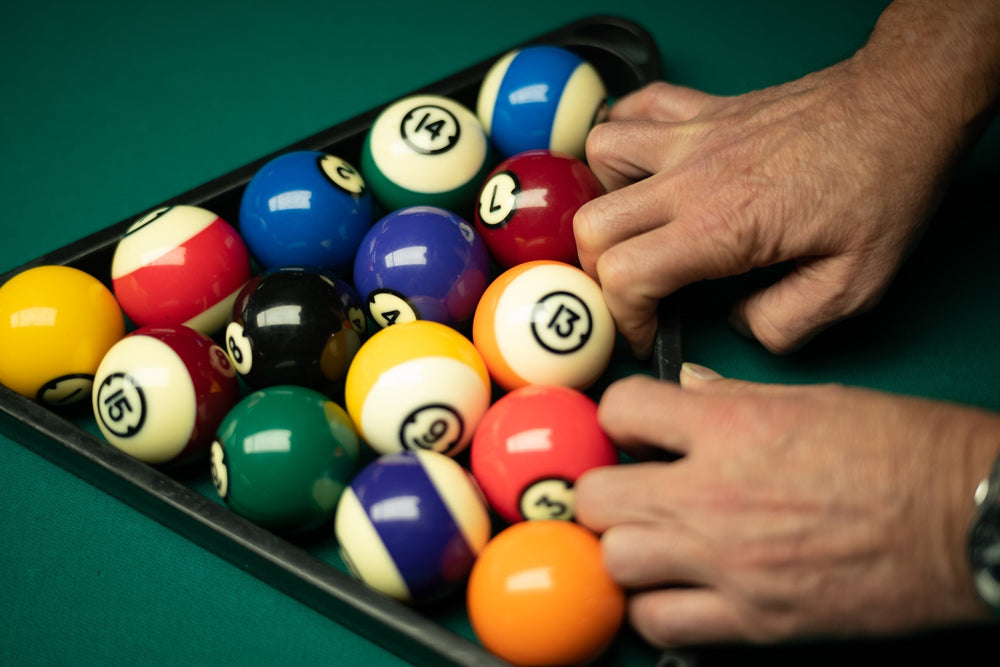
Alright, let's get down to business. Grab your 15 object balls. You'll need to decide where you want to place your rack. Typically, the rack sits at the foot spot of the table. This is the spot furthest from where you'll be breaking. If you're not sure where the foot spot is, don't worry! Most tables have it marked. If yours doesn't, it's usually about a quarter of the way up from the end rail, directly opposite the head spot (where the cue ball starts). Think of it as the ball pyramid's designated parking spot.
Now, pick up your triangle. It usually has one open side, which is where the balls will go in. Place the triangle on the table, with the open side facing you. This way, when you load the balls, they’re already oriented correctly to slide out of the triangle when you’re done. It’s all about working smarter, not harder, people!
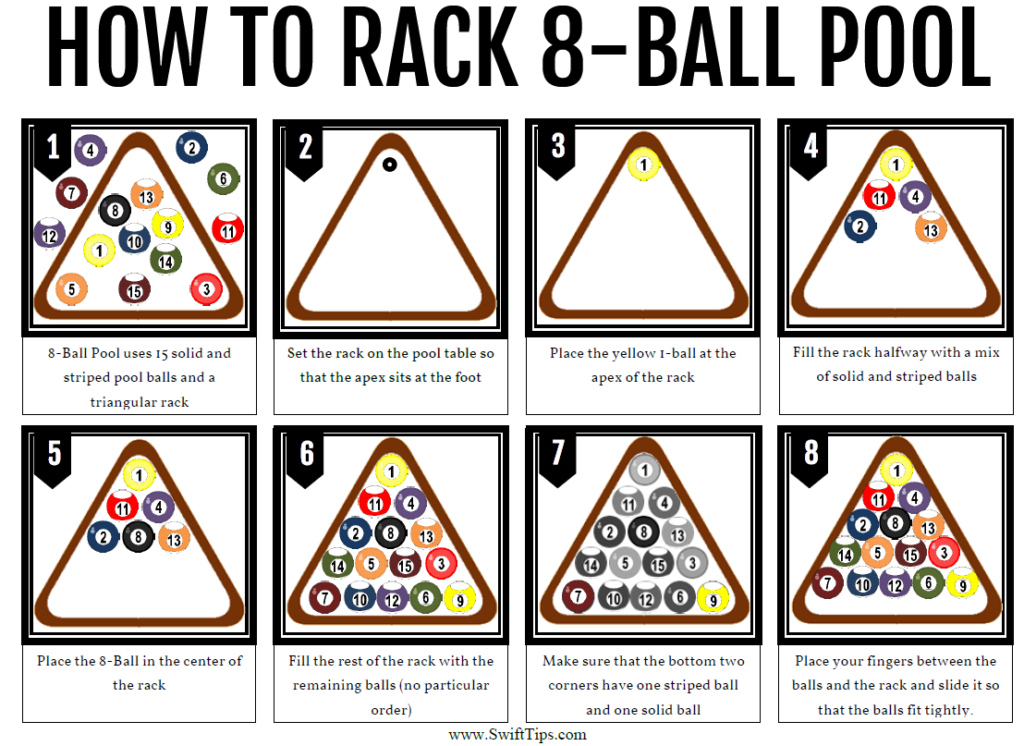
The Crucial Ball Placement: Where Does the 8-Ball Go?
This is where things get a little bit strategic, and frankly, where the fun begins. For an 8-ball rack, there's a specific rule about where certain balls must go. The 8-ball goes in the center of the third row from the front. So, if you count from the point of the triangle (the front), it's the middle ball of the row of three. Got it? Think of it as the VIP of the rack, sitting in the middle of the action. No, it doesn't get a tiny velvet rope, but it is pretty important.
What about the other balls? Well, here's where the game gets interesting. In a standard 8-ball rack, the ball at the very front point of the triangle (the apex) should be the cue ball's opposite. What does that mean? It means the ball at the front should be a solid color if you're aiming for a split of solids and stripes, or vice-versa. Generally, you want a good mix. Some folks like to put a specific numbered ball at the front, but for a casual game, just make sure it's not the 8-ball!
The ball at the back corner of the triangle on your side (the side where you're racking) should be a striped ball. The other back corner? It can be anything, but again, aiming for a balance is good. The rest? Mix 'em up! Honestly, for a friendly game, as long as the 8-ball is in the center of the third row and you have a ball at the front point, you're golden. The goal is to have a roughly even distribution of solids and stripes throughout the rack, so neither player has a massive advantage from the start. It’s like trying to give everyone a fair shot at glory!
Some serious players get very particular about the arrangement of the remaining balls. They'll arrange them so that every possible combination of balls is on the table. But for us regular folks just looking for a good time, a good sprinkle of solids and stripes, with the 8-ball in its rightful place, is perfectly fine. Remember, it's a game, not a math exam. Although, sometimes it feels like it!

The Racking Process: Loading the Balls
Now that we know where things go, let's load 'em up. Start by placing the balls inside the triangle. You’ll want to fill the back row first, which has 5 balls. Gently push them against the back of the triangle. Then, move to the next row, which has 4 balls, and push them against the row in front of them. Continue this process, row by row, until you have all 15 balls nestled snugly within the triangle. They should be touching each other and the sides of the triangle. This is how you achieve that tight, perfect rack.
Make sure there are no gaps. Any significant gaps can cause the balls to spread out unevenly on the break, which is a total bummer. Imagine the suspense! Will they scatter like confetti, or will they just sort of… shuffle? We want the confetti explosion, not the gentle shuffle. So, give those balls a firm, gentle push to ensure they’re all packed in there like sardines in a can. But don't be too rough; we're not trying to win a "most aggressive packing" award.
Once all 15 balls are loaded, and you’re happy with the placement of the 8-ball and the front ball (and maybe a stripe in the corner!), it’s time for the moment of truth.

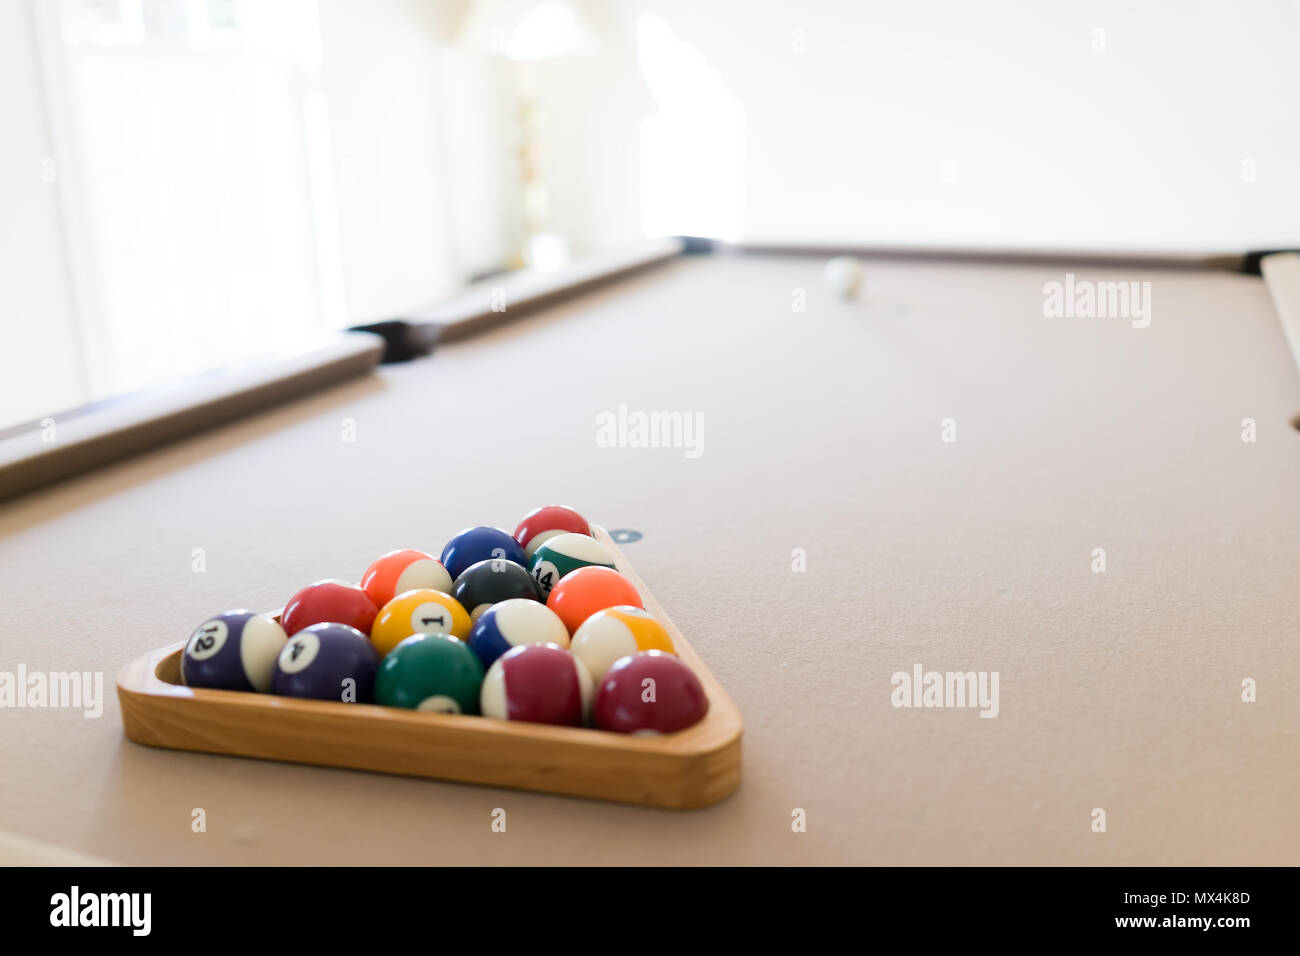
The Grand Unveiling: Removing the Triangle
This is the part where you feel like a magician performing a trick. With all the balls perfectly packed inside the triangle, and the triangle itself positioned correctly on the foot spot, you're going to carefully lift the triangle away. Do this slowly and steadily. Imagine you're lifting a precious artifact. You want to pull it straight up and away from the balls.
If you’ve done a good job packing them, the balls should remain in their perfect pyramid formation. Ta-da! You’ve just created a masterpiece. It’s a beautiful sight, isn’t it? All those colorful spheres in their rightful place, just begging to be scattered by the mighty cue ball. It’s like the calm before the storm, or perhaps, the calm before the fun storm.
If, by chance, a ball or two decides to go rogue and roll out, don't despair! This happens, especially when you're first learning. Just gently push them back into place, making sure they are snug against their neighbors and the triangle. Then, try removing the triangle again. A little bit of wiggling might be needed, but the key is to be gentle. Think of it as a dance with the balls – a slow, deliberate waltz.
Troubleshooting Tips for the Aspiring Racker
So, what if your rack looks more like a lopsided hill than a perfect pyramid? Here are a few common issues and how to fix them:

- Gaps Between Balls: As we mentioned, gaps are the enemy of a good rack. Make sure each ball is touching its neighbors. When loading, push the balls firmly but not violently towards the front and sides of the triangle.
- Uneven Rows: This usually happens if you don't have the balls packed tightly enough. Ensure the balls in each row are aligned and touching each other.
- Triangle Not Sitting Flat: Make sure the table surface is level. If your table is a bit wobbly, it can affect the rack. Also, ensure the triangle itself isn't warped.
- Balls Rolling Out When Removing the Triangle: This is the classic rookie mistake! It means your balls weren't packed tightly enough. Take your time, push them in firmly, and try lifting the triangle straight up, rather than at an angle.
Don't get discouraged if your first few racks aren't magazine-worthy. The more you practice, the better you'll get. It’s like learning to ride a bike – you might wobble a bit at first, but soon you’ll be cruising downhill!
The 9-Ball Rack: A Quick Nod
While we've been focusing on 8-ball, it's worth mentioning that 9-ball has a different racking system. For 9-ball, you'll use balls 1 through 9. The rack is a diamond shape, and the 1-ball goes at the front point, and the 9-ball goes in the center of the diamond. The rest of the balls can be mixed up. It's a simpler setup, but just as important to get right.
The Joy of a Perfect Rack
There's a certain satisfaction that comes with a perfectly set up rack. It's visually pleasing, and it sets the stage for a fair and exciting game. When those balls are neatly arranged, it just feels right, doesn't it? It's a small thing, but it contributes to the overall enjoyment of the game. It's the quiet anticipation before the exhilarating chaos of the break shot.
So there you have it! You’re now officially equipped to conquer the pool triangle. It's a simple skill, but a fundamental one. Remember to have fun with it, be patient with yourself, and enjoy the process. The next time you set up a game, you'll do it with confidence and a little bit of flair. May your racks be tight, your breaks be powerful, and your games be filled with laughter and good company. Now go forth and rack 'em up!