How To Set Up A Billiards Table
So, you've decided to join the illustrious ranks of the billiard-wielding elite. Perhaps you've had one too many pints at your local pub, watched "The Hustler" one too many times, or simply realized that life is too short for wobbly card tables and strategically placed coasters. Whatever the catalyst, congratulations! You're about to embark on a journey that's equal parts Zen mindfulness and pure, unadulterated fist-pumping victory. And it all starts with… setting up your very own billiards table. Don't worry, it's not as complicated as assembling a rocket ship. Mostly.
Before we dive headfirst into a world of felt and furiously chalked cues, let's address the elephant in the room. Or rather, the rather large, heavy, and incredibly precise object that is about to become the centerpiece of your entertainment empire. We're talking about a billiards table, people! This isn't some flat-pack furniture from IKEA that you can assemble with a single Allen wrench and a healthy dose of existential dread. This is a serious piece of equipment, and it deserves some respect. Think of it as your new, slightly bossy roommate who demands perfect alignment and a steady hand.
Phase 1: The Grand Arrival and the "Oh Crap, It's Heavy" Moment
First things first, you need to get the table to your chosen battleground. Unless you've opted for a miniature, travel-sized version (which, let's be honest, is probably more of a glorified shuffleboard), this thing is a beast. You'll likely need friends. Or several very strong, possibly bribed, individuals. Remember that scene in a cartoon where a piano is being moved down a flight of stairs? Yeah, something like that, but with more splinters and potentially damaged drywall. Communicate! Yell "Lift!" and "Lower!" and "For the love of all that is holy, don't drop it!"
Must Read
Once it's in the room, you'll realize it needs to go somewhere. This is where the concept of "prime real estate" takes on a whole new meaning. You can't just shove it in a corner like that awkward uncle at a wedding. Billiards tables require ample space for your glorious, sweeping shots. We're talking a minimum of 5 feet of clear playing area around the table. That means measuring your room and performing some advanced spatial reasoning. Can you actually walk around it without doing an interpretive dance? If not, it's time to start rearranging. Think of it as a game of real-life Tetris, but the pieces are couches and coffee tables.
A surprising fact for you: Did you know that the average pool table weighs between 600 and 1,000 pounds? That's like trying to move a small rhinoceros. So, yes, get help. And maybe some heavy-duty furniture sliders. Your back will thank you. And your friends, who might otherwise stage a revolt.

Phase 2: The Foundation of Greatness (And by "Greatness," I Mean a Level Table)
Now for the nitty-gritty. Your table is in position, and you've miraculously avoided any structural damage. It's time to talk about the most critical, and arguably the most tedious, part of the entire operation: leveling the table. Seriously, this is non-negotiable. A billiard table that's even slightly off-kilter is an affront to the laws of physics and a guaranteed way to have your perfectly aimed shots veer off into oblivion. It's like trying to tell a joke to someone who's already halfway out the door – it's just not going to land.
Most tables have adjustable legs, often with screws or turn-buckles. This is where your spirit of perseverance truly shines. You'll be hunched over, peering at a spirit level (a magical tool that tells you if things are straight, or as straight as a politician's promise), making tiny adjustments, and then testing again. It’s a dance of patience and precision. You'll find yourself uttering phrases like, "Just a smidge to the left," and "Is that… nope, still crooked." It's basically a high-stakes engineering project with significantly more swearing.

Here's a pro tip, learned from countless hours of mild frustration: check for level in multiple directions. Not just side-to-side, but front-to-back, and even diagonally. Imagine a tiny alien trying to walk across your table – if they're constantly tumbling, your table isn't level. You might need shims (thin pieces of wood or plastic) for those particularly stubborn legs that refuse to cooperate. Think of these shims as tiny, underappreciated heroes of billiards.
Phase 3: The Felt Frontier: Taming the Woolly Beast
With your table as steady as a seasoned poker player, it's time to introduce it to its glorious green (or red, or blue, depending on your daring) coat: the felt. This is where things can get a little… hairy. Literally. If your felt isn't installed correctly, it'll look like a poorly shaved poodle. And nobody wants to play on a poodle.
The process usually involves stretching the felt tightly and stapling or gluing it underneath the slate. This requires a good pair of staple guns (the heavy-duty kind, not the one you use to tack up flyers for lost cats) and a bit of muscle. You'll want to pull the felt taut, working from the center outwards, to ensure there are no wrinkles or sags. Wrinkles are the enemy of a smooth roll. They’re like speed bumps for your cue ball. Very annoying speed bumps.

Take your time here. This is not a race. It's more of a marathon of meticulousness. If you're feeling particularly ambitious (or masochistic), you can even try to get that perfect, taut finish that makes the pros jealous. You’ll be stretching, smoothing, and stapling like a professional upholsterer who's had way too much caffeine. And when it's done, and the felt is smooth and wrinkle-free, you'll feel a sense of accomplishment that rivals winning the lottery. Almost.
Phase 4: The Final Touches: Balls, Pockets, and the Dawn of a New Era
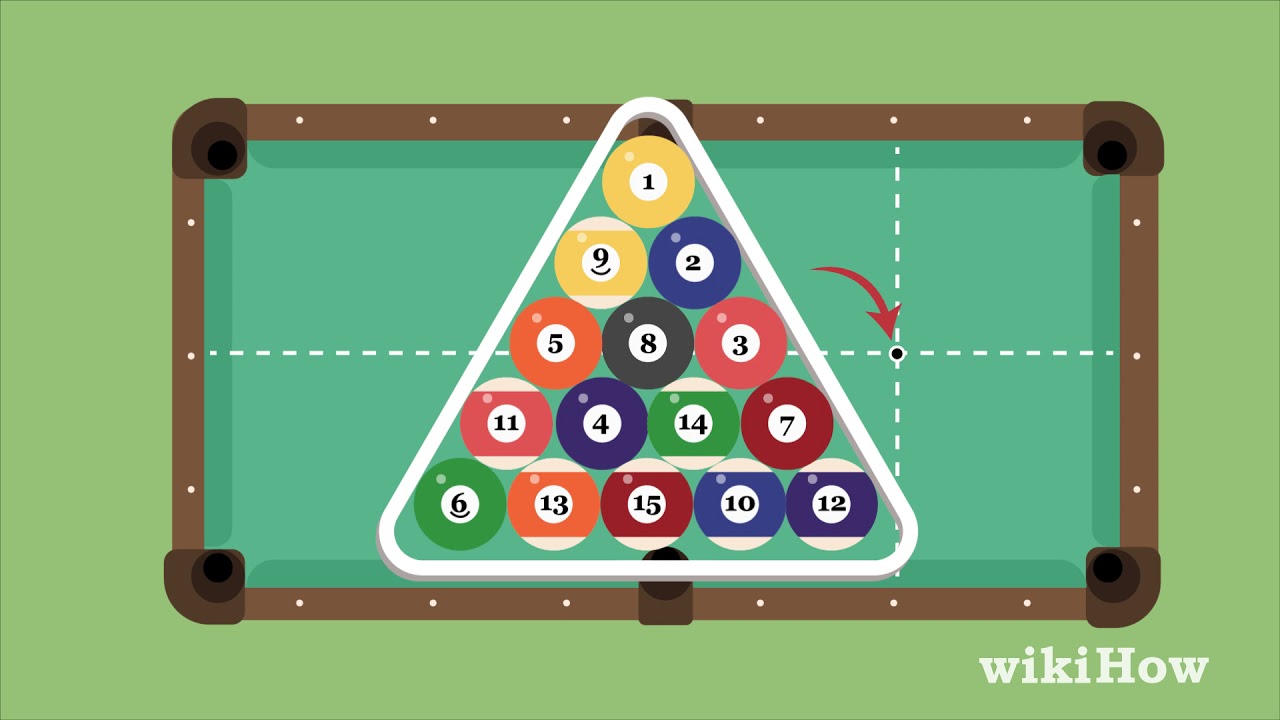
You're almost there! The table is level, the felt is (hopefully) pristine, and the only thing missing are the stars of the show: the balls. Place them carefully in their triangular rack, a sacred formation that looks vaguely like a very organized pyramid. And then, the moment of truth: the break.

Before that, though, let's talk about the pockets. Make sure they're securely attached and that the balls actually go into them. It sounds obvious, but in the heat of assembly, weird things can happen. You don't want your balls to be like escape artists, constantly finding new ways to get out of jail.
And then, there's the chalk. Oh, the chalk. This tiny, powdery cube is the secret weapon of any serious player. A good chalking technique can make the difference between a graceful shot and a disheartening kiss-off. So, get acquainted with your chalk. Rub it on your cue tip with the reverence it deserves. It's the magic dust of the billiard world.
Congratulations! You've done it. You've wrestled a behemoth, tamed a fuzzy beast, and achieved a level of zen that would make a monk proud. Now, go forth and conquer. May your shots be straight, your pockets be true, and your opponents be slightly intimidated by your impressive new setup. Just try not to spend all your time practicing. Remember, you still have to, you know, live life. But mostly, play pool.

