How To Put Up A Picture Rail

Hey there, DIY superstar! So, you've got a blank wall just staring at you, a beautiful picture itching to be hung, but the thought of drilling into your precious plaster makes your palms sweat? I get it. It’s like trying to perform open-heart surgery with a butter knife. But fear not, my friend, because today we’re embarking on a quest to conquer those walls with a technique as old as time (well, almost) and twice as elegant: the picture rail!
Think of a picture rail as a sophisticated hanger-hanger. Instead of directly assaulting your wall with nails and screws for every single piece of art, you’re installing a stylish ledge near the ceiling. From this ledge, special hooks and wires will magically suspend your masterpieces. It’s brilliant! It’s clean! And honestly, it makes you feel like you’ve got your interior design act together, even if you’re currently wearing mismatched socks and have a rogue crumb on your shirt. (No judgment here, by the way.)
Now, before we dive headfirst into the world of picture rails, let’s have a little chat. This isn't rocket science, but it does require a smidgen of patience and a healthy dose of optimism. If you’ve ever assembled IKEA furniture and emerged relatively unscathed, you’re practically a seasoned pro. If your DIY experience involves wrestling with a stubborn garden hose, well, you're about to level up!
Must Read
Why Bother With This Picture Rail Shenanigan?
You might be thinking, "But why? Why go through all this fuss when I can just whack a nail in?" Great question! Let me paint you a picture (pun intended). Imagine you’re redecorating. Again. You’ve moved your sofa three times, debated the merits of fifty shades of beige, and now you want to rearrange your art. If you’ve drilled holes for every frame, you’ll have more wall confetti than a toddler’s birthday party. And patching those holes? Let's just say it's not exactly a spa day for your walls.
With a picture rail, you gain unparalleled flexibility. Want to swap out that landscape for a portrait? Easy peasy. Feeling bold and want to hang that oversized abstract expressionist piece you bought on a whim (we’ve all been there)? No problem! You’re not limited by stud locations or the fear of creating a polka-dot wall of doom. Plus, it adds a touch of classic architectural charm. It’s like giving your room a tiny, elegant tiara. Very chic.
And let’s not forget the sheer joy of not damaging your walls. Especially if you’re renting, or if your walls are made of something as delicate as a butterfly’s sigh. Picture rails are your best friend in these situations. You get the gallery-worthy display without the landlord’s wrath or the structural integrity of your home breathing its last gasp. Win-win!
Gathering Your Trusty Tools and Materials
Alright, enough gushing. Let’s get down to business. What do you need to become a picture rail ninja? Don’t worry, no throwing stars required. We’re talking about pretty standard DIY fare.
The Picture Rail Itself:
You'll need to buy some picture rail molding. This stuff is usually made of wood and has a specific profile designed to hold the hooks. You can find it at most hardware stores or lumber yards. It comes in various lengths, so measure your room (or the sections you want to cover) and buy accordingly. Pro tip: Buy a little extra. Trust me on this. It’s better to have a bit leftover than to run out mid-project and have to go on a quest for more of the exact same profile. Paint matching can be a nightmare, folks!
Hooks and Wires:
This is where the magic happens. You’ll need special picture rail hooks. They’re designed to slot under the lip of the rail. You’ll then attach picture wire or cord to these hooks, and then to your frames. You can buy these in packs. Make sure the hooks are rated for the weight of your pictures. If you're hanging a collection of your grandma’s antique lead weights, you might need something a bit beefier.
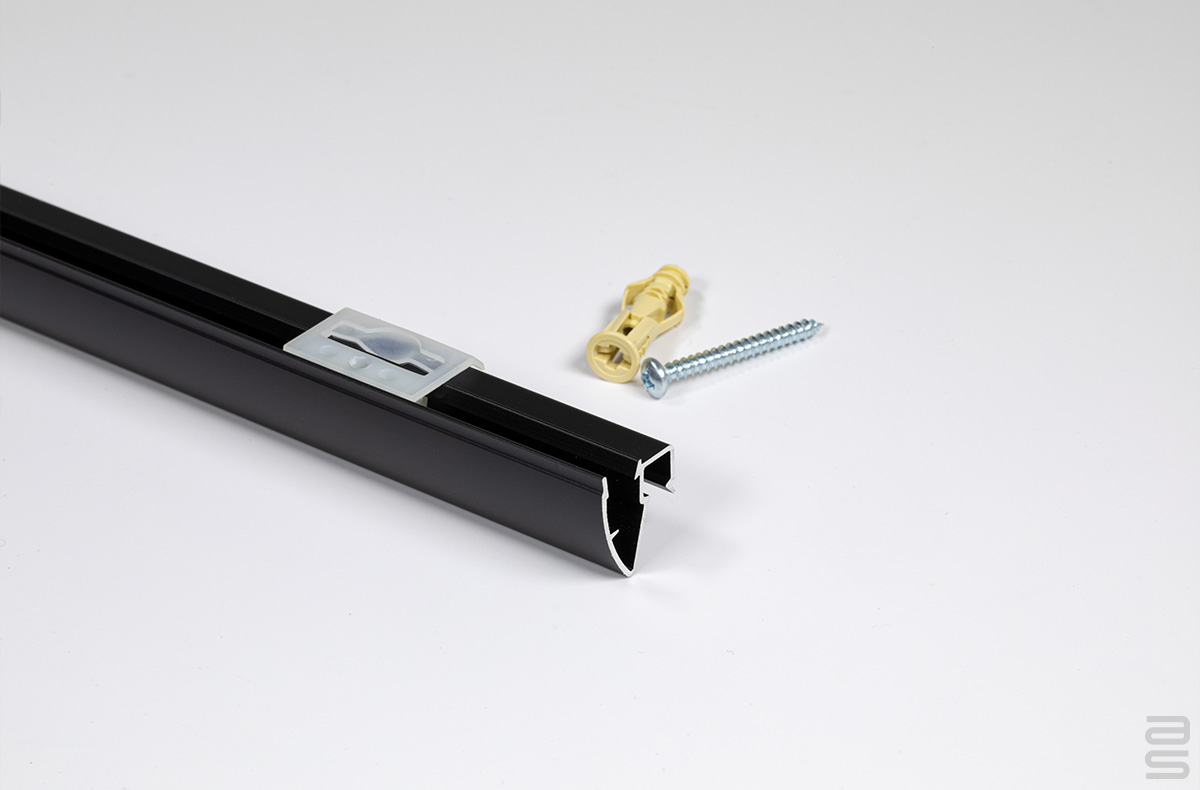
Fasteners and Adhesives:
For attaching the rail to the wall, you’ll likely use screws. But where do you screw? If you’re lucky, your walls have wooden studs conveniently located where you want your rail. If not, you’ll need some good quality wall anchors. The type of anchor will depend on your wall material (plaster, drywall, etc.). Your friendly neighborhood hardware store guru can help you pick the right ones. For a super secure finish, some people also use a bit of construction adhesive along the back of the molding before screwing it in. It’s like giving your rail a really strong hug from the wall.

Tools of the Trade:
- Measuring tape: For precision. Because “eyeballing it” is usually how you end up with a crooked rail and a slightly skewed sense of reality.
- Pencil: For marking. Be gentle; we’re not vandalizing, we’re decorating!
- Level: Your new best friend. This little beauty ensures your rail is as straight as a Roman emperor’s decree.
- Saw: To cut the molding to size. A miter saw is ideal for nice, clean angles, but a good handsaw will do the trick if you're feeling particularly Herculean.
- Drill: For pilot holes and driving screws. Make sure you have the right drill bits for wood and for your anchors.
- Screwdriver: If you prefer manual labor or your drill battery has decided to take a nap.
- Sandpaper: To smooth out any rough edges after cutting.
- Caulk: For filling any tiny gaps between the rail and the wall, or between rail sections. It’s the secret weapon of a flawless finish.
- Paint and paintbrush: To match your wall or trim color.
- Stud finder: If you're lucky enough to have studs in the right places. It’s like a treasure detector for your wall’s bones.
- Safety glasses: Because nobody wants sawdust in their eyeballs. Ouch.
The Grand Installation: Step-by-Step (No Tears Allowed!)
Okay, deep breaths. We’re going to break this down into manageable steps. Imagine you’re following a recipe for your favorite cookies, but instead of flour and sugar, we’re using wood and ambition.
Step 1: Planning and Measuring – The Blueprint of Your Dreams
First, decide where you want your picture rail to go. The traditional height is about 8-12 inches below the ceiling. This gives a nice visual balance. Hold a piece of molding up there and see how it looks. Use your pencil to mark the desired height at a few points around the room. Then, use your level to connect these marks and draw a faint line around the entire room. This is your guide. Don't draw too dark, or you’ll be scrubbing for days.
Measure the length of each wall where you’ll be installing the rail. If you’re planning on having a continuous rail around the whole room, add up all those lengths. Remember that extra piece of molding we bought? Now’s when you start to appreciate its existence. If you have corners, you’ll likely want to cut the molding at a 45-degree angle (a mitered joint) so the pieces fit together nicely. This is where a miter saw shines, but you can achieve it with a miter box and a handsaw too. It takes a bit more finesse, but it's totally doable.
Step 2: Cutting the Molding – Precision is Key!
Take your picture rail molding and carefully measure and mark it for your first cut. If you’re doing a corner, set your saw (or miter box) to 45 degrees and make the cut. Repeat for the other piece that will meet it. Test the fit. Does it look like a tiny, elegant handshake between the two pieces of wood? Perfect. Do this for all your sections. Don’t forget to sand down any rough edges after cutting. Smoothness is next to godliness, or at least, next to a professional-looking finish.
Step 3: Finding Your Wall’s Bones (or Using Anchors)
This is where the stud finder comes in handy. If you find studs along your marked line, that's fantastic! You'll screw directly into those. Mark the stud locations clearly. If you’re not lucky enough to have studs exactly where you need them, don't despair. You'll need to use wall anchors. There are many types: plastic expansion anchors, toggle bolts, self-drilling drywall anchors. The best choice depends on your wall material and the weight of your pictures. When in doubt, ask for advice at the hardware store. You’ll want to pre-drill holes for your anchors and screws. Make sure the holes are the correct size for your chosen hardware.
Step 4: Attaching the Rail – The Moment of Truth!
Now for the exciting part! You can either pre-drill pilot holes through the molding itself where you plan to screw it into the wall (and into studs or anchors), or you can hold the molding up, mark the hole locations through the molding onto the wall, remove the molding, drill the holes (and insert anchors if needed), and then reattach the molding. The second method can sometimes be easier for achieving a perfectly straight line.
Hold the first piece of molding up to your marked line. Use your level to make sure it’s perfectly straight. Now, screw it into place. Start with one screw, check the level again, and then add more screws, spacing them out evenly. If you’re using adhesive, apply a thin bead to the back of the molding before screwing. Repeat for all your sections. If you have a long run of wall, you might need to temporarily prop up the molding while you're screwing it in. Friends, clamps, or a strategically placed stack of books can all be your allies here.
Step 5: The Finishing Touches – Making It Sing!
Once all the molding is up, take a step back and admire your handiwork! Now for the magic part: caulk. Use a fine bead of paintable caulk to fill any small gaps between the molding and the wall, or along the mitered joints. Smooth it with your finger (dipped in water) or a damp cloth. This makes it look like the molding is part of the wall, not just stuck on.
After the caulk dries, it’s time to paint! Match your wall color or your trim color. A fresh coat of paint will hide any pencil marks, fill in any tiny imperfections, and give your picture rail that seamless, professional look. If you used different pieces of molding, painting them all the same color is crucial for a cohesive appearance.
Hanging Your Treasures: The Gallery Reveal!
The picture rail is up, it’s painted, and it’s looking absolutely fabulous. Now for the best part – hanging your art! Simply attach a picture rail hook to your molding. You can slide it along the rail to find the perfect spot. Then, attach your picture wire or cord to the hook. Now, hang your artwork! Adjust the wire to get the height just right. You can even use multiple hooks for heavier items or to create a more dynamic display.
This is where that flexibility really shines. Want to rearrange your gallery? Just slide the hooks! Want to add a new piece? Just add another hook! It’s like having a constantly evolving art exhibition in your own home.
A Job Well Done!
And there you have it! You’ve successfully transformed your walls from blank canvases into sophisticated display spaces. You’ve tackled a project that adds both beauty and functionality to your home. You’ve probably learned a new skill, conquered a few fears, and most importantly, you’ve created a space that truly reflects your personality and your taste. Go ahead, give yourself a pat on the back (or maybe a celebratory cookie – you’ve earned it!). Your walls (and your future decorating self) will thank you for it. Now go forth and hang, my friend, hang with pride!

