How To Put Up A Dart Board

Remember that dusty corner in the garage, or maybe the blank wall in the rec room that just seemed to be waiting for something? Well, my friends, that something is almost certainly a dartboard. It’s the humble gateway to countless evenings of friendly competition, questionable aiming, and the occasional dramatic comeback that will be recounted for years to come. And guess what? Putting one up is way less intimidating than you might think.
Think of it as an adventure, a miniature home improvement project that doesn't require a degree in engineering or a fleet of power tools. It’s more about a spirit of can-do and maybe a little bit of elbow grease. Plus, there's a certain satisfaction in transforming a forgotten space into the beating heart of your social life, one perfectly aimed dart at a time.
The Unboxing Ceremony
First things first, you have to get your hands on the prize! This usually involves a sturdy cardboard box. Inside, nestled amongst protective packaging that probably looks like it survived a small, controlled explosion, you'll find your glorious dartboard. It’s a beautiful thing, a circular universe of numbers and colors, promising hours of fun.
Must Read
Take a moment to admire it. This isn't just a piece of sporting equipment; it's the centerpiece of future legendary throws. It might even have a faint, intoxicating smell of compressed sisal fibers, a scent that promises adventure.
Gather Your Trusty Sidekicks
Before you go wild with a hammer, let's talk about your supporting cast. Most dartboards come with a mounting kit. This usually includes a clever bracket or a set of screws and wall anchors. Your trusty level, a pencil, and a drill (or, if you're feeling very old school, a sturdy screwdriver and some brute force) will be your best friends.
Don't forget your measuring tape! Accuracy is key here, not just for the darts, but for making sure your masterpiece is straight. A slightly crooked dartboard can lead to some… interesting debates about physics.

Location, Location, Location!
This is where the magic begins. You need a wall that can handle a few stray darts (and trust me, there will be a few). A solid, unyielding wall is your best bet. Think concrete, brick, or a stud in a drywall. Avoid anything that feels flimsy or hollow, unless you enjoy patching up drywall more than playing darts.
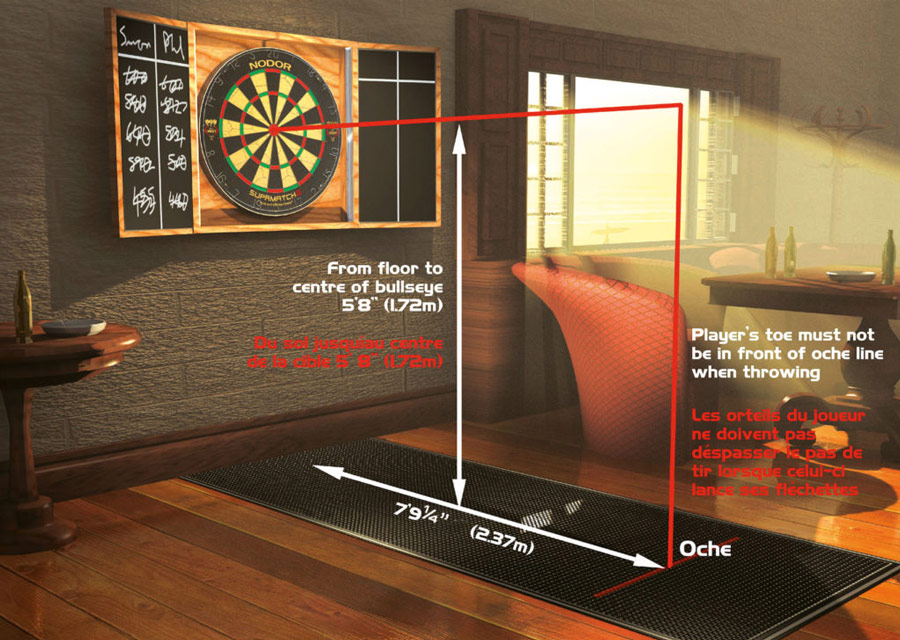
Consider the space around the board too. You need room to stand, to swing your arm with gusto, and to not accidentally nail your grandma's prize-winning ceramic cat. A good rule of thumb is about 10 feet of clear space in front of the board. This gives everyone enough room to unleash their inner Phil "The Power" Taylor.
The Height of Success
Now, the crucial measurement: height! The official height for a dartboard is 5 feet 8 inches from the center of the bullseye to the floor. This is a standard, so if you want to play by the rules (or at least pretend to), stick to this. It’s the perfect height for most adults to comfortably reach and throw.
Imagine yourself standing there, board at the perfect height. It's a moment of quiet contemplation before the storm of flying darts. This is the height that separates the amateurs from the… well, slightly less amateur.
Marking Your Territory
Grab your pencil and that trusty level. Hold the dartboard up to the wall, or at least the mounting bracket. Use the level to make sure it's perfectly horizontal. Mark the spots where the screws will go. This is where a steady hand and a cooperative wall are essential.
If you’re using a bracket, you might need to screw that to the wall first. This bracket acts like a little cradle for your dartboard, holding it securely. It’s like giving your dartboard a comfy little home.
Drilling for Victory
Now comes the part that might make some people a little nervous: the drill! If you're drilling into a stud, you can probably get away with a smaller drill bit. If you're going into drywall, you'll likely need those wall anchors. These little plastic or metal doodads spread out behind the drywall to give your screws something solid to grip.
Make sure you're using a drill bit that’s the right size for your screws or anchors. Too small and it won't go in; too big and you'll have a gaping hole. It's a delicate balance, like aiming for the treble 20.
The Big Reveal: Attaching the Board
Once your holes are drilled and your anchors are in (if needed), it’s time to attach the mounting hardware. Screw the bracket or the direct mounting screws firmly into the wall. Give them a good tug to make sure they’re secure. You don’t want your dartboard making a dramatic descent mid-game.
Now, the moment of truth. Lift your dartboard and align it with the bracket or the screws. Many boards simply hang on a hook or a set of screws. It might click into place with a satisfying thunk.

It's a bit like giving your dartboard a hug and saying, "Welcome home!"
Accessorizing Your New Arena
Almost there! Most dartboards don't come with a light. And let's be honest, playing darts in the dark is a recipe for disaster (and a lot of lost darts). You can get a simple dartboard light that clamps around the rim, or a more elaborate setup. A well-lit board makes all the difference.
And of course, you'll need darts! If you're just starting, don't go for the most expensive ones. Get a few sets, try them out, and see what feels right in your hand. They're like extensions of your throwing arm.
The First Throw
Step back, admire your handiwork. You’ve done it! You’ve brought a dartboard into existence. Now, pick up your darts, take a deep breath, and throw that first dart. It might land in the double 1, or it might be a glorious 180. It doesn’t matter.
What matters is the shared laughter, the friendly banter, and the creation of memories. This simple act of putting up a dartboard has opened the door to a world of fun, right in your own home. So go ahead, challenge someone, and let the games begin!