How To Put Kt Tape On Knee

Alright, let's talk knees. That unsung hero of our daily adventures, from conquering that grocery store stairwell to nailing that epic dance move (even if it's just in your living room). But sometimes, our knees whisper (or, let's be honest, sometimes they shout) for a little extra TLC. And that's where our colorful friend, KT Tape, swoops in like a stylish, supportive superhero.
Now, before you imagine a complex surgical procedure involving scalpels and a stern doctor, take a deep breath. Applying KT Tape is less like brain surgery and more like… well, let's say it's a bit like mastering the art of the perfect avocado toast – a little practice, a touch of intuition, and suddenly you're a pro. And who knows, maybe you'll even start coordinating your tape color with your outfit. We’re all about that holistic vibe, right?
Think of KT Tape as your personal cheer squad for your joints. It's designed to provide support and stability without restricting your movement. It’s that gentle nudge, that "you got this!" when your knee feels a little wobbly. It's the modern-day equivalent of those ancient healing practices, but with a science-backed twist and a whole lot more color options than your grandma's bandages.
Must Read
So, ditch the dread and let's get taping. We're going to break it down into simple, no-fuss steps, sprinkled with a few fun tidbits to keep things breezy.
The Prep: Setting the Stage for Success
Before we even think about peeling off that backing paper, let's get our workspace (and ourselves) ready. This is our pre-game ritual, the calm before the taping storm. Think of it as prepping for a great playlist – you wouldn't just hit shuffle and expect perfection, right?
First things first: clean skin. This is non-negotiable. Oils, lotions, sweat – they're all the arch-nemeses of good tape adhesion. Give your knee area a good wash and make sure it's completely dry. Think of it as creating a smooth canvas for your artistic endeavor. A little bit of alcohol wipe can work wonders here too, for that extra squeaky-clean feel.
Next, hair management. Now, this can be a sensitive topic for some. If you have a significant amount of hair in the area, it can be a bit… ouchy when you remove the tape. The simplest solution? Trim it down. You don't need to go for a full buzz cut, just a light trim will make the whole experience significantly more pleasant. Think of it as a mini-haircut for your knee, a little self-care before the self-care.
Finally, rounding the corners. This is a pro-tip that will save you future grief. Before you apply the tape, gently round the corners of your cut strips. Why? Because sharp corners are more likely to catch on clothing and peel up prematurely. It's the little things, you know? Like putting the cap back on the toothpaste. Small effort, big payoff.
The Application: Let's Get Down to Business (But Make it Fun!)
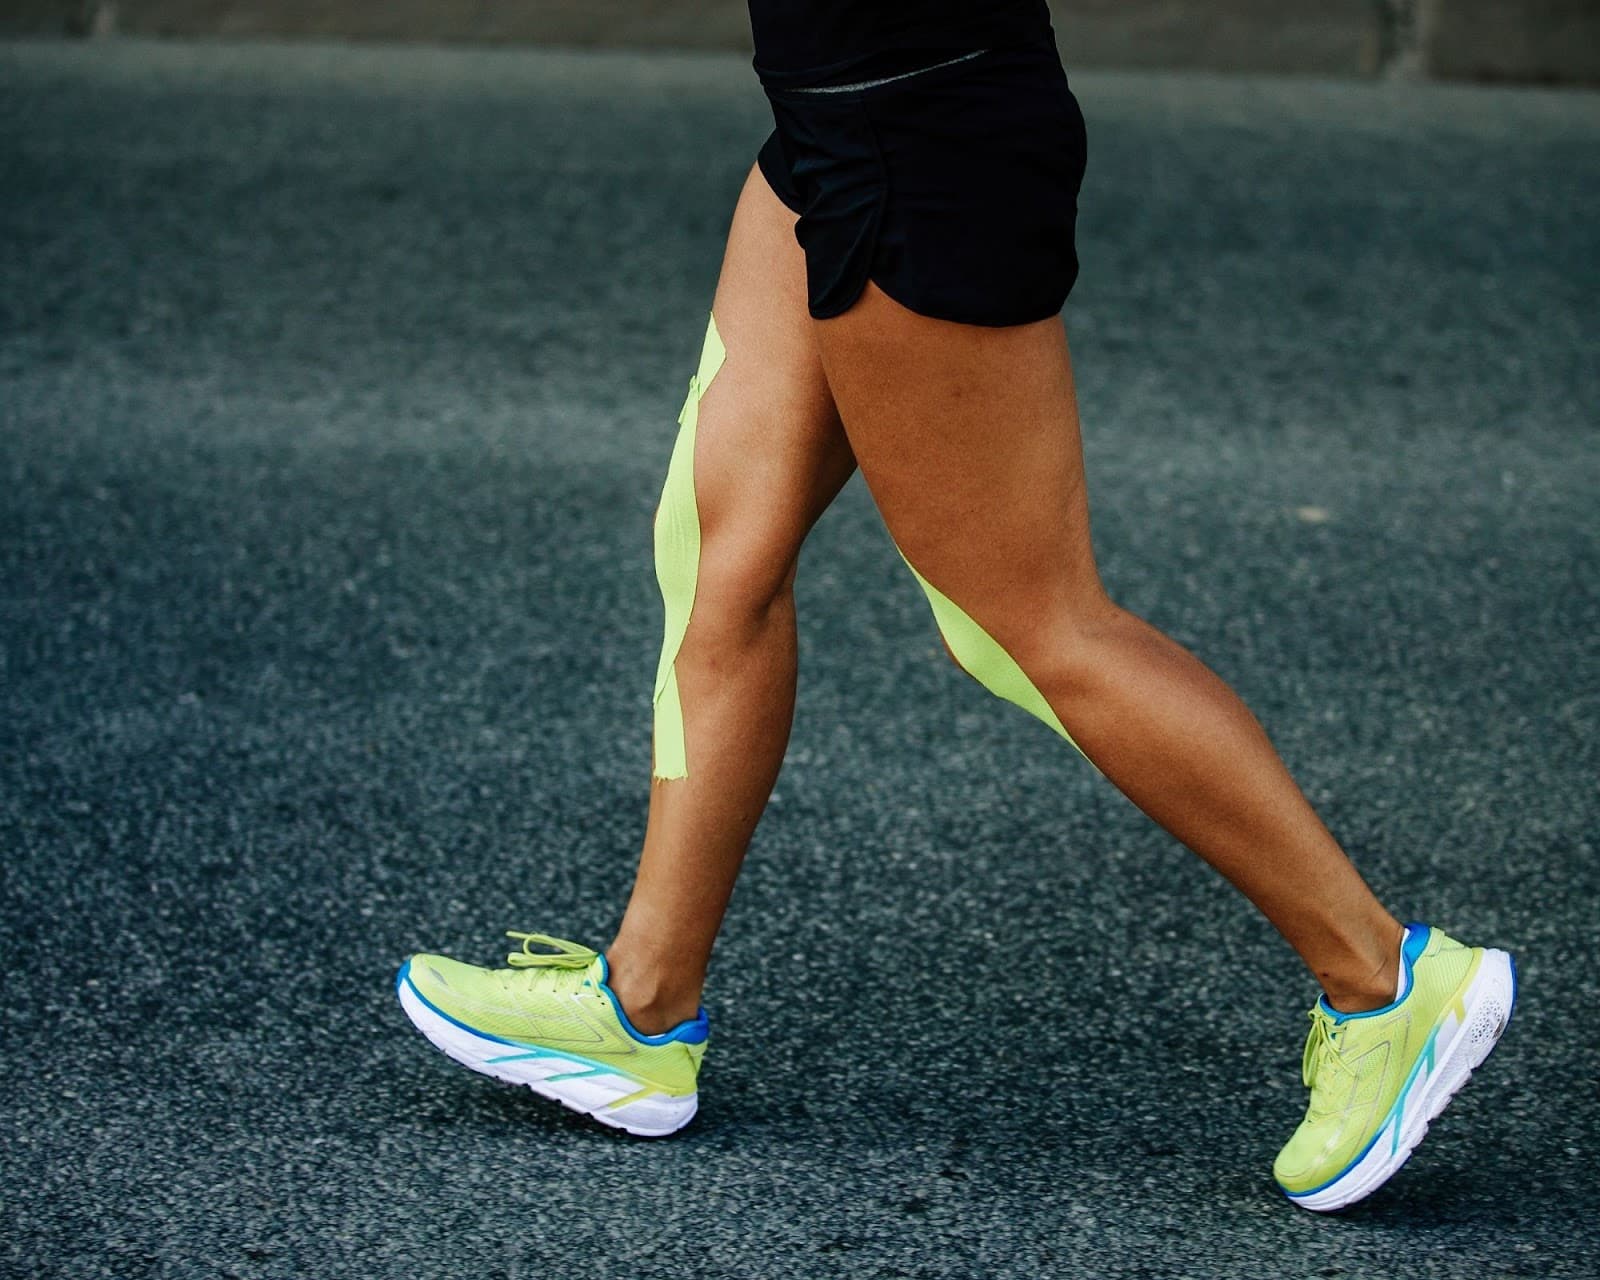
Alright, the stage is set. Time to introduce our star player: the KT Tape. For a basic knee application, we're usually looking at two strips, maybe three depending on your needs. Let's start with the most common setup.

The Anchor Strips: Building the Foundation
For our first two strips, we're going to aim for a bit of a "horseshoe" or "I" shape around the kneecap. This is all about providing support to that delicate area.
Strip 1: The Support Beam
Take one strip of tape and tear the backing paper about 2-3 inches from one end. This unpeeled portion is our "base". Lay this base down without any stretch on the skin, just below your kneecap. Think of it as anchoring your boat before you set sail.
Now, gently lift the rest of the backing paper as you bring the tape up and over your kneecap. For this strip, you'll want about 25-50% stretch. Not too tight, not too loose. Imagine you're gently hugging your knee. You're aiming to lift and support, not to constrict. The sweet spot for stretch is crucial; too little and it won't do much, too much and it can cause irritation. It’s a delicate dance!
Once the tape is in place, rub it firmly. This is key! The heat from your hands activates the adhesive. You'll feel it get a little warm. This friction is your friend; it ensures that tape sticks like a champ, ready for whatever your day throws at it. Think of it as giving your tape a motivational pep talk. "You can do it! Stick with it!"
Strip 2: The Complementary Hug

Now, for our second strip. Again, tear the backing paper about 2-3 inches from one end. This time, place the base just above your kneecap, also without any stretch. This is the upper anchor.
Gently peel off the rest of the backing paper as you bring the tape down and under your kneecap. Similar to the first strip, you're aiming for that 25-50% stretch. This creates a supportive cradle around your kneecap.
Again, the final step is to rub it firmly. Get that heat activated! This creates a strong bond and maximizes the tape's effectiveness. You're essentially building a dynamic duo of support here.
The Optional Third Strip: The Extra Boost (If Needed)
Sometimes, your knee might need a little extra love, especially if you're dealing with specific pain points or instability. This is where a third strip can come in handy.
Strip 3: The Stabilizer (The "X" Factor)
For this strip, you'll typically cut the tape in half lengthwise, creating two narrower strips. You can also use a full strip if your need is greater. This is where you can get a little creative, almost like a Kinesiology Tape Picasso.
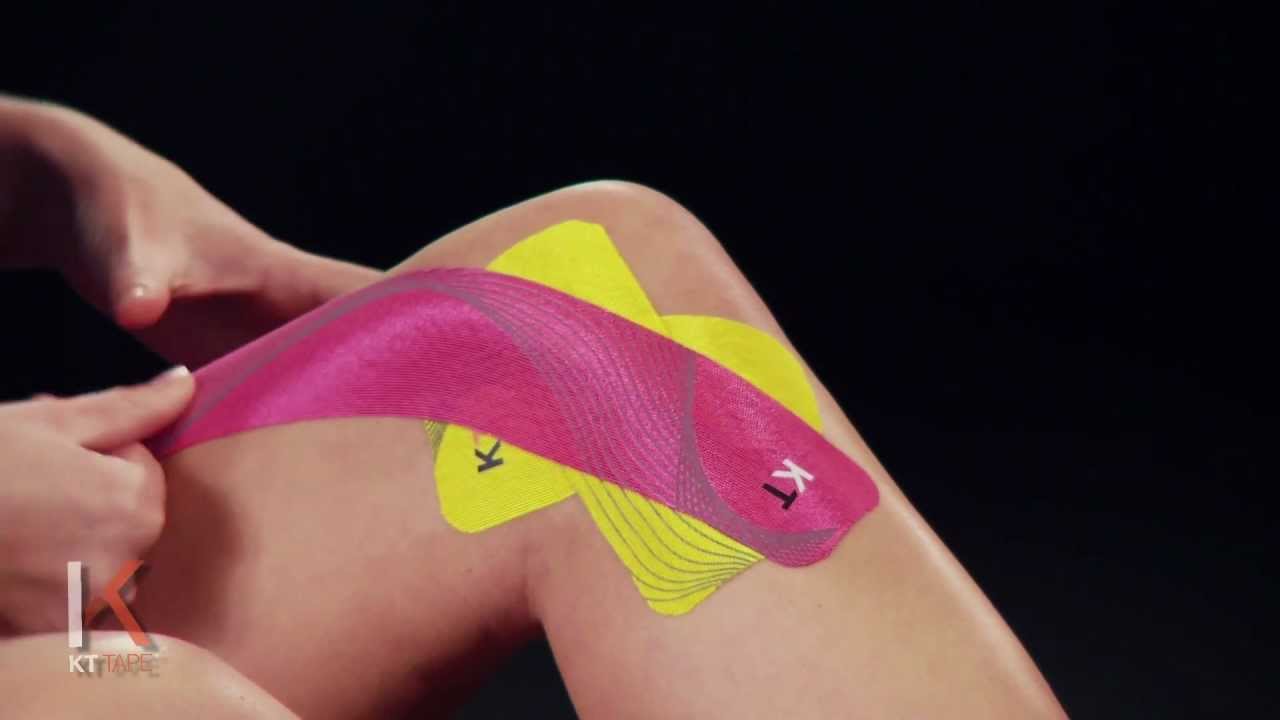
One popular method is to create an "X" shape. Take one of your narrower strips. Anchor one end on the front of your thigh, just above the kneecap. Then, with about 50-75% stretch (a bit more tension here for targeted support), bring the tape down and across the front of your knee, ending on the opposite side of your calf. Again, rub to activate the adhesive.
Repeat with the second narrow strip, creating the other half of the "X". You'll want the intersection of the "X" to be directly over your kneecap. This method provides excellent stabilization and can help with pain in the front of the knee. It's like giving your kneecap a gentle, stabilizing hug from all angles.
Another option for a third strip is a simple vertical application. Place one end on your hamstring (back of the thigh) with no stretch. Bring the tape down over the back of the knee with 25-50% stretch, anchoring the other end on your calf. This can help with pain behind the knee. It’s all about finding what feels best for your knee.
Fun Facts and Cultural Nods: Because Learning Should Be Entertaining
Did you know that KT Tape was originally developed by a Japanese chiropractor named Dr. Kenzo Kase back in the 1970s? He was looking for a way to support muscles and joints without restricting movement, drawing inspiration from traditional Asian healing methods. It’s like a modern take on ancient wisdom, brought to you in a rainbow of colors!
And let's talk about the colors! While the technology is the same regardless of hue, the different colors have taken on a life of their own. Athletes often choose colors to match their team uniforms, and it’s become a visual cue for "this person is performing at their peak." It’s also become a fashion statement in the fitness world. Who knew that a therapeutic tape could be so… chic?
Ever see those athletes with colorful tape on their legs or shoulders during the Olympics? That’s often KT Tape! It’s been embraced by athletes across pretty much every sport imaginable, from football and basketball to swimming and running. If it’s good enough for an Olympic athlete, it’s probably pretty darn good for your weekend hike.

The concept of "taping" for support isn't entirely new, of course. Think about old boxing movies where fighters get their hands wrapped. This is a more advanced, targeted form of that same principle: providing external support to allow internal healing and optimal performance.
The Longevity: How Long Does This Magic Last?
This is the million-dollar question, isn't it? Generally, KT Tape is designed to stay put for 3 to 5 days, even through showers and workouts. The secret? Proper application and that crucial step of rubbing it in. If it starts to peel at the edges after a day or two, a quick rub can often re-activate the adhesive.
When it's time to remove it, do so gently. It's best to remove it in the direction of hair growth, and if it's being stubborn, you can moisten it with warm water or a bit of baby oil to help loosen the adhesive. Think of it as a gentle farewell, not a rip-roaring goodbye.
A Moment of Reflection: Beyond the Tape
So, there you have it. A simple guide to taping your knee, transforming it from a potential pain point into a more resilient, supported part of your everyday. But beyond the practical application, there’s a little something more to consider.
This act of self-care, of taking a few minutes to address a niggle or a pain, is a powerful thing. In our go-go-go world, it’s easy to push through discomfort, to ignore those subtle signals our bodies are sending us. But by choosing to use KT Tape, you're choosing to listen. You're choosing to proactively support yourself, to acknowledge that your well-being matters.
It’s a small investment of time and energy, but the ripple effect can be significant. A comfortable knee means a more enjoyable walk, a more enthusiastic participation in your child’s playground adventures, a less hesitant climb up those stairs. It’s about reclaiming your freedom of movement, your ability to engage with life without a nagging whisper of pain.
And in a way, that’s what this easy-going lifestyle is all about, isn’t it? It’s not about grand gestures, but about the consistent, mindful choices we make to nurture ourselves. It’s about finding those little tools, those simple practices, that help us move through life with a little more ease, a little more joy, and maybe, just maybe, a perfectly coordinated tape job. Now go forth and conquer that day, one supported step at a time!