How To Put In A Septic Tank
Hey there, DIY warrior! So, you're thinking about tackling the not-so-glamorous, but oh-so-essential, task of putting in a septic tank? My friend, you've officially leveled up in the "responsible homeowner" game. Forget those fancy IKEA furniture builds; this is the real deal. Don't worry, though. We're going to break this down like it's a giant, slightly smelly, Lego set. Think of me as your trusty sidekick, armed with a virtual shovel and a can-do attitude. Let's dive in, shall we? (Just, you know, not literally into the tank itself. That's a whole other adventure we're not signing up for today).
First things first, let's talk about why anyone would embark on this journey. Usually, it’s because you're in a lovely spot that the municipal sewer gods haven’t graced with their presence. That’s okay! It just means you get to be the master of your own… well, waste management. And hey, think of the bragging rights! "Yeah, I installed my own septic system. What did you do this weekend?" Mic drop.
Now, before you grab your work gloves and a prayer, let's get real for a sec. This isn't a "nip out for a quick hardware store run" kind of job. This is a significant undertaking. It requires planning, permits, and a whole lot of elbow grease. If you're looking for a weekend project to impress your neighbors with your perfectly mulched flowerbeds, this ain't it. This is more of a "prepare for a few weekends of glorious dirt therapy" situation. But hey, at least you'll have a fantastic story to tell at parties!
Must Read
The "Before You Dig" Bonanza
Alright, my intrepid installer, before we even think about moving a single grain of dirt, there's a crucial pre-game ritual. This is where we channel our inner super-spy and gather intelligence. And trust me, the information you gather now will save you a mountain of headaches later. Think of it as your "avoiding a plumbing apocalypse" checklist.
Permits, Permits, Glorious Permits! Yes, I know, the word "permit" can send shivers down your spine. It conjures images of endless paperwork and stern-faced officials. But, my friend, in the world of septic systems, permits are your best buddies. You absolutely need to get in touch with your local health department or building authority. They'll have the official rules, regulations, and the magical paperwork that says you're allowed to proceed. Skipping this step is like trying to bake a cake without preheating the oven – you're just setting yourself up for disappointment (and potentially a very large fine).
Site Assessment: Your Septic Psychic Session. This is where you become one with the land. You need to figure out where your septic tank and drain field will go. Think about things like:
- Slope: You don't want your future septic system to be on a steep hill. Gravity is your friend, but not that much of a friend when it comes to sewage.
- Water Table: Is your land swampy? Do you get floods often? If so, you might need a raised bed system or a different approach. We don't want your septic tank becoming a bathtub for the neighborhood gnomes.
- Well Distance: This is a biggie! You need to keep your septic system a good distance away from your drinking water well. Safety first, people! We're talking about keeping your water sparkling clean, not… well, the alternative.
- Property Lines and Easements: Don't accidentally plop your tank onto your neighbor's prize-winning petunias or a secret underground tunnel. Check those boundaries!
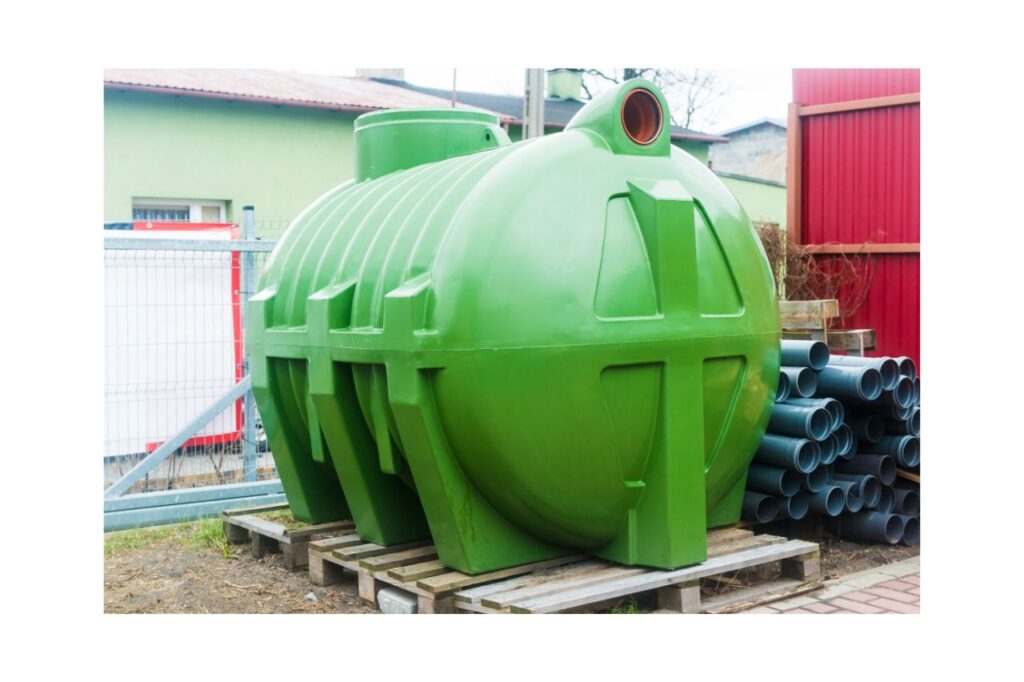
The Tank Itself: Choosing Your Chemical Companion. Septic tanks come in different shapes and sizes, and they're usually made of concrete, fiberglass, or plastic. Each has its pros and cons. Concrete is sturdy but heavy. Fiberglass is lighter but can be more expensive. Plastic is often the easiest to handle. Talk to your local suppliers and do some research. It's like picking a new pet – you want one that's a good fit for your lifestyle (and your budget!).
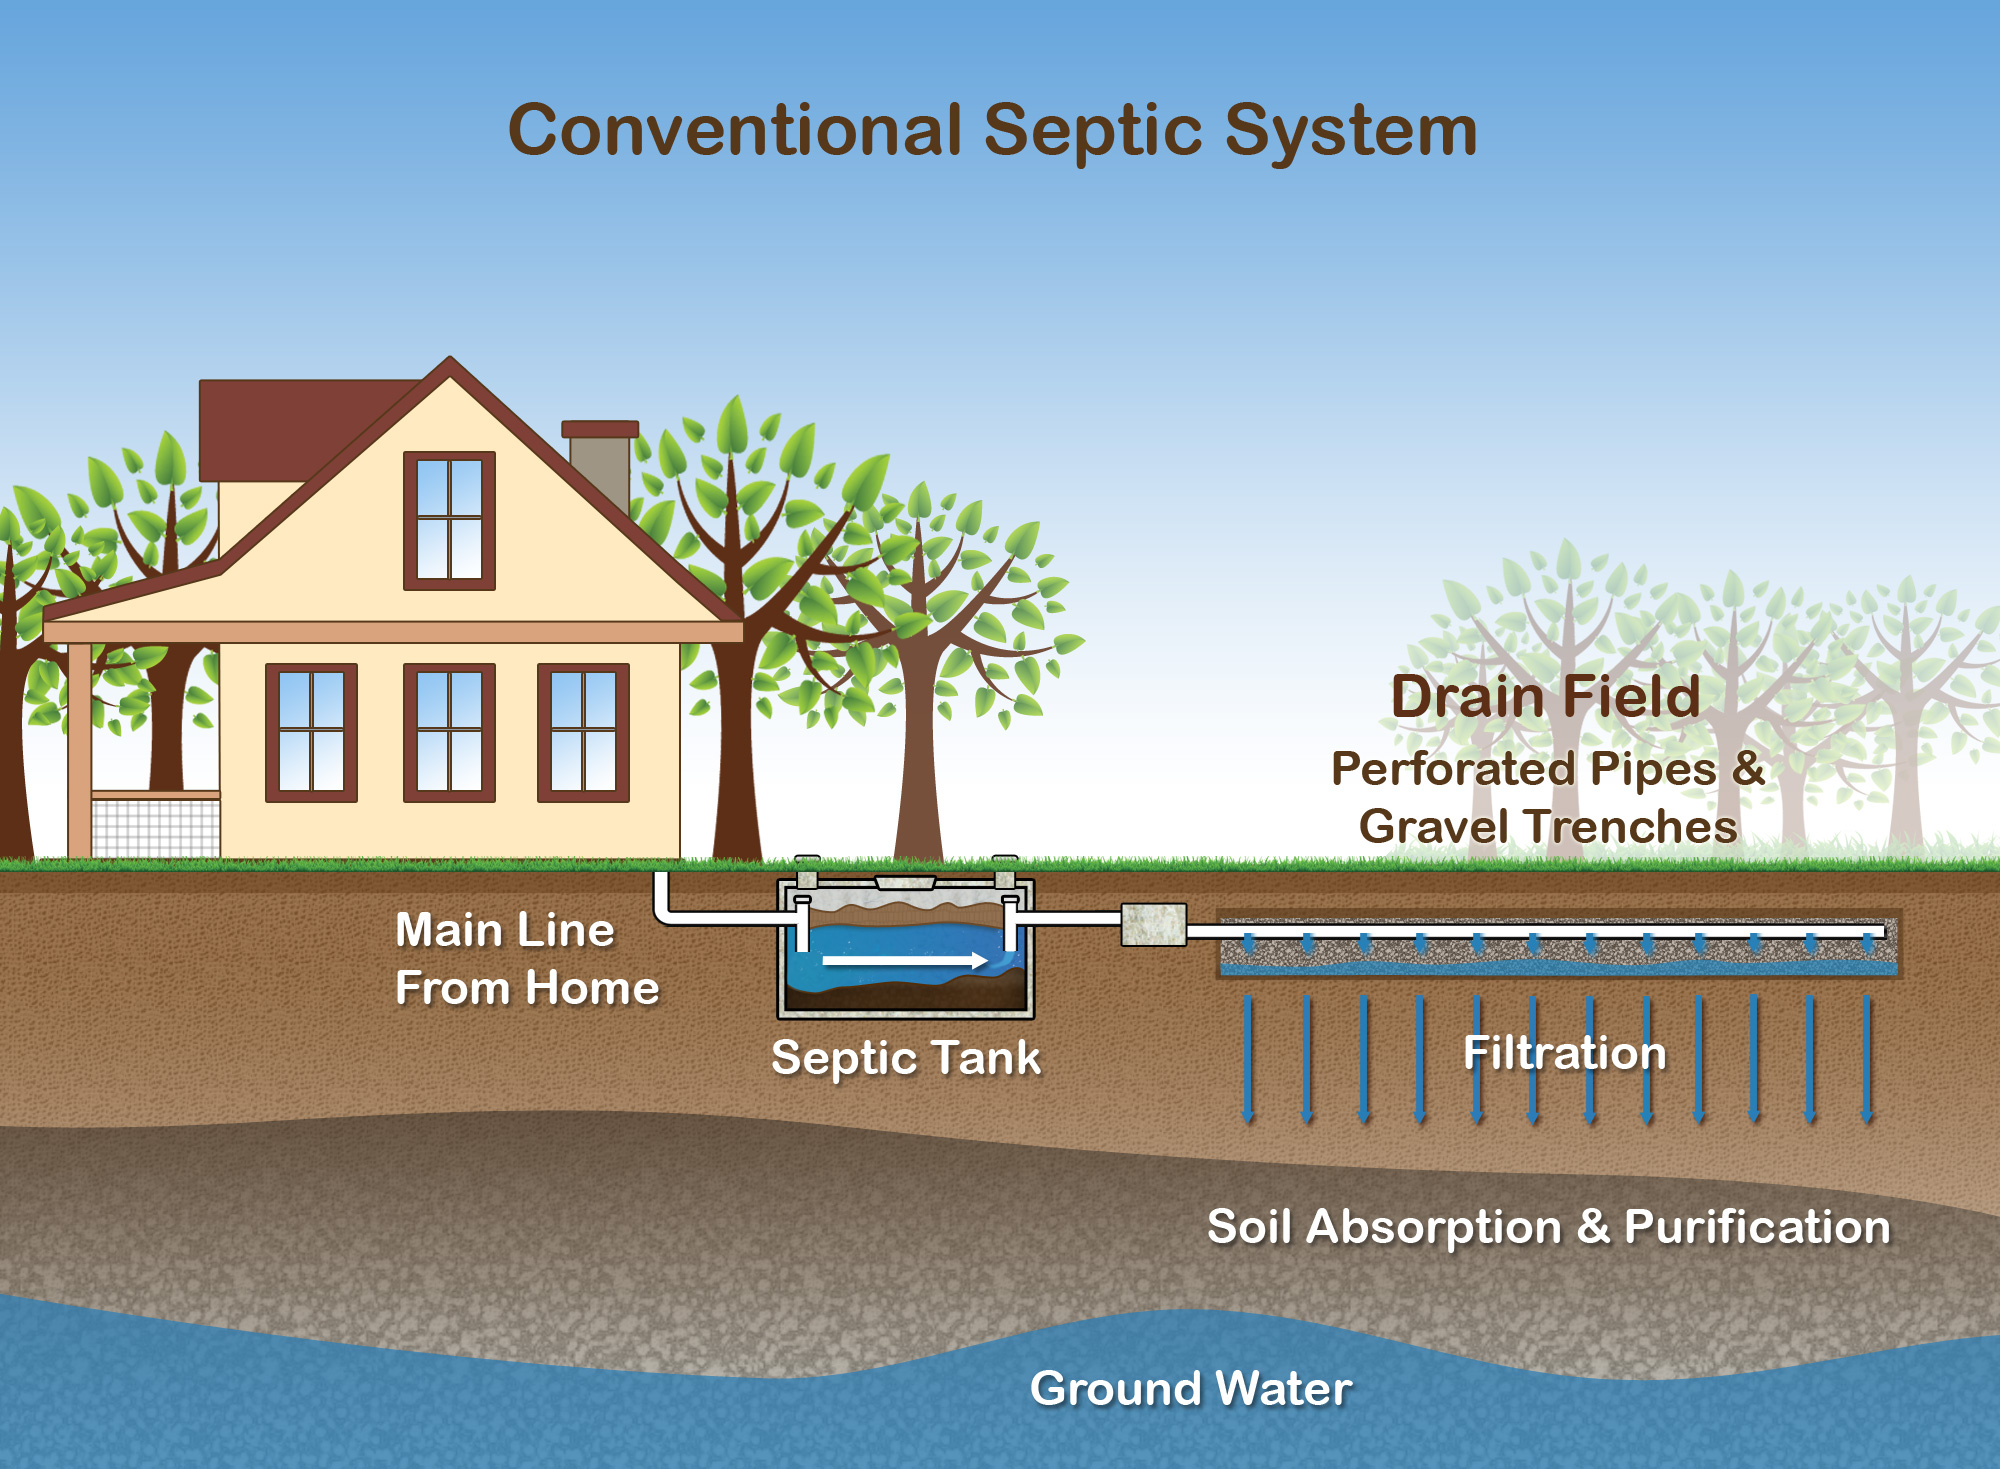
Drain Field Dynamics: Where the Magic Happens (Sort Of). The drain field, also known as a leach field, is where the treated wastewater from your tank seeps into the ground. This is super important for properly disposing of effluent. You'll need to figure out the size and layout of your drain field. Again, your local regulations will guide you here. Think of it as the spa treatment for your wastewater.
The "Let's Get Dirty" Phase
Okay, you've got your permits, you've scouted your location, and you've chosen your tank. It's go-time! This is where the real sweat equity comes in. And yes, I mean literal sweat. Maybe a little dirt under your fingernails. Embrace it!
Excavation Excitement!
This is probably the most physically demanding part. You'll need to dig a hole that's big enough for your tank and then some. We're talking a substantial pit. If you're feeling particularly ambitious (or masochistic), you could rent an excavator. Otherwise, it's you, your shovel, and a whole lot of determination. Make sure the bottom of the excavation is nice and level. We don't want a lopsided septic tank, do we? That would be… awkward.
Safety Note: Digging can be dangerous. Call 811 (or your local equivalent) before you dig to have underground utilities marked. You really don't want to accidentally cut into a gas line or a water main. That's a party nobody wants to attend.
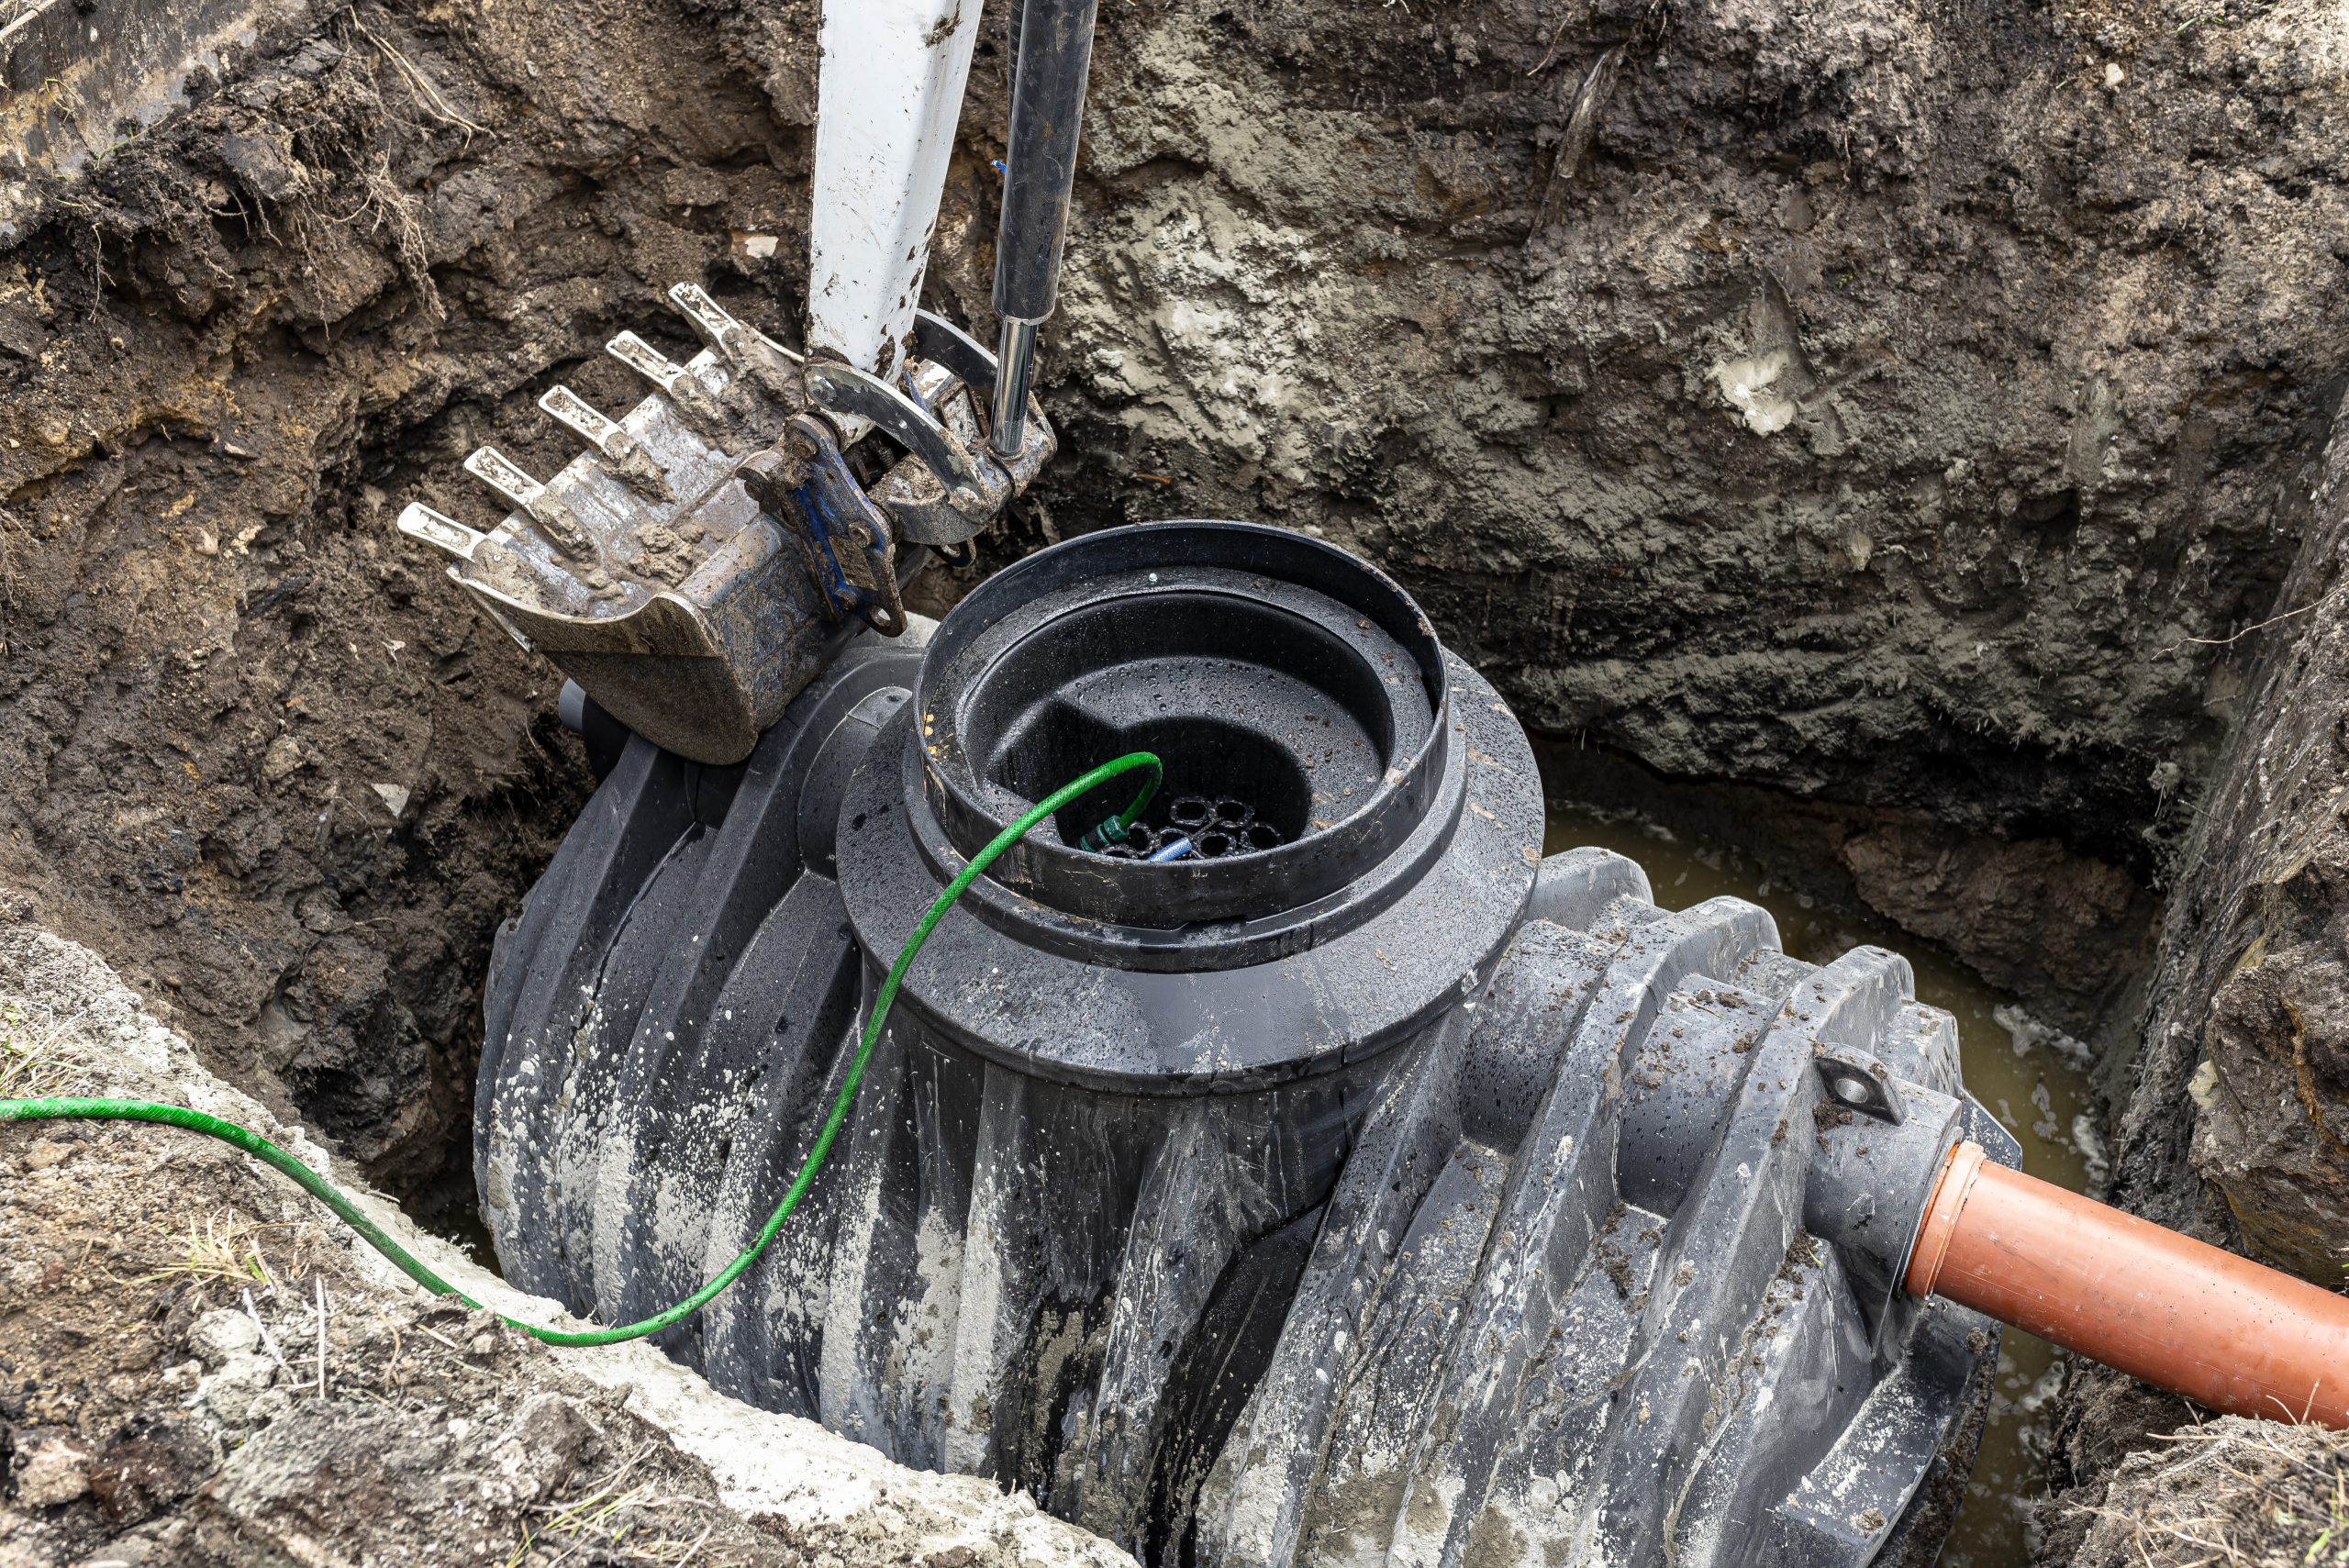
Tank Placement: The Grand Entrance
Once your magnificent hole is ready, it's time for the tank to make its grand entrance. If you've got a heavier tank like concrete, you might need a crane or some serious lifting equipment. For lighter tanks, you might be able to maneuver it with a few strong friends and some strategic leverage. Make sure it's perfectly level before you start filling in the dirt.
Pro Tip: Some people like to put a layer of gravel at the bottom of the excavation for drainage and to create a stable base. It’s like giving your tank a comfy bed.
Piping It Up: The Plumbing Symphony
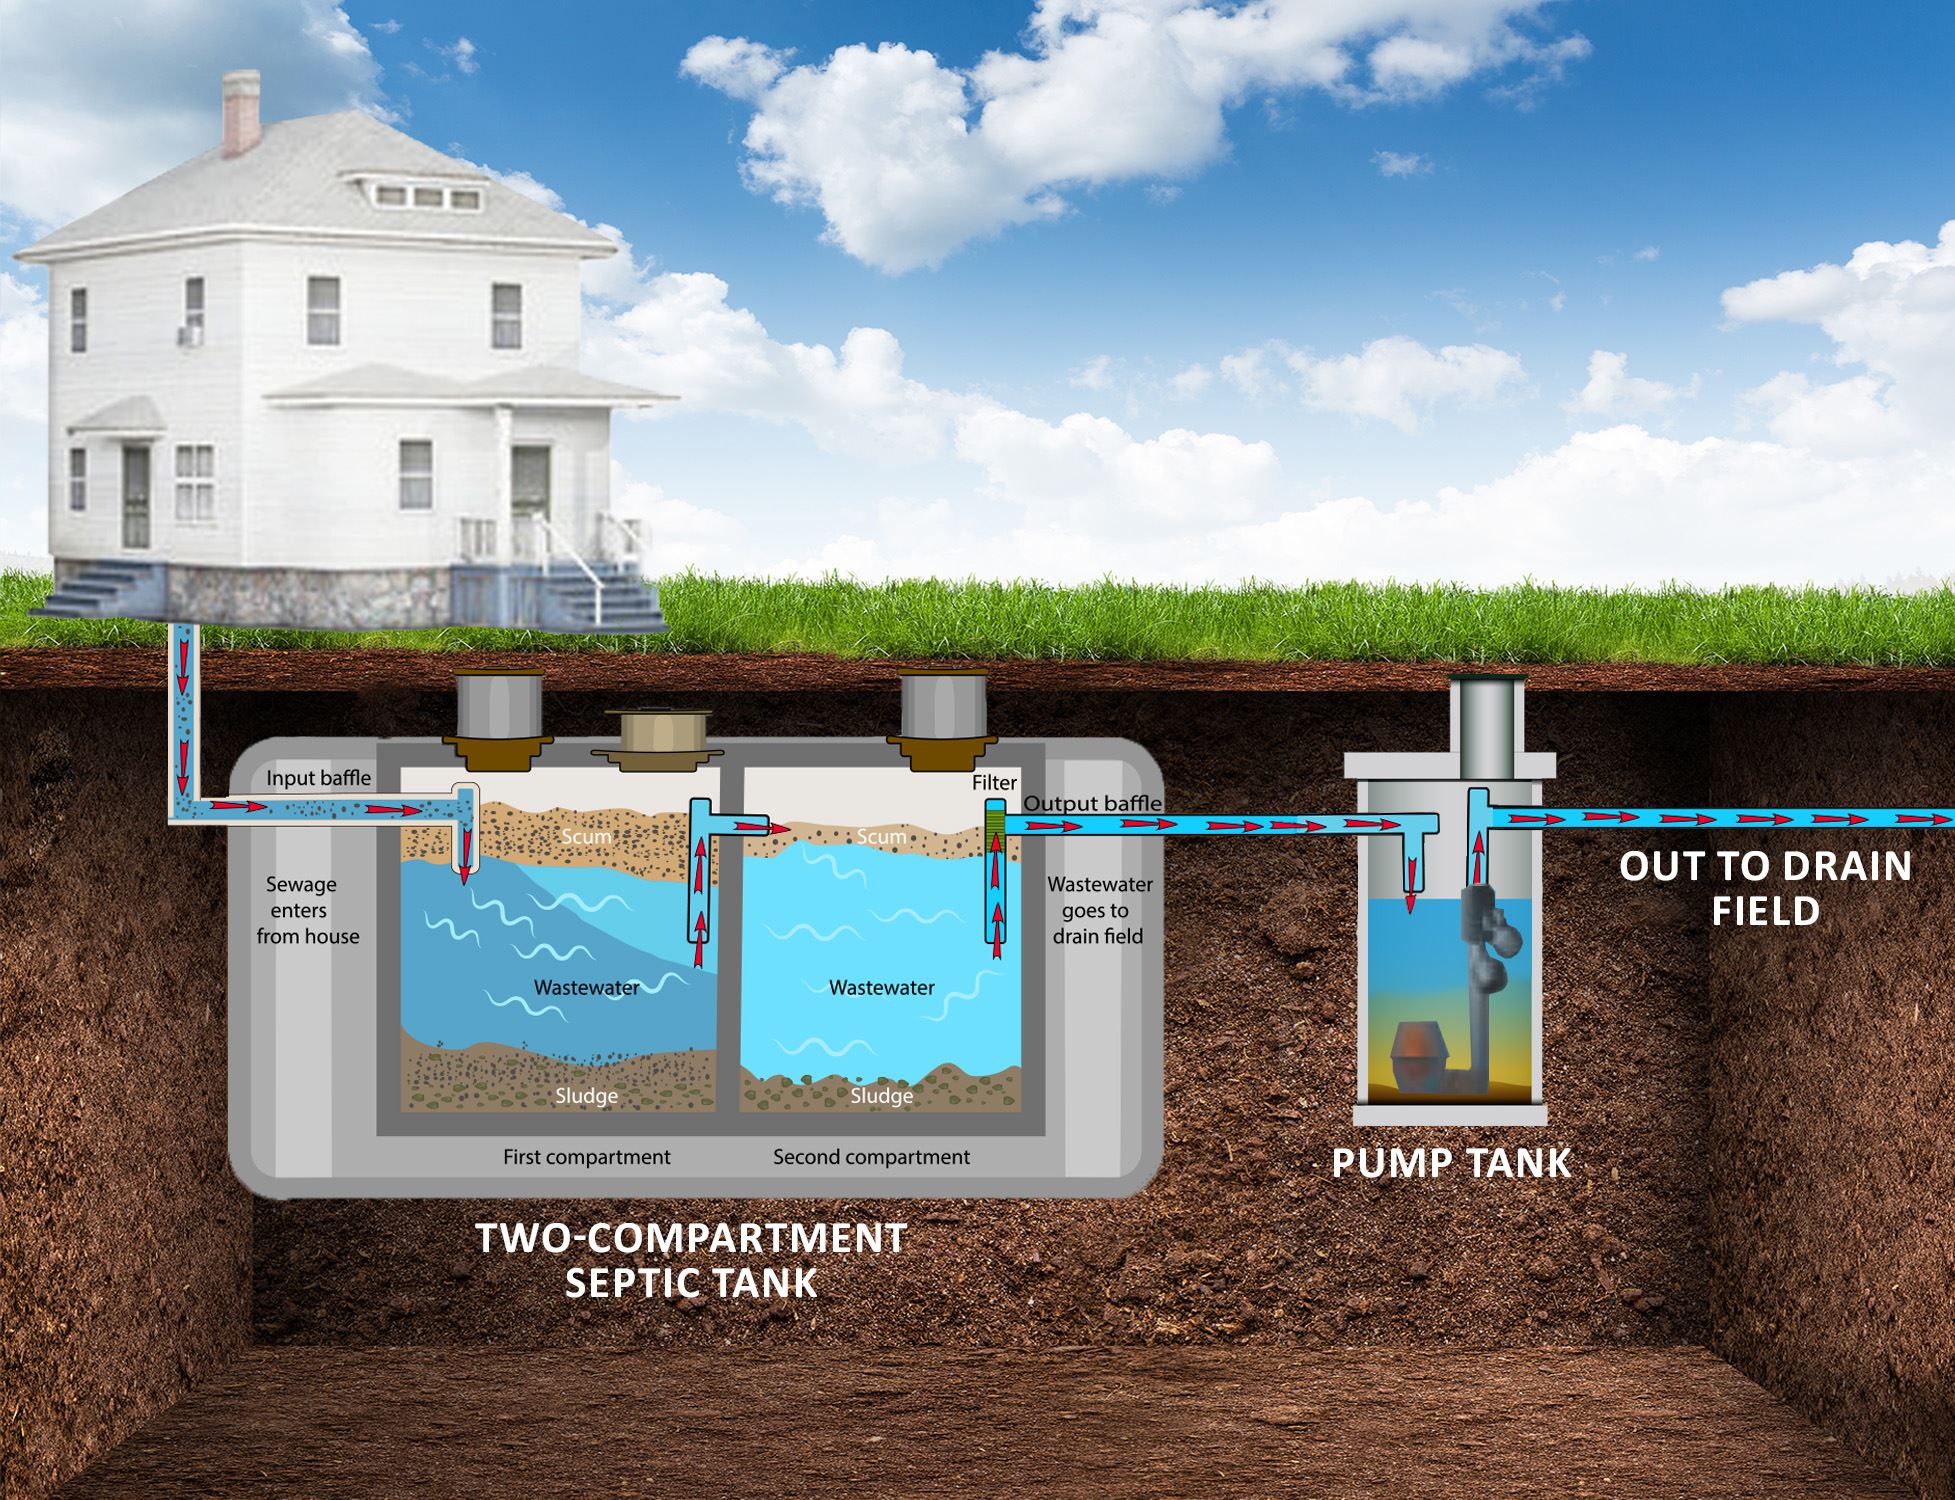
Now comes the plumbing part. You'll need to connect your house's main sewer line to the inlet of the septic tank. Then, you'll connect an outlet pipe from the tank to your drain field. This is where using the right fittings and making sure everything is sealed tight is crucial. Leaks are the arch-nemesis of a happy septic system. Think of it as a delicate dance of pipes and connectors. You want a smooth, seamless flow, not a chaotic water ballet.
Materials Matter: Use pipes designed for septic systems. They're built to handle the job. Don't go cheap here; it'll cost you more in the long run (and a lot more headaches).
Backfilling Bonanza: Burying the Beast (Nicely)
With the tank in place and the pipes connected, it’s time to backfill the excavation. This is where you carefully fill the hole around the tank with soil. You'll want to do this in layers, compacting the soil as you go. This prevents the soil from settling too much later on. Imagine you're tucking your septic tank into bed for a long, quiet nap. Be gentle, but firm!

Don't Forget the Risers! You'll want to install risers to bring the access manholes of your tank to ground level. This makes future inspections and pumping much, much easier. Trust me, you'll thank yourself later when you're not excavating just to get to your lid.
The "Finishing Touches and Future Fun" Stage
You've done the heavy lifting! You've wrestled with dirt and pipes. You deserve a pat on the back (or a cold beverage). But we're not quite done yet. There are a few more things to consider to ensure your septic system lives a long and happy life.
The Drain Field Dream
Depending on your system, you might need to prepare the drain field area. This could involve digging trenches, laying gravel, and installing perforated pipes. The goal is to allow the effluent from the tank to slowly percolate into the soil. Imagine it as a natural filtration system, working its magic underground. It’s pretty neat when you think about it – nature doing its thing!
Planting Positives: Once your drain field is ready, you can cover it with soil and plant grass or shallow-rooted plants. Avoid planting trees or shrubs with deep root systems nearby, as they can damage the pipes. Think of it as creating a lovely, functional lawn that secretly handles your… business. It’s the ultimate green initiative!
Inspection and Approval: The Final Seal of Approval
Remember those permits we talked about? Now’s the time to get your system inspected by the local authorities. They’ll want to make sure everything was installed according to code. Once they give you the thumbs-up, you’ve officially conquered the septic tank installation! Cue the confetti!
Maintenance Matters: Keeping Your System Happy
Installing the tank is a huge accomplishment, but the job isn't entirely done. You’ll need to perform regular maintenance to keep your septic system running smoothly. This typically involves having your tank pumped out by a professional every few years. Don't wait until you have a problem to call someone; proactive maintenance is key!
What NOT to flush: Avoid flushing things like grease, harsh chemicals, disposable wipes, and excessive amounts of paper products. These can clog your system and cause all sorts of unpleasantness. Think of your septic tank as a sensitive digestive system; treat it with respect!
You Did It, Champion!
So, there you have it! You've embarked on a journey that many homeowners shy away from, and you've come out victorious. You've learned about permits, sites, tanks, pipes, and the beautiful art of dirt management. You've tackled a project that directly impacts the functionality and health of your home. That's not just DIY; that's homeownership superhero stuff!
Take a moment to appreciate what you've accomplished. You've built something essential, something that will serve you and your home for years to come. You’ve not only installed a septic tank; you’ve installed a piece of self-reliance, a testament to your grit, and a fantastic story to tell. Now go on, stand tall, and bask in the glory of your perfectly functioning, self-installed septic system. You’ve earned it!