How To Insert Row In Word Table

Life, much like a well-organized spreadsheet (or, in this case, a Word table!), thrives on structure. Sometimes, though, life throws us a curveball, or perhaps we just think of a brilliant new category we absolutely need to add. That’s where the humble, yet mighty, act of inserting a row into a Word table comes in. It’s less about rigid rules and more about a gentle nudge, a little reshuffling to make your digital document just so. Think of it as tidying up your virtual bookshelf or adding a new, essential ingredient to your favorite recipe. Easy peasy, right?
We’ve all been there. You’ve crafted this beautiful, meticulously laid-out table in Microsoft Word. Maybe it’s a budget tracker that’s gotten a tad more complex than you initially anticipated. Or perhaps it’s a guest list for your next epic soirée, and suddenly, your cousin’s plus-one isn't a solo act anymore. Whatever the reason, the need arises: you need to insert a row. And thankfully, Word makes this process as seamless as sliding into your comfiest sweatpants after a long day.
The Zen of Table Creation
Before we dive into the nitty-gritty of row insertion, let’s take a moment to appreciate the beauty of a well-structured table. It’s like a perfectly curated Spotify playlist – everything in its place, easy to navigate, and aesthetically pleasing. Tables help us organize information, make comparisons, and present data in a digestible format. They’re the unsung heroes of reports, resumes, and even those quirky little personality quizzes you find online. Who knew data could be so… chic?
Must Read
Think about the iconic seating charts of Hollywood award ceremonies. The sheer precision! Or the complex schedules of Olympic athletes. These are all testaments to the power of organized rows and columns. And just like a great chef knows when to add a pinch of salt, we, as digital maestros, need to know when to add a new row.
Your Go-To Guide: Inserting Rows Like a Pro
Alright, enough preamble. Let’s get down to business. Inserting a row in a Word table is as straightforward as making your morning coffee. There are a few tried-and-true methods, and honestly, you’ll probably develop a favorite. It’s like choosing between a Netflix binge and a good book – both are valid, and the best one is the one that works for you in the moment.
Method 1: The Right-Click Magic
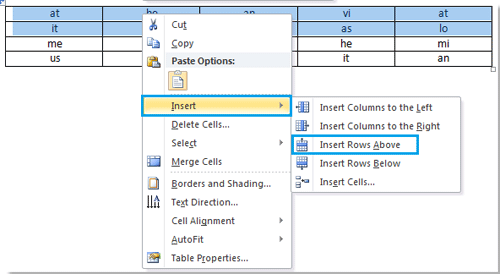
This is perhaps the most intuitive and commonly used method. It’s the digital equivalent of simply asking nicely. Hover your mouse pointer over the existing row where you want to add your new row. It doesn’t matter if you’re above or below; Word is pretty forgiving.
Once you’re hovering, perform a right-click. A contextual menu will pop up, looking like a tiny, helpful digital butler offering you options. Scan this menu for something along the lines of “Insert.” Bingo!
Under the “Insert” option, you’ll find a sub-menu. Here’s where the magic truly happens. You’ll see choices like “Insert Rows Above” and “Insert Rows Below.” It’s like having a tiny GPS for your table’s layout. If you want the new row to appear before your current row, choose “Insert Rows Above.” If you want it after, you guessed it – “Insert Rows Below.” A couple of clicks, and voilà! Your new row is gracefully introduced into the table’s narrative.
![How To Insert Row Or Column In Word Table? [2024] - Whatvwant](https://i0.wp.com/www.whatvwant.com/wp-content/uploads/2015/08/Insert-row-in-word-table.png?resize=713%2C381&ssl=1)
Pro Tip: This right-click method is also your secret weapon for inserting columns, deleting rows, merging cells, and a whole host of other table transformations. It’s the Swiss Army knife of Word table manipulation!
Method 2: The Ribbon Renaissance
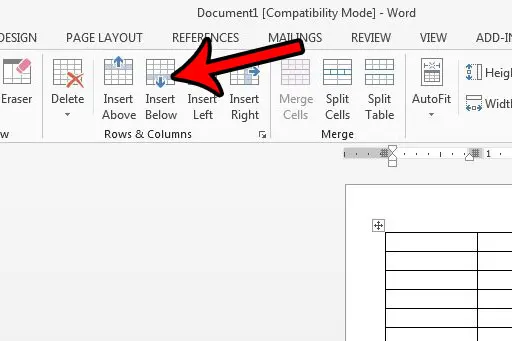
For those who appreciate a more structured approach, or perhaps are still getting acquainted with the right-click menu (no judgment here!), the Word ribbon offers a clear, visual path. When you’ve clicked inside your table, you’ll notice two new tabs appear at the top of your Word window: “Table Design” and “Layout.” These are your table’s dedicated command center.
Click on the “Layout” tab. This tab is packed with tools for arranging and organizing your table’s content. In the “Rows & Columns” group, you’ll find buttons that are pretty self-explanatory. You’ll see icons for “Insert Above,” “Insert Below,” “Insert Left,” and “Insert Right.”
To insert a row, simply place your cursor in the cell of the row where you want to add another. Then, click either “Insert Above” or “Insert Below” on the ribbon. It’s just as simple as choosing your preferred filter on Instagram. The result is the same: a fresh, empty row ready for your input.
Fun Fact: The ribbon interface in Microsoft Office was first introduced in Office 2007, replacing the older menu bar. It was designed to make features more discoverable and accessible. Think of it as the evolution from flip phones to smartphones – a more modern, user-friendly experience!

Method 3: The Keyboard Conqueror (For the Speedy Souls)
If you’re someone who thrives on keyboard shortcuts and wants to shave off those precious milliseconds, this method is for you. It’s like mastering a new skateboard trick – takes a little practice, but once you’ve got it, you feel unstoppable.
Here’s the magic sequence: Place your cursor in the very first cell of the row below where you want to insert a new row. Then, press the Tab key. If you're at the end of the table and press Tab, Word will often automatically add a new row. However, to specifically insert a row above the current one, you’ll need to use a slightly different approach.
A more consistent keyboard shortcut for inserting rows is to first select the entire row you want to insert above or below. You can do this by clicking to the left of the row. Then, press Ctrl + I (on Windows) or Cmd + I (on Mac). This is the universal “insert” command. However, this doesn't always default to inserting a row directly. The most reliable keyboard shortcut combination often involves using the Alt key for ribbon access. For example, on Windows, you might press Alt, then move through the ribbon keys. It can be a bit more convoluted than the mouse methods, but for the truly dedicated, it's a speed demon!
Let’s refine the keyboard approach for simplicity. The most effective keyboard-driven method that feels intuitive often relies on the Tab key trick if you're at the very end of the table. If you need more control, the right-click or ribbon methods are generally more straightforward. However, some users have found specific macro creations or custom shortcuts to streamline this. For the average user, sticking to the mouse is often the path of least resistance and most immediate satisfaction.
Cultural Nugget: Keyboard shortcuts are a cornerstone of efficiency in many fields, from coding to graphic design. They’re the secret handshake of the digitally fluent, allowing for faster, more fluid interactions with software. Think of it as the difference between writing a letter with a quill and ink versus typing on a typewriter – progress!
When More Than One Row is the Vibe
Sometimes, you’re not just adding one row; you’re in a full-on row-adding frenzy. Maybe you’re transcribing a lengthy document, or you’ve realized your table needs a lot more breathing room. Thankfully, Word has you covered.
If you want to insert multiple rows at once, the easiest way is to select the number of rows you want to insert. So, if you want to add five new rows above a specific row, click and drag your mouse down the left margin to highlight five existing rows. Then, right-click and choose “Insert Rows Above” or “Insert Rows Below.” Presto! Five new rows appear, ready for your data.
Alternatively, using the ribbon, you can click the “Insert Above” or “Insert Below” button multiple times. It’s a bit more repetitive, but it gets the job done. For the truly efficient, selecting multiple rows beforehand is the way to go.
Practical Tip: When inserting multiple rows, always double-check how many you’ve selected before hitting that insert button. It’s like counting your ingredients before you start baking – better to be sure than to have too much flour!
A Word on Spacing and Alignment
Once your new row is in place, take a moment to admire your handiwork. Does it look a little… lonely? Perhaps you need to adjust the spacing or alignment. This is where the “Layout” tab on the ribbon truly shines.

You can select your new row (or multiple rows) and then use the options in the “Cell Size” group to adjust row height. You can set an exact height, or choose “AutoFit” to have Word adjust it based on the content. The “Alignment” group offers a plethora of options to center, justify, or align your text within the cell. It’s like styling your hair – a little tweaking can make all the difference!
Design Insight: Good typography and layout are crucial for readability. Even in a simple table, paying attention to spacing and alignment can elevate your document from functional to fabulous. Think of it as the difference between a hastily scribbled note and a beautifully designed invitation.
Troubleshooting: When Tables Get Stubborn
Occasionally, even with the best intentions, a table might act a little… quirky. If you’re trying to insert a row and it’s not cooperating, here are a few things to check:
- Are you definitely inside the table? Click into a cell to ensure the table-related tabs appear on the ribbon.
- Is there an unexpected merge or split in the cells? Sometimes, complex cell structures can throw things off. Try to simplify the affected area if possible.
- Is your document in a strange layout mode? Ensure you’re in “Print Layout” view for the most predictable table behavior.
If all else fails, a good old “save and reopen” or even a restart of Word can sometimes clear up mysterious glitches. It’s the digital equivalent of taking a deep breath and starting fresh.
The Grand Finale: Reflection
Inserting a row in a Word table might seem like a small, almost insignificant task. But in the grand scheme of things, it’s a micro-moment of control and adaptation. It’s about recognizing a need for expansion, for more space, for a new piece of information to be housed. In a world that’s constantly evolving, where plans change and new ideas bloom, this simple act mirrors our own lives.
We, too, need to make space for new experiences, new relationships, and new perspectives. We learn to adjust our schedules, our expectations, and even our inner landscapes to accommodate growth. Just as we effortlessly add a row to a table to refine our digital documents, we can approach our own lives with a similar grace and flexibility. It’s about understanding that sometimes, the most elegant solution is simply to make a little more room. So, the next time you’re navigating the digital landscape of a Word document and need to insert a row, remember: you’re not just manipulating pixels; you’re practicing the art of graceful adaptation, one click at a time.