How To Fix A Buckled Bike Wheel

Alright, gather ‘round, my two-wheeled adventurers and occasional pavement-kissers! We’ve all been there, haven’t we? That heart-stopping moment when you’re cruising along, feeling like the king or queen of the cobblestones, only to hear that telltale thwack-thwack-thwack and see your trusty steed performing a rather alarming shimmy. Yep, you’ve got yourself a buckled wheel. It’s like your bike’s suddenly developed a serious case of the jitters, or perhaps it’s just trying to do the funky chicken to impress the pigeons.
Now, before you start envisioning a dramatic swan dive into a hedge or contemplating selling your bike for scrap metal and investing in a unicycle (which, let’s be honest, is a whole other ballgame of wobbles), take a deep breath. Fixing a buckled wheel might sound like brain surgery for bicycles, but it’s actually more like giving your bike a gentle, yet firm, chiropractic adjustment. And hey, think of the bragging rights! You’ll be the hero of the bikepath, the maestro of spokes, the… well, you get the idea.
First things first, let’s diagnose the damage. A buckle isn’t just a simple bend; it’s a complex dance of lateral (side-to-side) and radial (up-and-down) wobbles. Imagine your wheel as a perfectly round dinner plate. A buckle is when that plate has been enthusiastically used as a frisbee by a particularly clumsy giant. We’re talking about the rim itself being pushed out of its intended circular perfection.
Must Read
You can usually spot a buckle by simply spinning the wheel and watching it closely. Does it deviate from a perfect circle? Does it rub against your brake pads like an overeager admirer? If so, congratulations, you’ve got a bona fide buckle. It’s not the end of the world, but it’s definitely the beginning of a small, manageable project. And trust me, it’s way more satisfying than binge-watching that show you’ve been meaning to catch up on (though that’s also a valid weekend activity).
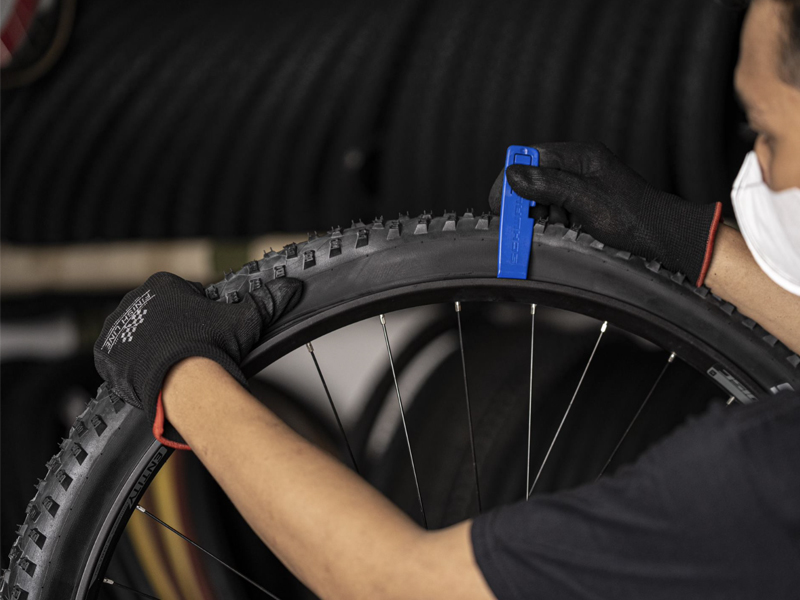
The Tools of the Trade: Your Spoke Spanner and Gentle Touch
So, what do you need for this epic undertaking? Well, forget the power tools and the intimidating array of specialized equipment. For most minor to moderate buckles, all you really need is a good old-fashioned spoke wrench. These little gizmos are specifically designed to grip those tiny nipples at the end of your spokes. Think of them as the tiny, very specific tweezers for your bike’s skeleton.
You can find spoke wrenches at any decent bike shop, and they’re usually super affordable. Get one that fits your spoke nipples – they come in different sizes, so it’s worth double-checking. Other helpful companions on this journey include: a rag (for wiping away sweat, tears, or mysterious grease stains), some patience (this is key, folks!), and perhaps a comfy stool because you might be crouching for a bit.

Now, for the really important part: gentleness. You’re not trying to Hulk-smash this buckle out of existence. We’re talking about subtle adjustments, like a seasoned diplomat negotiating a peace treaty. Too much force, and you’ll end up with a bigger problem, possibly involving snapped spokes and a wheel that looks like it’s been through a cheese grater. Nobody wants that.
The Art of Truing: Bringing Harmony Back to Your Wheel
The process of fixing a buckle is called truing a wheel. It’s all about adjusting the tension of the spokes to pull the rim back into alignment. Imagine each spoke as a tiny tugboat, and the rim is a giant, slightly-off-course iceberg. You’re going to command those tugboats to pull in just the right directions to steer that iceberg back to its proper place.
Here’s the golden rule, the secret handshake of spoke adjustment: when a wheel is wobbling outwards, you tighten the spokes on that side. When it’s wobbling inwards, you loosen the spokes on that side. It’s like playing a cosmic game of tug-of-war. Sounds simple, right? Well, it is, sort of. The trick is knowing which spokes to adjust and how much.

Tackling the Lateral Wobble: The Side-to-Side Shimmy Shimmy
Let’s say you’ve got a buckle that makes your wheel sway left and right like a palm tree in a hurricane. To fix this lateral wobble, you need to identify the point where the rim is furthest out on one side. For example, if the rim is pushed to the left, you’ll be working with the spokes on the right side of that wobble.
Here’s where the magic happens: you’re going to tighten the spokes on the side opposite the direction of the wobble. Think of it this way: if the rim is too far left, you need to pull it back to the right. The spokes on the right side of the wheel are the ones that will do that pulling. Give them a tiny turn, maybe a quarter turn, with your spoke wrench. Then, spin the wheel again and see what’s happened. It’s a process of tiny, iterative adjustments.
Conversely, if the rim is sticking out to the right, you’ll be tightening the spokes on the left side of the wheel. It’s like saying to those spokes, “Alright, fellas, a little more tension, please!”

Now, if the buckle is more of an inwards dip, meaning the rim is bending towards the center of the wheel, you’ll do the opposite. You’ll loosen the spokes on the side closest to the inward dip. This allows the rim to spring back out. Again, think of it as giving those spokes a bit of slack to let the rim find its happy place.
Conquering the Radial Wobble: The Up-and-Down Bounce
The radial wobble, the up-and-down bounce, is a bit trickier and often goes hand-in-hand with a lateral buckle. This is where the wheel isn’t perfectly round. Some parts are closer to the hub, and some parts are further away. This can feel like riding over a series of tiny speed bumps, even when the road is smooth.
To address this, you need to identify the high spots (where the rim is furthest from the hub) and the low spots (where it’s closest). For the high spots, you’ll want to tighten the spokes that connect to that section of the rim. This will pull the rim inward, effectively lowering that high spot. For the low spots, you’ll loosen the spokes, allowing the rim to move outwards and rise up.

It’s a bit like trying to iron out a wrinkled shirt. You’re gently tugging and releasing until everything is smooth and flat. Remember, small, consistent adjustments are key. You’re not trying to perform a wheelie of epic proportions; you’re just coaxing it back into its intended circular glory.
A Few Words of Caution (and Encouragement!)
Now, a word of warning: if your buckle is severe, meaning the rim is bent at a sharp angle, or if you have several broken spokes, this might be beyond a quick DIY fix. In those cases, it’s probably best to take your bike to a friendly neighborhood bike mechanic. They’ve seen it all, and they have the specialized tools and expertise to sort out even the most tragic of wheel maladies. Think of them as the emergency room for your bike.
Also, be aware that truing a wheel can be a bit of a time sink, especially at first. You might find yourself spinning the wheel, making an adjustment, spinning again, and repeating the process what feels like a thousand times. It’s a bit like meditation, but with more potential for frustration and grease under your fingernails. But hey, the feeling of accomplishment when you finally get that wheel spinning true is chef’s kiss.
Don’t be discouraged if your first attempt isn’t perfect. Truing a wheel is a skill that improves with practice. The more you do it, the more intuitive it becomes. You’ll start to develop a feel for how much tension to apply and how to read the subtle language of the spokes. So, embrace the wobble, grab your spoke wrench, and go forth and conquer! Your bike will thank you, and you’ll have a fantastic story to tell at your next café stop. Happy wrenching!