How To Add Yes Or No In Excel

Ever found yourself staring at a spreadsheet, wishing you could inject a bit more oomph into your data? We're talking about making your Excel sheets less like a dry textbook and more like a dynamic, interactive tool. Well, get ready to have some fun, because today we're diving into one of the most surprisingly versatile and downright handy tricks in the Excel playbook: adding "Yes" or "No" options! It might sound simple, but trust us, this little maneuver unlocks a world of efficiency and clarity for your spreadsheets.
Think about it. How many times have you been managing a project list, a budget, a guest RSVP, or even just a personal to-do list, and found yourself typing "Yes," "No," "True," "False," or some variation thereof? It's tedious, prone to typos (did you spell it "yess" or "yes"?), and makes sorting and filtering a headache. But what if you could turn those cells into neat little dropdown menus where you only have the options you want? That's where the magic of Data Validation comes in, and specifically, how to make it deliver your perfect "Yes" or "No" choices.
Why This Little Trick is a Spreadsheet Superstar
So, why bother with this specific Excel feature? Let's break down the awesome benefits:
Must Read
- Say Goodbye to Typos: No more accidentally typing "Ye s" or "N o". When you create a dropdown list for "Yes" and "No," you're guaranteeing consistency. Every entry will be exactly what you intend it to be.
- Speed Up Your Data Entry: Clicking a dropdown is infinitely faster than typing. For large datasets, this can save you a significant amount of time.
- Effortless Filtering and Sorting: Imagine trying to find all the "No" responses in a column where people have entered "Nope," "Nah," "No way," and "N." With a standardized "Yes/No" dropdown, filtering for "No" is as simple as selecting it from a list. Your data becomes so much more actionable.
- Crystal Clear Data: When everyone (or just you!) is using the same defined options, your data becomes incredibly easy to understand at a glance. No ambiguity, no guesswork.
- Foundation for More Complex Formulas: Having clean, consistent "Yes/No" data is the first step to using powerful Excel functions like
SUMIF,COUNTIF, orAVERAGEIF. You can easily count how many people said "Yes" to an event, or calculate a budget based on certain "Yes" conditions.
It's the ultimate way to bring order and ease to your spreadsheets. Ready to transform your data from drab to fab?
Let's Get Practical: Adding Those "Yes" or "No" Dropdowns
The secret sauce is a feature called Data Validation. Don't let the name intimidate you; it's incredibly straightforward. Here's how you do it, step-by-step:

Step 1: Select Your Cells
First things first, decide where you want these "Yes" or "No" options to appear. Click and drag to select the range of cells where you'll be entering this information. This could be a single column, multiple columns, or even a specific block of cells.
Step 2: Find Data Validation

Now, head over to the Data tab on your Excel ribbon. Look for a button group called Data Tools. Within that group, you'll find the glorious Data Validation button. Click it!
Step 3: Set Up the Validation Criteria
A new window will pop up, and we're interested in the Settings tab. Here's where the magic happens:

- In the Allow: dropdown menu, choose List. This tells Excel you want to create a dropdown menu.
- Now, look at the Source: box. This is where you'll type in your "Yes" and "No" options. The trick here is to separate them with a comma. So, you'll type: Yes,No.
- Make sure the In-cell dropdown checkbox is ticked. This is what actually makes the little arrow appear next to your cells.
Step 4: Add Some Flair (Optional but Recommended!)
Excel's Data Validation has two other super-useful tabs: Input Message and Error Alert. These are like friendly assistants for your spreadsheet users:
- Input Message: Click on the Input Message tab. You can check Show input message when cell is selected. Then, you can add a Title (like "Selection") and an Input message (like "Please choose Yes or No from the dropdown"). This pops up when someone clicks on one of your validated cells, giving them a hint.
- Error Alert: Click on the Error Alert tab. You can check Show error message after invalid data is entered. Here, you can set a Style (Stop, Warning, or Information), a Title (like "Invalid Choice!"), and an Error message (like "Please select either 'Yes' or 'No' from the list."). This prevents people from typing in anything other than your allowed options.
Step 5: Hit OK!
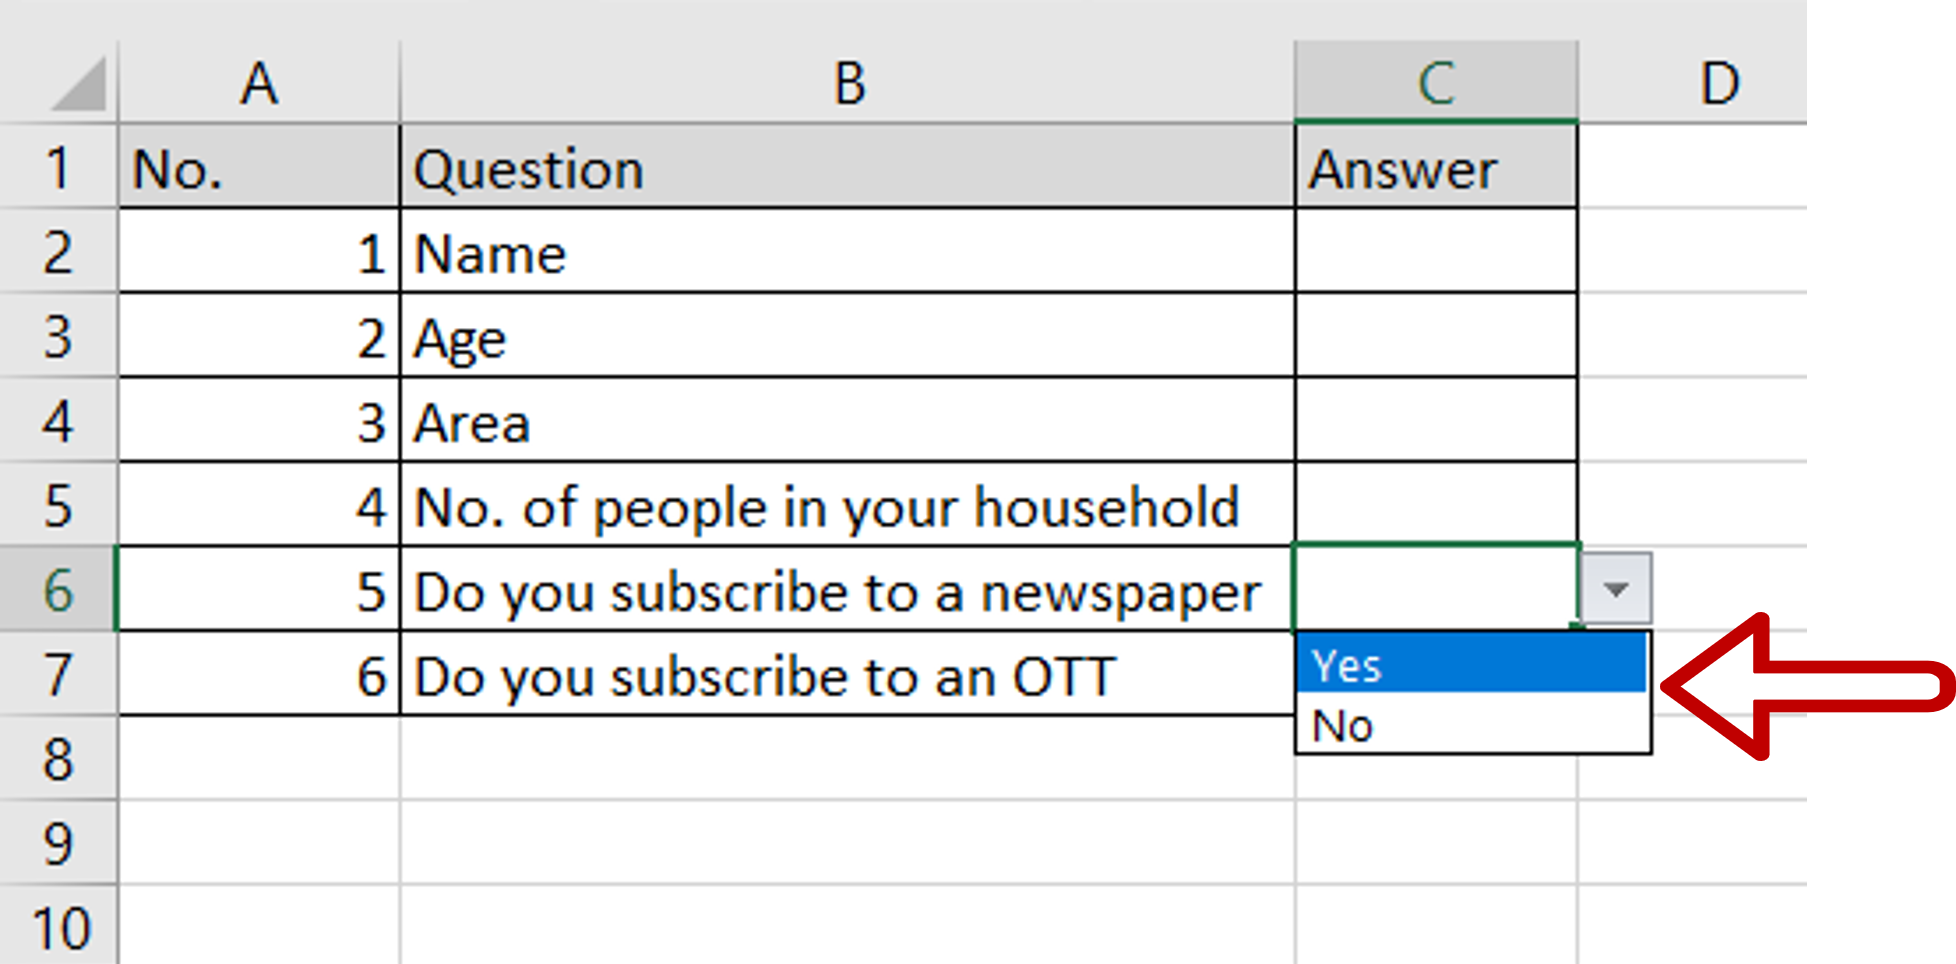
Once you've set up your preferences, click OK. And voilà! Head back to your selected cells. You should now see a little dropdown arrow next to each one. Click on it, and you'll have your neat, tidy "Yes" or "No" options waiting for you. Isn't that just the best?
Pro-Tips for Maximum "Yes" or "No" Power
While the basic "Yes,No" is fantastic, here are a few more ways to level up:
- "N/A" for Not Applicable: Sometimes, "Yes" or "No" doesn't quite fit. You might want to include an option for when the question isn't relevant. Just change your source to: Yes,No,N/A.
- Customizing Your Lists: If you have a longer list of options that isn't just "Yes" or "No" (e.g., "Low," "Medium," "High" for priority levels), you can still use the List option. You can either type them separated by commas, or better yet, type them in a separate range of cells elsewhere in your worksheet and then select that range as your Source. This makes it super easy to edit your list later!
- Applying to New Rows: If you add new rows to your table, you might need to re-apply the data validation. A quick way is to select the cells with the validation, copy them (Ctrl+C), and then select the new empty cells and paste special (Ctrl+Alt+V), choosing Data Validation.
So there you have it! You've just unlocked a powerful, yet incredibly simple, Excel skill. Adding "Yes" or "No" dropdowns might seem like a small thing, but the impact on your data's clarity, consistency, and ease of use is enormous. Go forth and make your spreadsheets smarter and more fun!