How Do You Make Iron On Patches
Ever scrolled through your favorite online shops or flipped through a fashion magazine and spotted that perfectly placed patch on a jacket, backpack, or even a pair of jeans? They're everywhere, and for good reason! Iron-on patches are a fantastic way to inject personality, show off your fandom, fix a small tear, or just make something utterly you. They're like instant customization for your wardrobe and accessories, and the best part? You don't need to be a sewing whiz to bring your visions to life. So, grab your iron and get ready to dive into the surprisingly simple and incredibly satisfying world of making your own iron-on patches!
Why bother making your own, you ask? Well, the benefits are as plentiful as the designs you can dream up. For starters, personalization is king. Forget settling for mass-produced items. With DIY iron-on patches, you can represent your obscure band, a beloved inside joke, a quirky doodle, or even a logo for your small business. It’s a way to tell your unique story without saying a word.
Then there's the aspect of repair and refresh. Did your favorite jacket snag? Does your child’s backpack have a small hole? Instead of tossing it, a well-placed, cool-looking patch can not only cover the damage but also give the item a whole new lease on life. It’s a sustainable and stylish solution!
Must Read
And let’s not forget the sheer fun and affordability. Creating your own patches can be a fantastic crafting project, perfect for a rainy afternoon, a party activity, or a way to bond with kids. Compared to buying custom patches, making them yourself can be significantly more budget-friendly, especially if you’re looking for a large quantity or intricate designs.
So, how does this magic happen? It all boils down to a few key components and a bit of heat. The core of your DIY patch will be your chosen design, printed onto a special kind of paper called iron-on transfer paper. This isn't your average printer paper; it's coated with a substance that allows ink to adhere and then transfer onto fabric under heat. You can find this paper at most craft stores or online, and it's usually designed for either light or dark fabrics, so be sure to pick the right one for your project.

Next, you'll need your fabric base. While patches can be applied directly to garments, many people prefer to create a patch that can then be sewn or, you guessed it, ironed onto something else. For this, you’ll need some sturdy fabric, like canvas, denim, or a thick twill. The type of fabric will influence the final look and feel of your patch. A stiff canvas might give a more traditional, structured patch, while a softer denim could offer a more relaxed vibe.
The final crucial element is the adhesive backing. This is what makes the patch "iron-on." You can buy dedicated iron-on adhesive sheets or fusible web. These are typically thin, flexible sheets that have a slightly sticky side. When heated, they melt and bond to both the fabric of your patch and the fabric of the item you're applying it to.
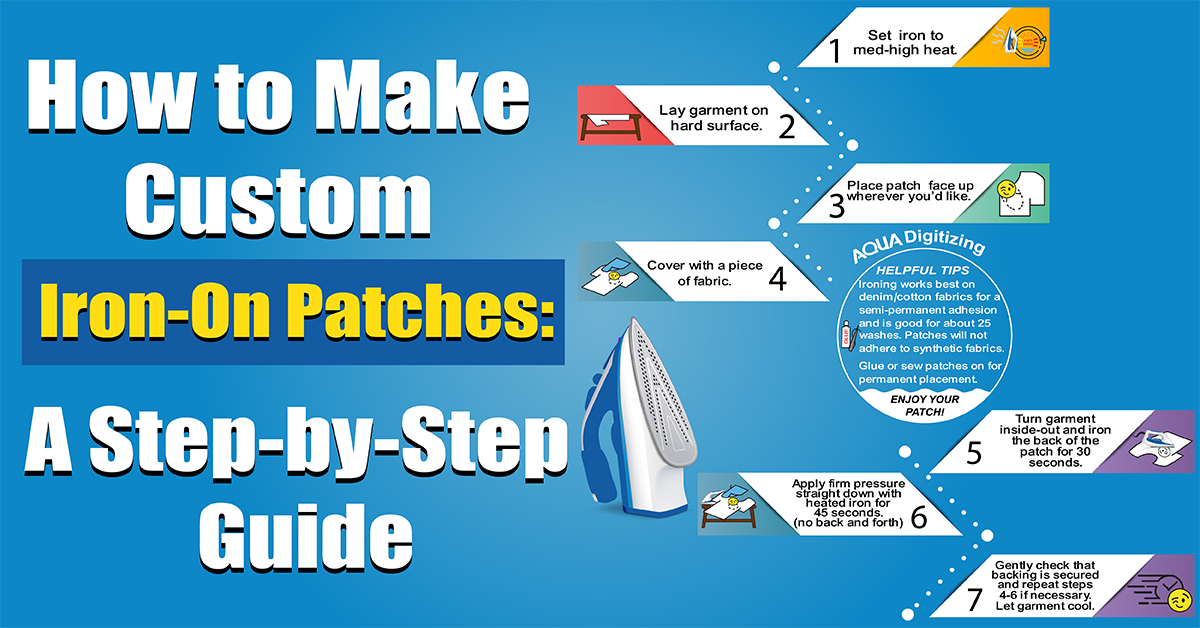
Let’s walk through the process. First, you'll design your patch. This can be done using graphic design software on your computer, or even with good old-fashioned drawing and scanning. Keep in mind that the design will be mirrored when you print it onto the transfer paper, so make sure any text or directional elements are reversed in your digital file before printing. Print your design onto the iron-on transfer paper using an inkjet printer, following the manufacturer’s instructions carefully. For darker fabrics, you’ll often print the image in reverse, and for lighter fabrics, you’ll usually print it normally and then cut it out.

Once printed, you'll typically need to cut out your design. For complex shapes, using a craft knife or cutting machine like a Cricut or Silhouette can be a lifesaver for precision. If you're going for a simpler shape or want a more distressed edge, scissors are perfectly fine.
Now, it’s time to create the actual patch fabric. Take your chosen fabric (canvas, denim, etc.) and cut it to a size slightly larger than your printed design. Then, you’ll apply your iron-on adhesive. Follow the instructions for your specific fusible web or adhesive sheet. Usually, this involves placing the adhesive onto the fabric and ironing it on, creating a bond.
Once the adhesive is bonded to your fabric, you’ll carefully place your cut-out iron-on transfer design onto the fabric base. Some transfer papers require you to peel off a backing first, while others have you place the printed side directly onto the fabric. Again, always refer to your transfer paper’s instructions! Then, using a hot, dry iron (no steam!), press down firmly and evenly over the design for the recommended amount of time. This heat activates the adhesive on the transfer paper and bonds it to your fabric base.
After the ironing, you'll let it cool. Once cool, you'll peel off the transfer paper backing, revealing your vibrant, custom-made patch adhered to your fabric. You can then trim the fabric around your design to create a clean border, or leave a bit of fabric showing for a more rustic look. Some people even use a fabric marker to color in the edges of the excess fabric for a neat finish.
And there you have it! You’ve just made your very own iron-on patch. You can either apply this new patch directly to your item using your iron and more fusible web, or you can sew it on for extra durability and a classic patch look. The possibilities are truly endless, and the satisfaction of creating something so personal is immense. So, what will your next patch be?