How To Fill Tiny Holes In Wall
Ah, the humble wall. It’s the silent witness to our lives, the canvas upon which our interior decorating dreams (and sometimes nightmares) are painted. It’s where we hang those priceless, albeit slightly crooked, masterpieces from our kids. It’s where that one picture frame just needed to be a smidge higher, resulting in a tiny, yet irksome, hole. Or maybe it was the rogue broom handle, the enthusiastic dog, or even, dare I say it, a particularly aggressive spider expedition that left its mark. Whatever the culprit, those little craters in your drywall can start to feel like a thousand tiny noses peeking out, judging your tidiness.
But fear not, my fellow dwellers of domesticity! We’re not talking about structural damage here, the kind that makes you suddenly consider moving to a yurt. We’re talking about the itty-bitty, insignificant-looking, yet surprisingly annoying pockmarks that accumulate over time. The ones that, when the light hits them just right, look like miniature lunar landscapes on your otherwise pristine surfaces. And guess what? Fixing them is surprisingly… well, not a big deal. In fact, it's so straightforward, you might find yourself looking for more holes to fill, just for the sheer satisfaction.
Think of it like this: your wall is a comfy old sweater. Over time, it gets a few snags. You wouldn't throw the whole thing out, would you? Of course not! You’d grab a needle and thread and do a quick fix. Filling tiny wall holes is the DIY equivalent of that trusty needle and thread. It’s about bringing back that smooth, unblemished look without needing a full-blown renovation project. It’s about reclaiming your wall’s dignity, one tiny repair at a time.
Must Read
The Usual Suspects: What Causes These Little Annoyances?
Let's be honest, walls are surprisingly vulnerable. They’re not made of adamantium, after all. They endure a lot. So, before we get to the exciting part – the filling – it’s good to know our enemy, or rather, our accidental hole-makers.
Remember that time you were trying to hang that incredibly heavy, yet undeniably chic, mirror? And you swore you only needed one nail, but then it started to sag, and you ended up drilling a second, slightly-off-center hole? Yep, that’s a classic. Or the enthusiastic toddler who decided their toy truck had wings and proceeded to do a dramatic landing on the wall? Those little dings are practically badges of honor for parents everywhere.
Then there are the invisible offenders. The ones you can’t quite pinpoint. Did you absentmindedly lean on the wall a bit too hard while you were on a particularly animated phone call? Did a picture frame that’s been hanging for years suddenly decide gravity was its best friend and slither down a millimeter, leaving a faint crease? These are the subtle sabotage acts of everyday life. They’re the wall’s way of saying, “Hey, I’m here, and I’ve seen things.”
And let's not forget the dreaded "nail pop." This is when a nail that was once snug and secure decides to make a break for it, pushing out a little bit of drywall and creating a small dome. It’s like the nail is staging a mini-rebellion. Those little bumps can be surprisingly noticeable, especially when you’re trying to paint a smooth finish.
The good news is, no matter the origin story of your wall’s tiny imperfections, the solution is usually pretty much the same. It’s less about forensic investigation and more about good old-fashioned mending.
The Knight in Shining Armor: What You'll Need
Now, let's talk about your arsenal. You don't need a professional toolkit or a degree in construction for this. Think of it as your basic "fix-it-quick" starter pack.
:max_bytes(150000):strip_icc()/how-to-fill-drywall-screw-holes-1821503_hero_1536-4424d0106c834a8f8204f6bf8542d566.jpg)
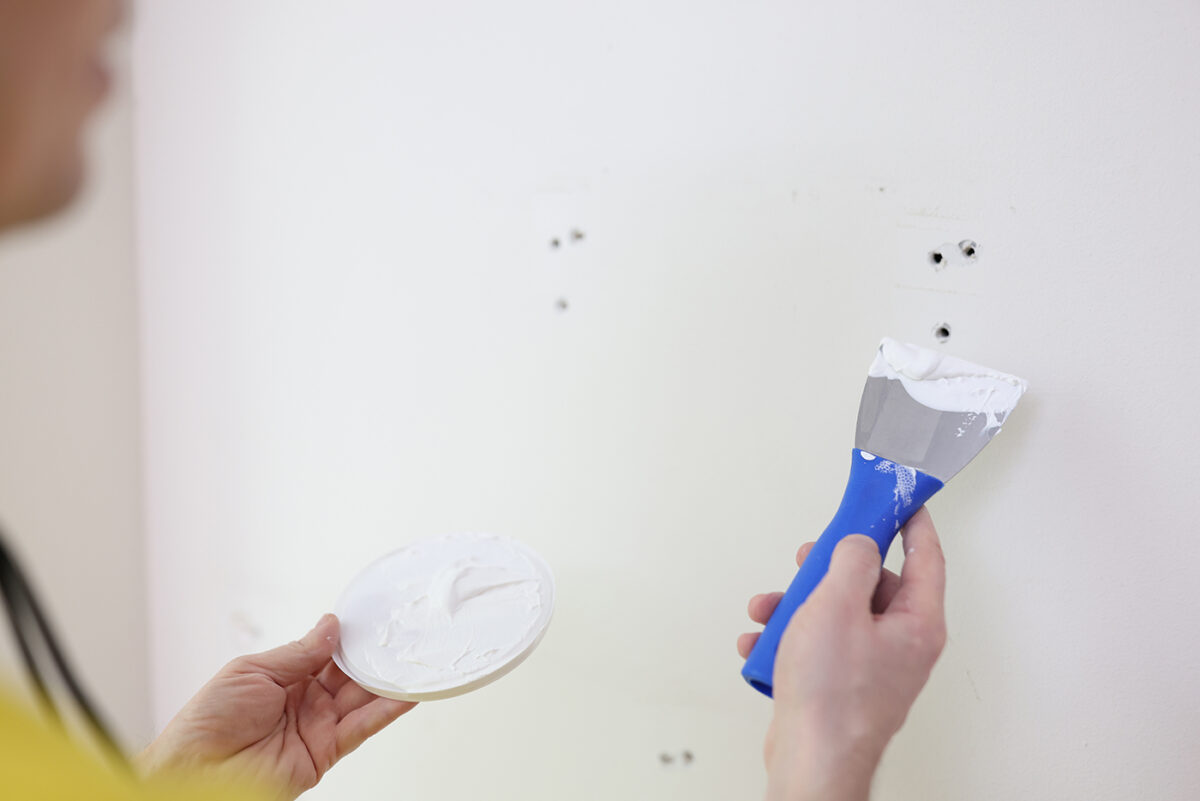
First up, the magic paste. This usually comes in a tub and is called drywall compound, spackling paste, or just "spackle." It’s essentially a putty that dries hard and can be sanded smooth. It’s like the magical elixir that erases those little imperfections. You can usually find small tubs of this at any hardware or home improvement store. Don't go overboard and buy a five-gallon bucket unless you're planning on becoming a professional wall-hole filler in your spare time.
Next, you’ll need something to apply this magic paste. A putty knife is your best friend here. Think of it as a tiny, flat spatula for walls. You want a reasonably sized one, maybe 1.5 to 3 inches wide. Too small, and it’ll take forever. Too big, and you’ll be smearing paste everywhere. It’s a Goldilocks situation, but for DIY tools.
Then comes the sanding. Once the paste is dry, you’ll want to smooth it down so it’s flush with the wall. For tiny holes, a fine-grit sandpaper (around 120-220 grit) is perfect. You can buy sandpaper sheets, or for a really easy time, a small sanding block. This is where the satisfaction really kicks in, as you buff away the evidence of your repairs.
And finally, the finishing touch: paint. You'll want some of the same paint color that's already on your wall. This is crucial. Trying to paint over a repaired spot with a different color is like wearing mismatched socks to a formal event – it just doesn't look right. If you’re unsure of the color, check any leftover paint cans you might have, or take a small chip of the paint to the store to have it matched.
You might also want a damp cloth for wiping up any stray bits of compound and maybe a small paintbrush or a roller depending on the size of the area you’re painting.
The Art of Application: Getting That Paste In There
Alright, you’ve got your supplies. You’ve located the offending holes. Now it’s time to get to work. This is the moment of truth, the part where you transform your wall from a dotted line into a smooth, unbroken expanse.

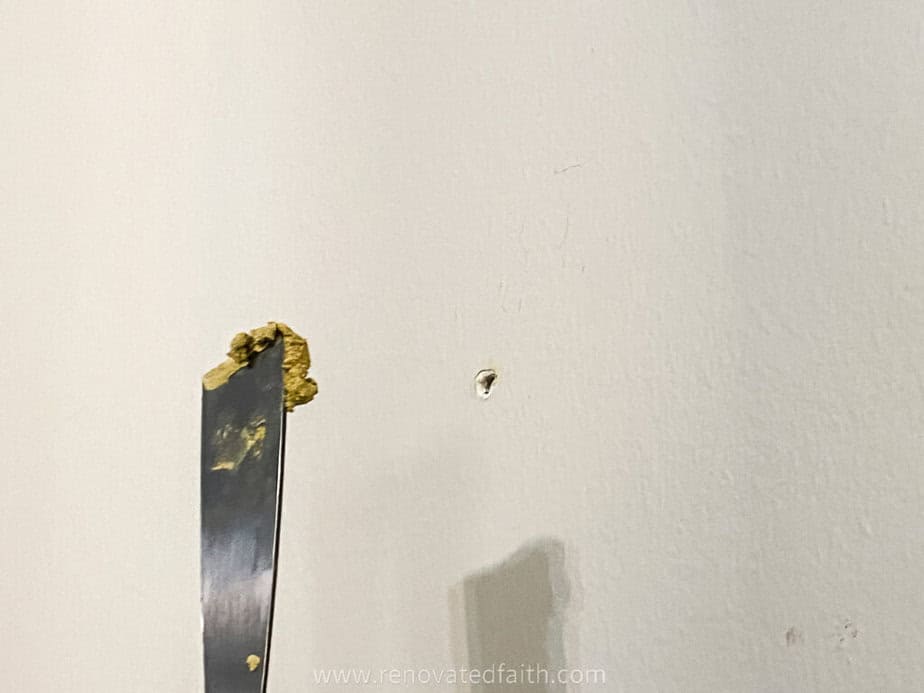
First, take your putty knife and, with a gentle hand, scrape away any loose bits around the hole. You want a clean surface to work with. Think of it as prepping a tiny canvas. You don’t want any stray dust bunnies or old paint flakes getting in the way of your masterpiece.
Now, scoop a small amount of your spackling paste onto the putty knife. You don’t need a mountain of it. A little goes a long way, especially for these tiny holes. Imagine you're trying to give a tiny, very specific hug to the hole.
Here’s the trick: hold your putty knife at a slight angle to the wall, and press the paste into the hole. Then, with a smooth, even stroke, wipe away the excess. You want to fill the hole, but you don’t want a big glob of paste sticking out like a sore thumb. Aim for a flush finish, or even slightly under the surface of the wall, as the paste will likely shrink a tiny bit as it dries.
For very, very small holes, like nail holes, you might only need one application. For slightly larger ones, you might need a second, thinner layer after the first has dried. The key is to be patient. Don’t rush it. It’s not a race to the finish line; it’s a marathon of meticulous mending.
And here’s a little pro-tip: try to make your application as smooth and even as possible. The less sanding you have to do later, the better. It’s like trying to make your bed perfectly the first time – a noble, though sometimes elusive, goal.
The Drying and the Smoothing: The Patience Game
This is where the real test of your newfound DIY prowess comes in: patience. Drywall compound needs time to do its thing. It needs to dry thoroughly. Trying to sand or paint it while it's still damp is like trying to eat soup with a fork – it’s just not going to end well.

Check the instructions on your spackling paste tub, but generally, it takes a few hours to dry. For smaller holes, it might be faster. You’ll know it’s dry when it changes color (usually from a greyish-white to a brighter white) and feels hard to the touch. No more squishy bits allowed!
Once it’s completely dry, it’s time for the satisfying part: sanding. Grab your fine-grit sandpaper or sanding block. Gently, and I mean gently, start sanding the repaired area. You're not trying to sand away the entire wall, just the raised bits of dried compound until it’s smooth and level with the surrounding wall. Imagine you're giving the wall a very gentle facial.
Wipe away the dust with your damp cloth. Do a visual check. Run your hand over the area. Does it feel smooth? Can you see where the hole used to be? If you can still feel a slight indentation or bump, you might need another thin layer of compound, followed by more drying and sanding. It’s all about achieving that seamless finish. Think of it as a multi-step beauty routine for your wall.
This is also a good time to check for any "nail pops" that might have caused a little bump. You can often gently tap those down with a hammer after you’ve applied a bit of compound to the surrounding area, and then sand them smooth once dry. It’s like giving the rebellious nail a gentle but firm reminder of its place.
The Grand Finale: Painting for Perfection
You’ve filled, you’ve dried, you’ve sanded. You’re in the home stretch! Now, for the final flourish: painting. This is what truly makes the repair disappear, blending it seamlessly back into your wall’s landscape.
Using your small paintbrush or a small roller (depending on the size of the repair), apply a thin, even coat of your matching paint over the dried and sanded spackling compound. Don’t go too heavy on the first coat. You can always add another if needed.
The goal is to feather the edges of your paint job. This means gently blending the new paint into the existing paint so there’s no harsh line. It's like a subtle makeup contour for your wall.
Let the first coat dry completely. Then, take a look. Does it blend in perfectly? If you can still see a faint outline, apply a second, thin coat. Sometimes, especially if the original paint has faded a bit over time, you might need to paint a slightly larger area to make it truly invisible. Think of it as giving the repaired spot a little buddy to blend in with.
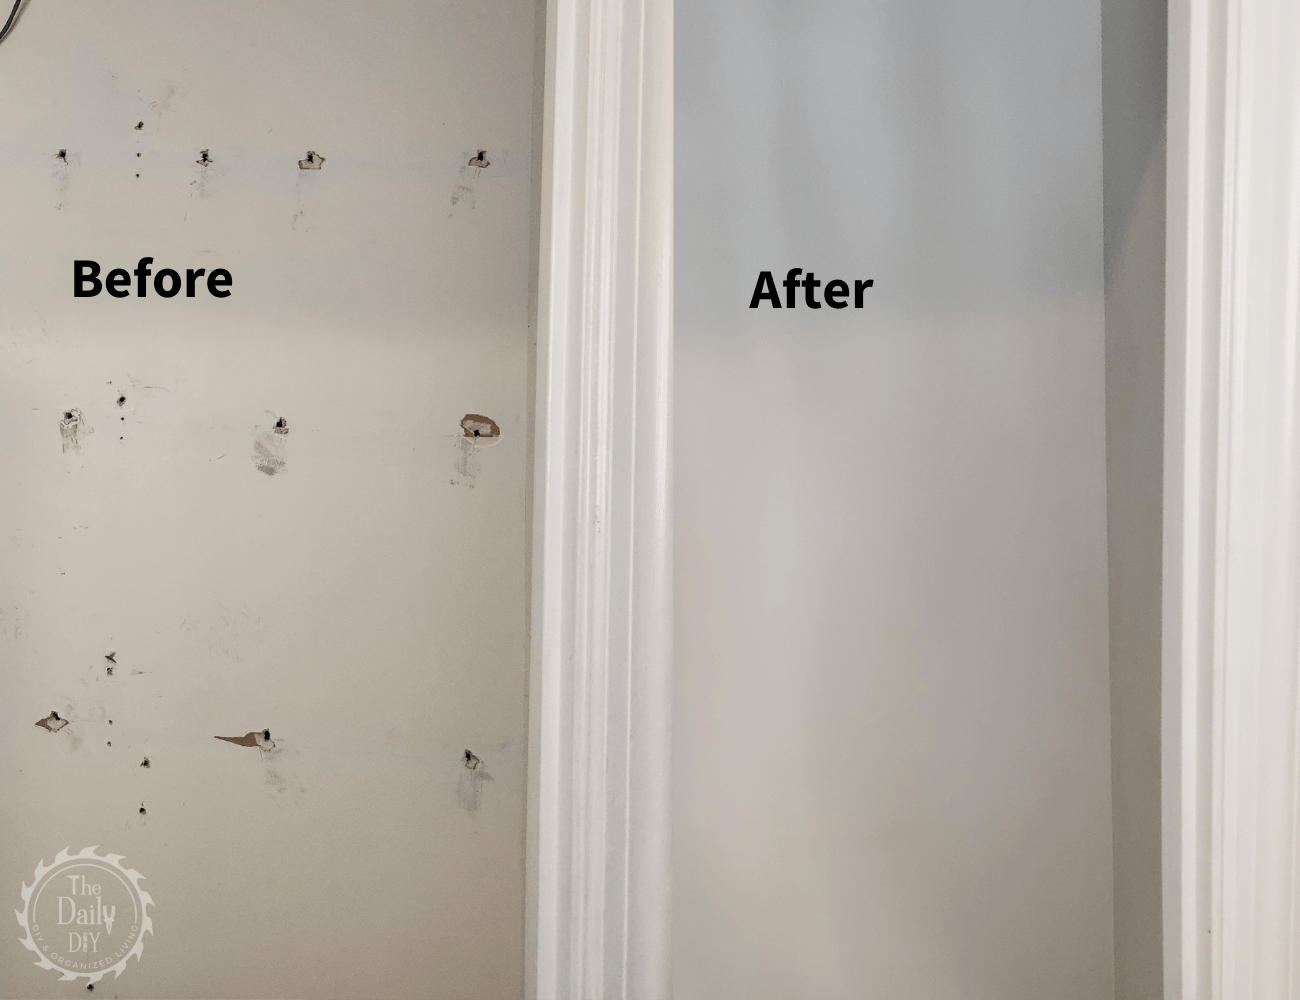
And there you have it! You’ve transformed your wall from a miniature minefield of tiny holes into a smooth, unblemished surface. You’ve conquered the minor imperfections that were bugging you, and you did it yourself. High five!
The Joy of a Smooth Wall
There’s a quiet satisfaction that comes with fixing those little wall holes. It’s the kind of accomplishment that doesn't involve a standing ovation or a trophy, but it’s deeply rewarding nonetheless. You’ve taken something that was slightly ‘off’ and made it ‘right’ again.
It’s the same feeling you get when you finally find that missing sock, or when you successfully assemble that notoriously tricky piece of flat-pack furniture. It’s a small victory, but it’s your victory. And it makes your living space feel a little more polished, a little more put-together.
So, the next time you notice a tiny hole, or a little ding, or a faint scratch that’s been bothering you, don’t sigh. Don’t despair. Grab your putty knife and your magic paste. Embrace the process. You’re not just filling holes; you’re performing a miniature act of home improvement, a testament to your growing DIY confidence. And who knows, you might just find yourself looking forward to the next little imperfection, ready to smooth it away with a smile.