How Do You Kt Tape A Knee

Hey there, knee-pain warriors! So, you’ve been battling that ache, that twinge, that “oh no, is that a permanent thing?” feeling in your knee, and you’ve heard whispers of this magical stuff called K-Tape. Well, you've come to the right place! Think of me as your friendly neighborhood K-Tape whisperer, here to demystify this colorful athletic bandage and show you, in a way that won’t make your brain do a backflip, how to get that bad boy on your knee. No fancy medical degree required, I promise!
First things first, let’s get the existential dread out of the way. Is K-Tape some kind of super-secret ninja bandage only sports gods can wield? Absolutely not! It’s basically a fancy elastic bandage that sticks to your skin and, when applied correctly, can offer a surprising amount of support and relief. It’s like giving your knee a gentle hug that says, “Hey buddy, you got this!” And the best part? It comes in all sorts of fun colors. So you can be practical and fashionable. Who knew?
Before we get our hands sticky, let’s chat about why you might be reaching for the K-Tape. Is it that nagging pain after a long run? That slight instability that makes you second-guess that jump? Or maybe you just want to prevent future grumpy knees. Whatever the reason, K-Tape can be a pretty awesome tool in your arsenal. It's not a magic cure-all, mind you, but it’s a pretty neat way to give your knee a little extra love.
Must Read
Okay, so you’ve got your roll of K-Tape. It probably looks like a roll of brightly colored duct tape, but don’t go sticking it on your bicycle handlebars just yet. This stuff is designed for your skin, so it’s breathable and, for the most part, hypoallergenic. But hey, if you’ve got skin like a delicate flower, maybe do a little patch test first. We don’t want any unexpected red rashes joining the party, right?
Gathering Your "Supplies" (It's Not Like Baking a Cake, But Close!)
Alright, time to round up your troops. You’ll need:
Your K-Tape Roll: Duh! Make sure it's a good quality one. No one wants their tape to bail on them halfway through a workout. That’s just embarrassing for everyone involved.
Sharp Scissors: This is crucial. You don’t want to be wrestling with dull scissors, ripping the tape like a toddler trying to open a candy wrapper. Nice, clean cuts are key for optimal sticking power. Think of it as giving the tape a polite haircut.
Rubbing Alcohol (or Mild Soap and Water): We need to make sure your skin is squeaky clean. Any oils, lotions, or that suspicious sweat from your last adventure can prevent the tape from sticking like a champ. So, give that knee a good scrub. No excuses!
A Friendly Face (Optional but Recommended): If you’re applying this to someone else, a little encouragement goes a long way. If you’re doing it yourself, a good pep talk in the mirror never hurt anyone. “You can do it, knee! We believe in you!”
Pre-Tape Rituals: Setting the Stage for Success
Before we get to the sticky business, there are a few things to get right:
Hair Be Gone (If Necessary): Now, this is a sensitive topic for some. If you’ve got a veritable jungle growing on your knee, you might want to trim it down a bit. K-Tape sticks best to skin, not to a thick carpet of hair. No need for a full shave, just a gentle trim will do. Think of it as tidying up the garden.
Dry, Dry, Dry: Seriously, I can’t stress this enough. If your skin is even a little bit damp, that tape is going to have a shorter lifespan than a mayfly. Towel dry that knee like you're trying to win an award for best drying technique.
No Lotions or Potions: As mentioned before, any oily residue is the enemy of good adhesion. So, resist the urge to slather on that fancy moisturizer just before taping. Your knee will thank you later, and so will the tape.
The Grand Application: Let's Get This Show on the Road!
Alright, deep breaths. We’re going to break this down into simple steps. Think of it as following a super-easy recipe. No obscure ingredients or complicated techniques here!
Step 1: Measure and Cut (The Foundation of a Good Tape Job)
This is where your sharp scissors come into play. There are a few common taping techniques for the knee, but we'll focus on a couple of the most effective and easiest ones. Let's start with the "I" strips, which are great for general support and pain relief.
For an “I” strip, you’ll want to cut two pieces of tape. The length is important, but don’t stress about being perfectly precise. You want one piece to run vertically along the front of your knee, from just above your kneecap to just below it. The second piece will run vertically along the back of your knee. So, roughly measure from your thigh down to your shin, bending your knee a little as you do. You want the tape to have some slack when your knee is straight, but not be so long that it bunches up when you bend it.

Pro Tip: Round the corners of your tape strips! This helps prevent the edges from peeling up prematurely. It’s like giving the tape little rounded bumpers. Cute, right?
Step 2: The First "I" Strip (The Anchor)
Now, find the middle of your first strip of tape. Peel back the paper backing about an inch from the center. Do not touch the sticky part! This is like handling a delicate piece of artwork. Hold the ends of the tape, leaving the exposed sticky part in the middle.
Now, here’s the key to K-Tape magic: stretch! With your knee slightly bent (think a little more than hip-width apart, a comfy, relaxed bend), you’re going to apply the middle, sticky part of the tape directly over your kneecap. Apply it with no stretch. This is your anchor.
Then, with gentle tension, lay down one of the ends of the tape down your thigh, and the other end down your shin. You should have about 50% stretch in these ends. Imagine you're gently pulling the tape taut, but not so much that it’s trying to snap back. Think of it as a firm, supportive hug.
Playful Aside: If you accidentally stick it to your finger, just admire your new, colorful finger accessory. We’ve all been there!
Step 3: The Second "I" Strip (The Support Squad)
Grab your second strip of tape. Repeat the same process: peel back the backing from the center, leaving about an inch exposed. Again, no touching the sticky bit!
This time, you're going to apply the middle section of this strip on the back of your knee, directly behind your kneecap. Again, apply the anchor with no stretch. Then, with about 50% stretch, lay down the ends along the back of your thigh and shin. This creates a nice little criss-cross or cradle around your kneecap, giving it extra stability.

Important Note: When applying the ends, make sure they lie flat and smooth against the skin. No wrinkles or bubbles, as this can lead to irritation. Think of it as smoothing out a wrinkle in your favorite shirt.
Step 4: The "X" Marks the Spot (Optional but Awesome)
For a bit more targeted support, especially if you have pain on the sides of your knee, you can add an "X" strip. Cut a single piece of tape about the length of your thigh to shin. Round the corners, of course!
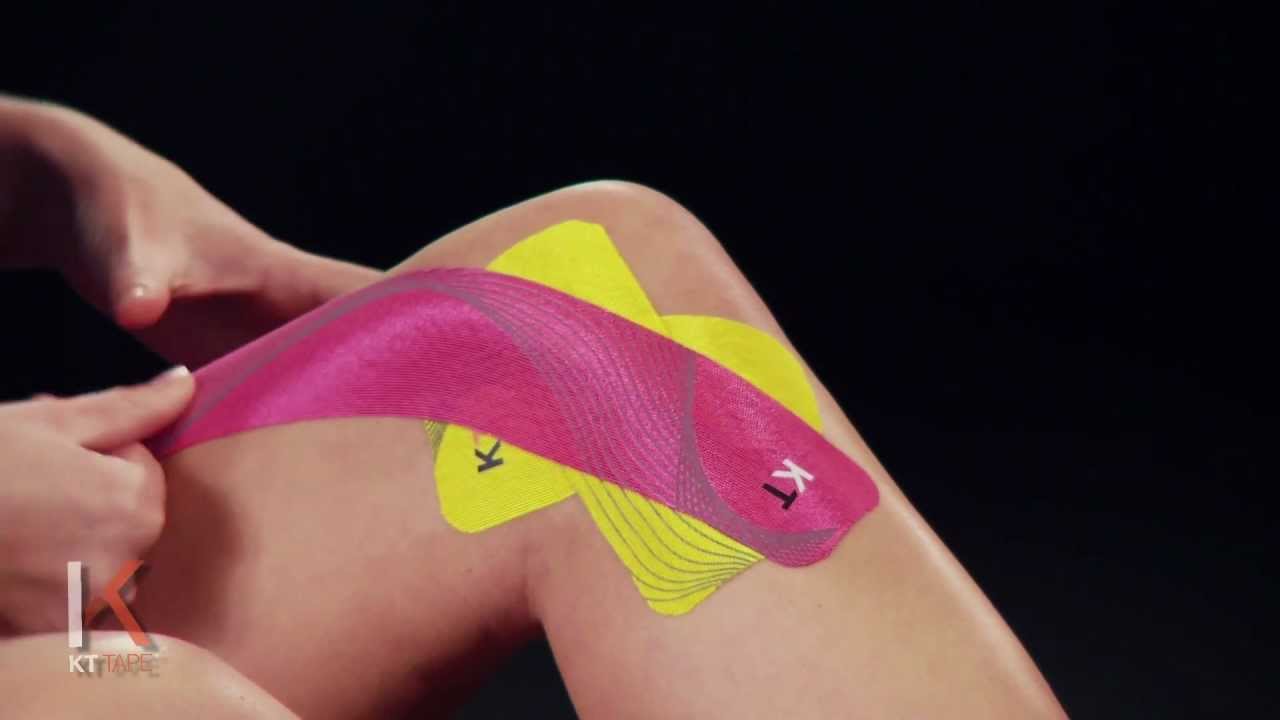
Peel back the paper from the center. With your knee still in that slightly bent position, lay the center of the tape over the front of your kneecap, with no stretch. Then, with about 50% stretch, bring each end diagonally towards the outside of your knee. One end will go up your thigh towards your outer hip, and the other will go down your shin towards your outer ankle. You’re essentially creating a little supportive X over your kneecap.
Humorous Thought: You can make an "O" if you’re feeling particularly optimistic about your knee’s recovery!
Step 5: The Final Rub Down (The Activation)
Once all your tape strips are in place, give them a good, firm rub. This is super important! The heat from your hands activates the adhesive, making the tape stick like glue. Imagine you’re trying to warm up a cold pizza slice – you need to get some friction going!
Rub each strip for about 20-30 seconds. You’ll feel it get warm and sticky. This is a good thing!
What About Those Other Taping Styles?
You might see pictures of people with all sorts of elaborate K-Tape patterns on their knees. Don't get overwhelmed! The "I" strips are a fantastic starting point and cover a lot of common knee issues. Once you get comfortable with these basic techniques, you can explore more advanced methods like the "Y" strip or the "web" technique if you have specific concerns.
A Little Wink: Think of the basic "I" strips as your trusty everyday jeans, and the more complex techniques as your fancy evening wear. Start with the jeans, and work your way up!
A Few More Things to Keep in Mind (Because We’re Being Thorough!)
Listen to Your Body: If the tape feels like it’s digging in, causing pain, or making things worse, take it off. K-Tape is meant to help, not hurt. Your body will usually tell you if something isn't quite right.
How Long Does It Last? K-Tape can generally stay on for 3-5 days, even through showers and workouts. However, if the edges start to peel significantly, or if you notice any irritation, it's time to remove it.
Removing the Tape: This is where you can be a little gentle. Slowly and carefully peel the tape back on itself in the direction of hair growth. You can soak the tape with baby oil or warm, soapy water to help loosen the adhesive. If it’s still a bit stubborn, you can use rubbing alcohol. The key is to be patient and avoid ripping it off like a band-aid from a papercut.
It’s Not a Permanent Fix: Remember, K-Tape is a fantastic supportive tool, but it’s not going to magically fix underlying issues. It’s best used in conjunction with rest, proper form, and perhaps some strengthening exercises recommended by a professional. Think of it as a superhero sidekick, not the main hero.
You’ve Got This!
There you have it! You’ve conquered the art of K-Taping your knee. See? It wasn’t so scary, was it? You’ve armed yourself with knowledge and, soon, you’ll be armed with colorful tape. Go forth and conquer those everyday aches and pains!
Remember, every little step you take towards taking care of your body is a victory. So, whether you’re an athlete pushing your limits, a weekend warrior enjoying the outdoors, or just someone who wants a little extra comfort, you’re doing great. Give yourself a pat on the back (and maybe a gentle rub on your newly taped knee!). You’ve got this, and your knee is going to thank you for it. Now go out there and move with a little more confidence and a lot less discomfort. You deserve it!

