How Do You Cut Blinds To Size
Okay, so picture this: you've just gotten your hands on some absolutely gorgeous new blinds. They’re going to transform your room from “meh” to “WOWZA!” The only tiny, insignificant, barely-worth-mentioning hiccup? They’re a smidge too big. Like, maybe the width is about as wide as your cat’s favorite napping spot, and you need it to be more like the length of your outstretched arm. Or perhaps the length is just long enough to trip the mailman (which, let’s be honest, might be kind of funny, but probably not ideal for your window treatments).
Fear not, my DIY-loving, interior-design-dreaming friends! Cutting blinds to size isn't some arcane wizardry reserved for lumberjacks and engineers. It's totally doable, and dare I say, even a little bit… fun? Think of yourself as a window-dressing ninja, armed with a few simple tools and a can-do attitude. You're about to conquer those pesky inches and make your windows sing with perfectly fitted glory!
Let’s Get Our Blades Ready!
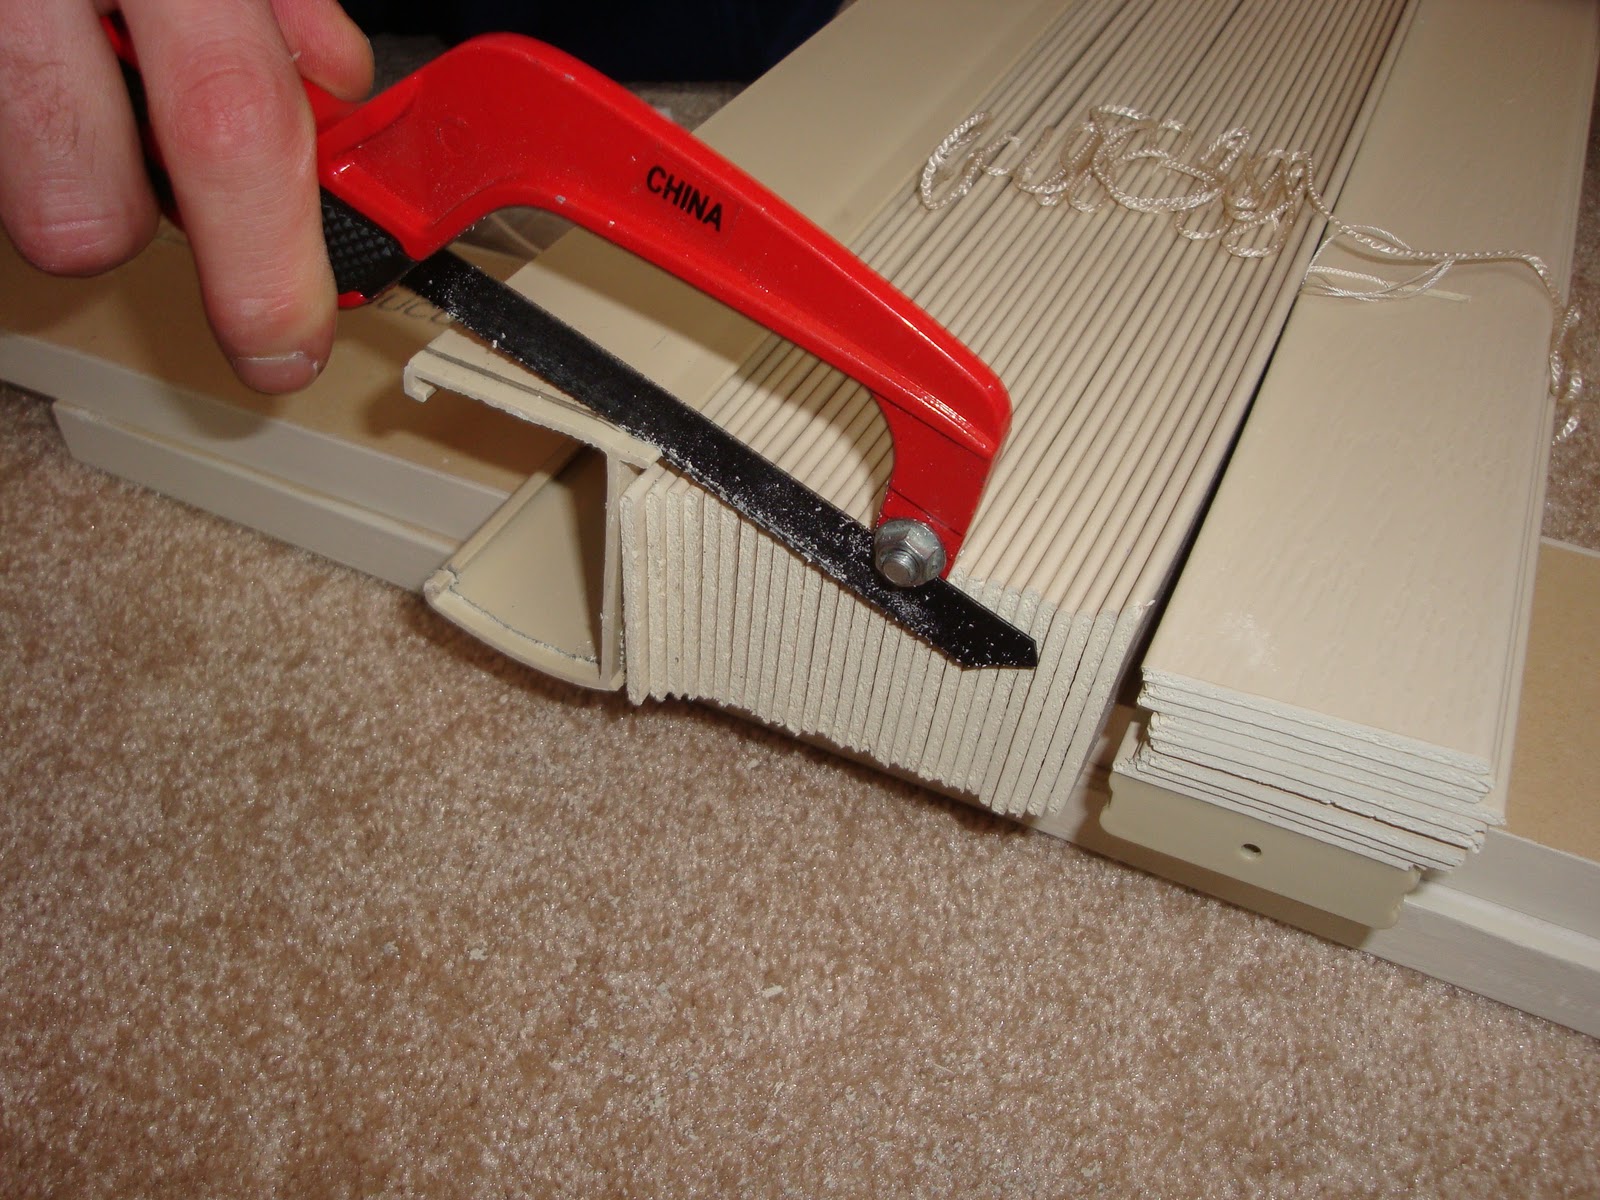
So, what magical implements do you need for this grand undertaking? Mostly, it’s just about having something sharp and something to measure with. For most common types of blinds, like those lovely faux wood or vinyl ones, a good, sturdy utility knife is your best friend. We're talking the kind with a retractable blade – a true workhorse of the household. Think of it as your trusty steed, ready to gallop through those slats!
Must Read
You’ll also need a measuring tape. No, not the one you use to see if your new sofa will fit through the door (although that’s important too!). We need a precise measuring tape, the kind that doesn’t wiggle and wobble like a nervous jelly. And for marking your lines, a nice, bold marker or a pencil will do the trick. Something that makes a clear, unmissable line. We don't want to be playing "guess the measurement" with our beautiful new blinds!
If you’re dealing with something a bit more… robust, like real wood blinds, you might want to step up your game to a fine-tooth handsaw. Or, if you're feeling particularly ambitious and have access to one, a miter saw can make things super-duper precise, but honestly, a good old-fashioned handsaw will get the job done with a bit of elbow grease. We're not aiming for a Nobel Prize in carpentry here, just perfectly sized blinds!

Pro Tip Alert! Always, and I mean always, measure twice and cut once. This golden rule is practically etched in stone for a reason. It’s the secret handshake of successful DIY projects. So grab that tape, stretch it out, and double-check those numbers. Your future self (and your perfectly fitted blinds) will thank you!
The Width is Your Friend (Usually!)
Let’s tackle the width first. Most blinds come with a little extra… let’s call it “wiggle room.” You’ll usually find that the slats themselves can be shortened. For vinyl and faux wood blinds, this is often as simple as making a few careful cuts along the edges of the slats. You’re essentially trimming off the excess material.

Lay your blind flat on a sturdy surface. A table, a workbench, even a clean section of floor will do. Make sure it’s stable, so it doesn’t go sliding around like a greased piglet mid-operation. Now, grab your measuring tape and your marker. Measure from the edge of the blind where you want to start trimming, and mark your desired width. Do this at a few points along the blind to ensure a nice, straight line.
Then, and this is where the fun begins, take your utility knife. You’ll likely need to go over your marked line a few times to get a clean cut. Don’t try to force it in one go; that’s a recipe for a jagged edge that looks like it was attacked by a grumpy badger. Go slow, apply steady pressure, and let the blade do its work. You might want to put a scrap piece of wood or cardboard underneath the area you’re cutting to protect your surface and give yourself a firmer base.
For wood blinds, if you're trimming the width, you'll be cutting the individual slats. You’ll still measure and mark, but then you’ll carefully saw through each slat. It might sound like a lot of sawing, but think of it as building a tiny, perfectly proportioned wooden orchestra!

Length: The Vertical Victory!
Now, let's talk about length. This is usually where you'll find the more substantial adjustments. For most blinds, the length is determined by the number of slats and the length of the cords that operate them. You might not need to do anything to the slats themselves. Instead, you’ll be shortening the lift cords.
First, extend your blind to its full length. Then, measure from the very top of the blind mechanism down to where you want the bottom of your blind to hang. This is your target length. Now, carefully unravel the lift cords. You’ll need to figure out where to knot them to achieve your desired shorter length. It’s like giving your blind a perfectly tailored hemline!

This part might involve a little bit of trial and error. You might need to tie a knot, then re-raise and lower the blind to check the length. Don’t be afraid to un-tie and re-tie until it’s just right. Think of it as a high-stakes game of blind-length dominoes, where the winning piece is a perfectly draped window treatment.
If you're dealing with blinds where you do need to cut the actual material for length (this is less common but can happen with some roller blinds or Roman shades), the process will be similar to cutting the width. Measure carefully, mark your line, and use the appropriate cutting tool – a utility knife for thinner materials or a scissors for fabrics. For anything more substantial, you might need a rotary cutter or even a craft knife.
And there you have it! You’ve transformed those slightly-too-big blinds into a custom-fit masterpiece. High fives all around! You’ve faced the challenge, armed yourself with tools, and emerged victorious. Your windows are now looking sharper than a freshly sharpened pencil, and your home feels just a little bit more you. Go forth and conquer more DIY adventures, you magnificent window wizard!

