How Do I Test A Lambda Sensor

So, the other day, my trusty old sedan decided to throw a little tantrum. Not a full-blown, smoke-billowing-from-the-hood kind of tantrum, thankfully. More like a subtle, "hey, maybe you should check something out" kind of vibe. The check engine light, that ever-so-subtle beacon of automotive joy, winked at me from the dashboard. And you know what’s funny? Whenever that light comes on, my brain immediately jumps to the most expensive, complex repairs. Oh no, it’s the transmission! It’s the engine block! It’s probably a tiny gremlin that lives in the exhaust system and eats spare change! My wallet started weeping in sympathy, even before I knew what was wrong.
But then I remembered my mechanic’s sage advice, delivered with a knowing grin: "Most of the time, Dave, it's something simple. Don't panic." And he’s usually right. This time, after a quick scan with my OBD-II reader (which, by the way, is probably the best £20 I ever spent on car stuff), the culprit was staring me in the face: P0420. Catalyst System Efficiency Below Threshold. Uh oh. That sounds… expensive. But then, another code popped up, a little more specific: P0138. O2 Sensor Circuit High Voltage (Bank 1, Sensor 2). Ah, the O2 sensor. Or, as it’s more commonly and affectionately known, the lambda sensor. Suddenly, my wallet stopped whimpering and just went into hibernation. This felt doable.
If your check engine light is giving you the evil eye, and you're suspecting a lambda sensor might be the troublemaker, then you've landed in the right digital neighborhood. Let's ditch the jargon and get down and dirty with how to actually test this little gadget. Because, let's be honest, figuring out if your car is trying to tell you something important or just having a bad hair day can be a real head-scratcher. And if you can diagnose it yourself, well, that's just a win, isn't it? More money for fancy coffee or, you know, essential car-related things like… more car parts. We’ve all been there.
Must Read
So, What Exactly IS a Lambda Sensor, Anyway?
Before we start prodding and poking, a quick recap. The lambda sensor, or oxygen sensor, is basically the car's little chemist. It lives in your exhaust system, usually somewhere before and sometimes after the catalytic converter. Its job is to measure the amount of unburned oxygen in the exhaust gases. Why? Because that’s a pretty good indicator of how efficiently your engine is burning fuel. Too much oxygen? Your engine is running lean (not enough fuel). Too little oxygen? It’s running rich (too much fuel). And that’s where the magic (or the mayhem) happens.
Think of it like this: your engine needs a perfectly balanced mixture of air and fuel to run optimally. Too much air and it sputters and can damage things. Too much fuel and it guzzles gas like a college student on a Saturday night, plus it can foul up your catalytic converter (which is definitely expensive to replace). The lambda sensor is the referee, constantly feeding information back to the Engine Control Unit (ECU) so it can adjust the fuel mixture on the fly. It's a pretty crucial little dude, despite its humble appearance.
Why Would It Go Bad?
Like most car parts, lambda sensors don't last forever. They're exposed to some pretty harsh conditions: extreme heat, exhaust gasses, carbon buildup, and sometimes even small oil leaks. Over time, the sensor element can get coated, become less responsive, or just plain give up the ghost. A faulty lambda sensor can lead to all sorts of problems, including:
- Reduced Fuel Efficiency: Your car thinks it's running rich and dumps more fuel than it needs. Hello, gas station!
- Increased Emissions: That little light isn't just for show; your car is probably spewing more nasties into the atmosphere.
- Poor Engine Performance: Hesitation, rough idling, lack of power – it can all stem from bad sensor readings.
- Catalytic Converter Damage: This is the big one. A clogged or damaged cat can cost a fortune.
So, yeah, testing it is a good idea before you start swapping out major components. Let's get to it!
The Different Ways to Test a Lambda Sensor
Now, for the fun part! There are a few ways to skin this cat, or rather, test this sensor. We'll cover a couple of the most common and accessible methods. You don't necessarily need to be a rocket scientist, but a bit of patience and a willingness to get your hands a little grimy will go a long way. And maybe some gloves. Seriously, trust me on the gloves. Nobody likes a greasy keyboard.
Method 1: The OBD-II Scan Tool Tango
This is where we start. If you don't have an OBD-II scan tool, go get one. Seriously. It's your first line of defense against mysterious dashboard lights. Mine is a basic Bluetooth one that connects to my phone, and it's been a lifesaver more times than I can count. Plug it into the diagnostic port (usually under the steering wheel on the driver's side), and fire up your car. The tool will read the error codes.
As I mentioned, my car threw P0420 and P0138. P0138 points directly at a specific O2 sensor (Bank 1, Sensor 2). Bank 1 usually refers to the side of the engine that has cylinder number 1. Sensor 2 typically means the sensor after the catalytic converter (downstream). Sensor 1 is usually before the converter (upstream). The upstream sensor is more critical for real-time fuel mixture adjustments, while the downstream sensor's main job is to monitor the effectiveness of the catalytic converter.
Once you have the code, you can often look up its definition online. But that's just the code. It tells you what the ECU thinks is wrong, not necessarily why. This is where live data comes in.
Live Data: Watching the Sensor Work (or Not Work!)
Most OBD-II scan tools, even the cheap ones, can show you live data from various sensors. This is gold! With the engine running, navigate to the live data stream section and find your O2 sensor readings. You'll usually see readings for O2 Sensor Voltage and sometimes O2 Sensor Current (for a heated version). For a typical narrowband O2 sensor, you're looking for a voltage that fluctuates rapidly between roughly 0.1V and 0.9V. It should be "swinging" back and forth, indicating the ECU is making adjustments to the fuel mixture and the sensor is reporting those changes.
If your sensor is stuck at a high voltage (like the P0138 code suggested), stuck at a low voltage, or not fluctuating at all, that’s a pretty strong indicator that the sensor itself might be bad. Or, and this is important, there could be an issue with the wiring or even a problem further up the chain that's causing the sensor to report a false reading. The scan tool can't always tell you the difference between a dead sensor and a sensor being fed bad information.

Pro tip: If you have multiple O2 sensors, compare their live data. If one is behaving normally and the other isn't, that helps narrow it down. For example, if Sensor 1 (upstream) is fluctuating nicely but Sensor 2 (downstream) is reading a steady, high voltage, it might still be a faulty Sensor 2, or it could mean your catalytic converter is failing and the ECU is trying to compensate, causing the downstream sensor to stay at a certain reading.
Method 2: The Multimeter's Mystical Measurements
If your OBD-II scanner is basic and doesn't give detailed live data, or you want to be extra sure, a multimeter is your next best friend. This is where you get a bit more hands-on. Disclaimer: If you're not comfortable working with electrical components or on your car, it's always best to consult a professional. Electricity and internal combustion engines can be a potent (and potentially dangerous) combination!
What You'll Need:
- A multimeter (digital is easiest)
- Basic hand tools (wrenches, possibly a socket set)
- A way to access the O2 sensor (sometimes you need to get under the car)
- A repair manual for your specific vehicle (highly recommended!)
- Gloves! (Seriously, I'm saying it again.)
The Process (General Steps):
First, you need to locate your lambda sensor(s). Consult your car's manual or do a quick online search. They're usually threaded into the exhaust pipe. You'll need to disconnect the electrical connector that goes to the sensor. Be gentle with these connectors; they can be brittle.
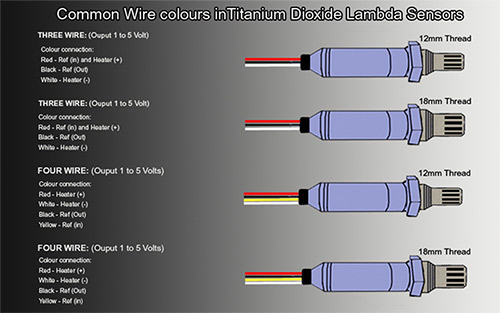
Now, you'll want to connect your multimeter to the relevant wires. This is where the repair manual is essential. O2 sensors have different wire configurations, and you need to know which wires carry the signal, which are for the heater circuit (if it has one), and which are ground. A typical 4-wire sensor might have:
- Two wires for the heater (often the same color, like white)
- One signal wire (often gray or black)
- One ground wire (often black or blue)
Important Note: Never test the sensor by probing the wires while the engine is cold and the sensor hasn't heated up. The sensor needs to reach operating temperature to give accurate readings. So, start the engine and let it run for a few minutes, or take it for a short drive.

Once the engine is warm:
- Signal Voltage Test: Set your multimeter to DC Voltage mode (usually a V with a solid line and a dashed line above it). Connect the multimeter's positive probe to the sensor's signal wire and the negative probe to the sensor's ground wire. You should see that fluctuating voltage between 0.1V and 0.9V, just like with the scan tool. If it's steady, high, low, or shows nothing, the sensor is likely bad.
- Heater Circuit Test: If your sensor has a heater circuit (most modern ones do), this is also worth checking. Set your multimeter to resistance (Ohms, Ω) mode. Disconnect the sensor entirely. Measure the resistance between the two heater wires. Consult your manual for the expected resistance value, but it's typically a few ohms (e.g., 2-10 Ω). A very high resistance or an open circuit (OL on the meter) means the heater element is dead.
Double-checking your work: If you get questionable readings with the multimeter, try testing the wiring harness itself. Disconnect the sensor and test the voltage coming from the ECU through the harness. If the harness is sending the correct voltage and signal, then the problem is almost certainly the sensor. If the harness isn't sending the right signal, you've got a wiring issue to track down. See? It’s a detective game!
Method 3: The "Tap Test" (Use with Caution!)
This one is a bit more of a quick-and-dirty check and not a definitive diagnostic, but it can sometimes give you a clue. And I mean, a clue. This is not a scientific method, so take it with a grain of salt. With the engine running and warm, and your OBD-II scanner showing live O2 sensor data, gently tap the sensor with a rubber mallet or the plastic handle of a screwdriver. Be careful not to damage it!
If the sensor is sticky or partially failing, you might see a slight change in its voltage reading when you tap it. If you see a noticeable fluctuation or improvement for a moment, it could be a sign that the sensor's internal components are physically compromised.
Again, this is not a reliable test on its own. It's more of a "hmm, that's interesting" kind of observation that might lead you to investigate further.
What Happens If It's Bad?
If your tests point to a faulty lambda sensor, the solution is usually replacement. They're generally not repairable. You can often buy them online for a fraction of the dealer price. Some are easier to get to than others. If yours is buried deep in the exhaust, or you're just not feeling up to the job, a mechanic can swap it out pretty quickly. It’s a common enough job.
When you get a new sensor, make sure it's the correct one for your car. Some sensors come with a liberal coating of anti-seize on the threads, which is handy. If yours doesn't, make sure to apply some to the threads of the new sensor. And don't forget to plug the electrical connector back in securely!
After replacement, clear the error codes with your OBD-II scanner and drive the car. The check engine light should stay off. If it comes back on, you might need to revisit your diagnosis or investigate other possibilities (like that catalytic converter, if you had a P0420 code). It’s a process of elimination, really.
The Takeaway
Testing a lambda sensor might sound intimidating, but with a few basic tools and a bit of common sense, it’s a very achievable DIY task. It’s a fantastic way to save money and gain confidence in your car maintenance skills. Remember, that little light on your dashboard is often just trying to tell you something simple. Don't let it scare you into thinking you need a whole new engine. Start with the basics, test your sensors, and remember to breathe. And maybe wear those gloves.
Happy wrenching!