How Do I Lay A Patio On Soil
So, you've got a patch of dirt that's just begging for some serious upgrade? A place where you can kick back with a frosty beverage, host a legendary barbecue, or simply bask in the glory of your own DIY awesomeness? Well, my friends, you're about to embark on a journey to transform that humble soil into a patio paradise! Don't worry, it's not rocket science, though if you were building a rocket, we'd probably advise against laying it directly on top of your lawn.
Think of it this way: we're not just laying down some slabs; we're creating an outdoor living room, a sanctuary, a testament to your ambition and perhaps your slightly stubborn refusal to hire professionals. This is where the magic happens, where sweat and a little bit of elbow grease turn ordinary into extraordinary. Get ready to unleash your inner landscape architect!
The Grand Unveiling: What You'll Need
Before we start digging like a troupe of over-caffeinated badgers, let's gather our trusty sidekicks. You'll need a good spade, a sturdy shovel, and maybe a wheelbarrow that won't try to escape down the nearest hill. Don't forget a tape measure, a level (essential for preventing future 'oops' moments), and some string and stakes to keep your dreams on track.
Must Read
And of course, the stars of the show: your paving slabs! Whether you're going for classic stone, chic concrete, or something a little more whimsical, these are the building blocks of your future patio glory. Oh, and a tamper! This little beauty is like a personal trainer for your patio base, ensuring it's firm and ready to support your fabulous new hangout spot.
Operation: Excavation - Digging for Glory!
This is where things get really exciting. We're going to dig a hole! Sounds simple, right? But this isn't just any hole; this is the foundation of your future patio dreams. You want to dig deep enough to accommodate a good layer of sub-base material, think of it as a sturdy mattress for your patio.
We're talking about a good few inches, people! Deeper than you might think, especially if you want your patio to withstand the trials and tribulations of time, and maybe a rogue shopping cart. Aim for a depth that will allow for your paving slabs, a generous helping of crushed stone, and a layer of sharp sand. It’s all about building a solid base, like a really good pancake batter.

"My patio is my happy place, and it all started with a very enthusiastic hole!" - A Wise (and Slightly Dusty) DIYer
Now, for the digging itself. It can be a workout, I won't lie. Imagine you're a superhero, fighting off the forces of unruly soil. Channel that inner strength! Keep your back straight, bend your knees, and if all else fails, blast some epic music and pretend you're on a construction reality show.
As you dig, make sure to keep the edges relatively neat. This is the perimeter of your future masterpiece, after all. And don't be afraid to get a little dirt under your fingernails; it's practically a badge of honor in the DIY world.
The Foundation Fiesta: Building the Base
Once your magnificent hole is ready, it's time for the base. This is where the magic really starts to happen. We're going to fill that void with glorious crushed stone, sometimes called aggregate. This is the backbone of your patio, the stuff that will keep everything from sinking into the earth like a forgotten potato.
Pour it in, spread it out, and then it's time for your tamper to shine. Get to work! This isn't a gentle pat; this is a firm, purposeful pressing down. You want to compress that crushed stone until it's as solid as your resolve to finish this project. Think of it as giving your patio its first, very firm handshake with the earth.
After you've tampered the crushed stone into submission, it's time for a layer of sharp sand, also known as building sand. This sandy blanket will create a perfectly smooth surface for your paving slabs to rest upon. Spread it evenly, making sure it’s all nice and level. Use your level here, folks! No one wants a patio that feels like a funhouse mirror.
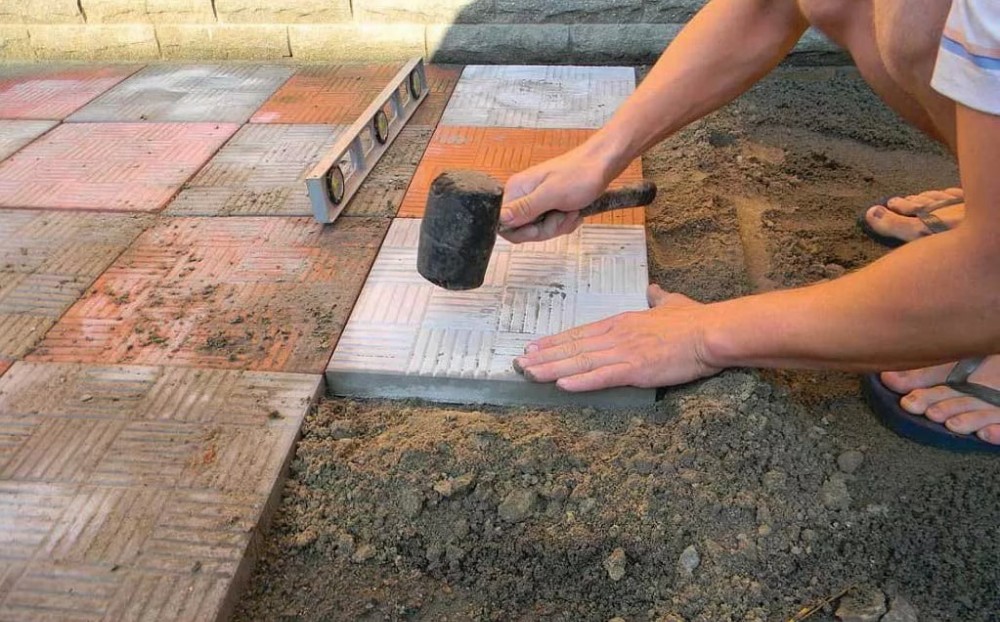
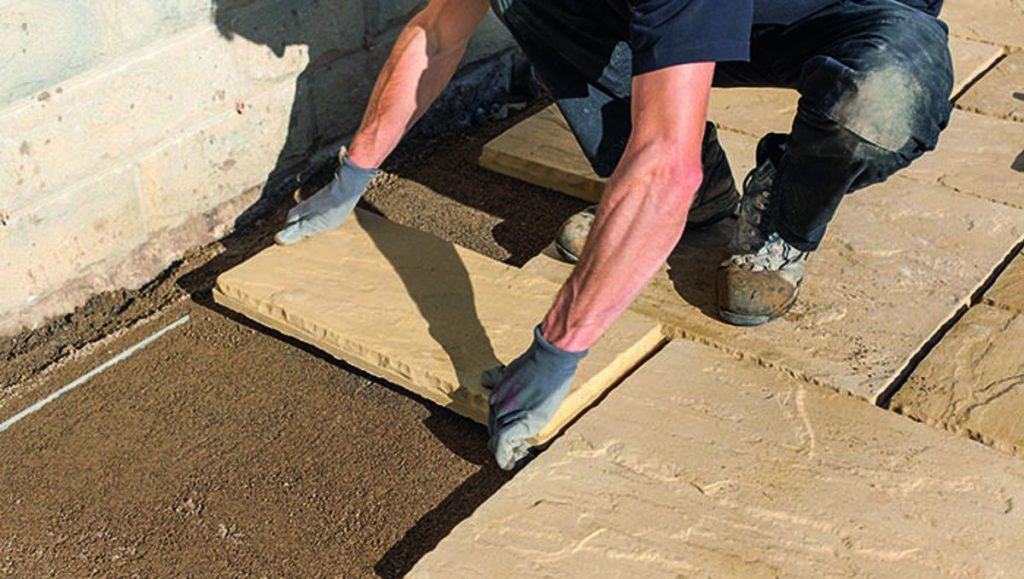
The Grand Entrance: Laying the Paving Slabs
And now, the moment you've been waiting for! It's time to lay your beautiful paving slabs. Start at one corner or edge, and work your way outwards. Gently place each slab onto the prepared sand base, tapping it down with a rubber mallet to ensure it's firmly seated.

Use your level again, constantly checking that each slab is flush with its neighbors and that the overall surface is sloping gently away from your house. This is crucial for drainage, preventing any surprise puddles turning your patio into a mini-lake. Nobody wants a patio that doubles as a duck pond, unless you're specifically aiming for that, which is… a bold design choice.
"My patio looked like a puzzle, and I was the one putting the pieces together. And guess what? I didn't lose any!" - A Proud Puzzle Master
As you lay each slab, maintain consistent gaps between them. These gaps are where the jointing compound or sand will go, holding everything together like a strong friendship. If you're using paving slabs with chamfered edges, the gaps will be created for you. It's like the slabs come pre-designed for a perfect hug!
The Finishing Touches: Sealing the Deal
Once all your slabs are laid and you've stepped back, admiring your handiwork, it's time for the final flourish. We need to fill those gaps between the slabs. This is where jointing sand or jointing compound comes in.

Sweep the sand or compound into the gaps until they are completely filled. Then, give the whole patio a gentle watering. This will help settle the sand and bind it together. It’s like giving your patio a warm, reassuring hug after a long day.
For an extra layer of protection and to really make those colours pop, consider applying a patio sealer. This acts like a shield, protecting your patio from stains, moss, and the general wear and tear of life. Plus, it gives it that extra gleam, that "wow" factor that will make your neighbors green with envy. You’ve earned it!
And there you have it! You've transformed a patch of dirt into a functional and fabulous patio. Take a moment to soak it all in. You did this! You battled the soil, wrestled the sand, and conquered the slabs. Your patio is ready for its grand debut. Now go forth and enjoy your magnificent creation!

