How Do I Connect A Light Switch

Hey there, coffee buddy! So, you're staring at a bare wall, a dangling wire, and thinking, "Man, I could really use a light right about now." Or maybe you're just feeling that DIY itch, you know? That urge to conquer something a little... electrifying. Well, you've come to the right place. Let's talk about how to connect a light switch, shall we? It’s not as scary as it sounds, I promise. Think of it as a fun puzzle, with a very bright reward.
First things first, though. Safety. Always safety. We're messing with electricity here, and while it’s not the boogeyman, it’s also not something to play footsie with. So, the absolute first step, before you even look at that wire like it’s a prize, is to turn off the power. Seriously. Go to your breaker box. Find the switch that controls the lights in the area you're working on. Flick it off. Did you hear that satisfying click? Good. Now, just to be extra, extra sure, grab a non-contact voltage tester. Wave it around the wires you're about to touch. If it beeps or lights up, congratulations! You get to go back to the breaker box and try again. No shame in that game. It’s better to be safe than... well, you know. Let’s not even go there.
Gathering Your Tools: The Light Switch Toolkit
Okay, power is OFF. Excellent. Now, what do you actually need to get this party started? It’s not a whole lot, thankfully. Think of it as a minimalist approach to home improvement. You'll need your new, shiny light switch, of course. Make sure it’s the right kind for your situation. Single-pole is the most common for basic on/off, but if you're feeling fancy later, we can chat about dimmers or three-ways. For now, let's stick to simple.
Must Read
Then, you’ll want a screwdriver. Usually a Phillips head is your best friend here, but sometimes a flathead comes in handy. Wire strippers? Absolutely essential. You can't connect anything if the wires are all… naked and unready. Speaking of naked, you’ll also want some wire nuts. These are like little hats for your wires, keeping them together and safe. And, of course, that trusty voltage tester we just talked about. Keep it close!
Oh, and a flashlight. Because even though you think you turned off the power, sometimes the universe likes to play tricks. And working in the dark is never the vibe.
Understanding the Wires: The Color Code Conspiracy
Now, let’s dive into the exciting (yes, exciting!) world of wire colors. It’s not as random as you might think. There’s a whole secret language going on in your walls. For a typical single-pole switch, you're usually looking for three main players:
The Hot Wire (Black): This is the one that brings the power to the switch. Think of it as the energetic youngster, always ready to go. It’s usually black. Always black. Unless it’s red, or some other wild color in older homes. But mostly, it’s black. Just remember, black is the bossy one bringing the juice.

The Switched Hot Wire (Also Black, or Sometimes Red): This is the wire that takes the power from the switch to your light fixture. It’s like the messenger, carrying the important news. It’s usually black, too. But sometimes, in fancier setups, it might be red. The key is, it’s the one coming out of the switch after the power has been "decided" upon. Confusing? A little. But we’ll get there.
The Neutral Wire (White): This is the return path for the electricity. It’s the quiet one, the steady friend who brings things back home. It’s usually white. Always white. Unless, of course, it’s been painted over. Or it's acting as a hot wire in a switch loop, which is when things get really fun. For our basic switch, though, it’s usually white and it generally doesn't connect to the switch itself. It goes straight to the light fixture. Mind. Blown.
The Ground Wire (Green or Bare Copper): This is the safety net. The superhero that swoops in if something goes wrong. It’s usually green, or just a bare copper wire. This one is super important for safety. It connects to the ground terminal on your switch and then to the ground in your electrical system. Don't skip this one, okay? It's like wearing a helmet when you ride your bike.
The Actual Connection: Let's Get Down to Business!
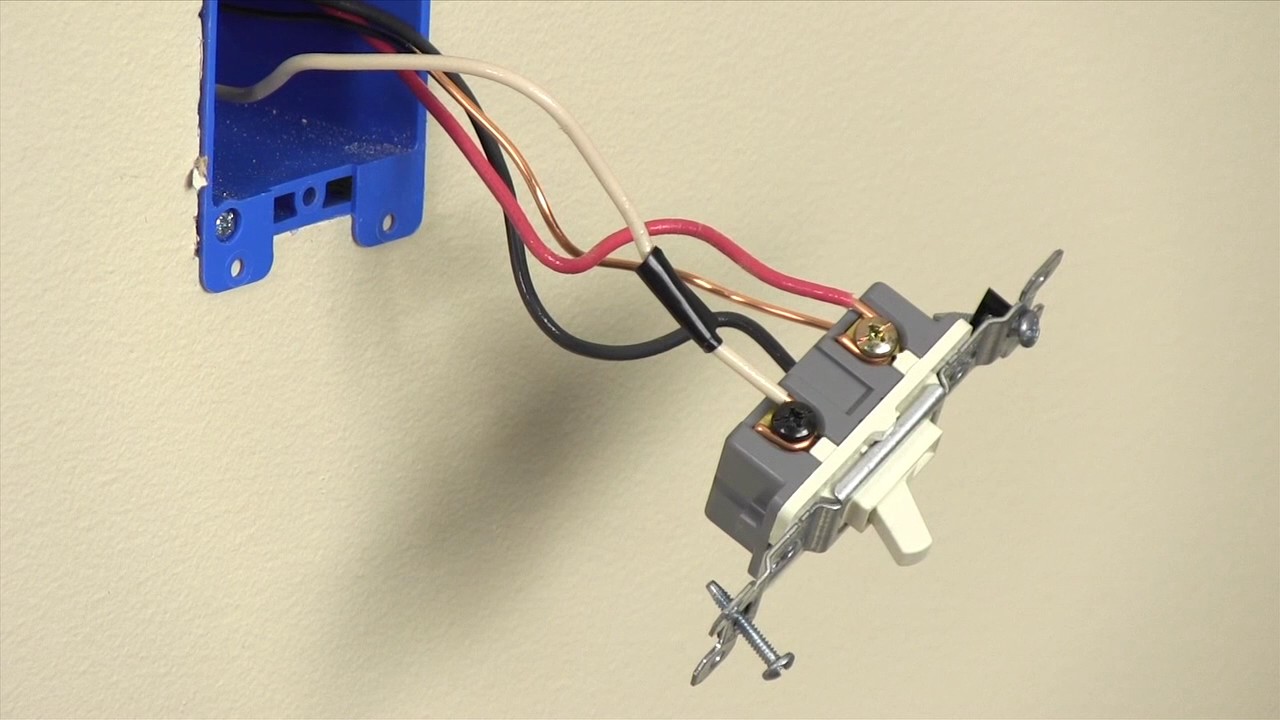
Alright, deep breaths. We’ve got the power off, we know our wires, and we have our trusty tools. Let’s do this. You’ll typically see two screw terminals on your switch, plus a green screw for the ground. Sometimes, there’s a third terminal for more complex setups, but for a standard switch, it’s usually two.

Step 1: Connect the Ground Wire. See that little green screw on your switch? That’s where the green or bare copper ground wire goes. Strip a little bit of the insulation off the end of the ground wire (about half an inch is good). Then, loop it around the screw in a clockwise direction. Tighten that screw down firmly. You want a good connection. This is our safety first!
Step 2: Connect the "Hot" Wire. This is the black wire that's bringing the power to the switch box. Strip about half an inch of insulation off its end. Loop it around one of the brass-colored screws on the switch. Again, clockwise. Tighten it up. This wire is the one that will be "on" when the switch is flipped.
Step 3: Connect the "Switched Hot" Wire. This is the black (or sometimes red) wire that goes from the switch to your light fixture. Strip its end, loop it around the other brass-colored screw, and tighten it up. This is the wire that will get power only when the switch is flipped "on."
What about that white neutral wire? Remember how we said it usually bypasses the switch? In a standard setup, the white wire coming into the box from the power source will connect directly to the white wire going to the light fixture, often using a wire nut. It’s like a direct handshake, no switch involved. You’re essentially just creating a path for the electricity to go to the light and then back, with the switch acting as a gatekeeper for the "hot" side.
If you have a switch loop (which is a bit more advanced and can be confusing), the white wire might be used as a hot wire. In that case, it’s good practice to wrap a piece of black tape around the white wire to indicate it's being used as a hot wire. But let's not overcomplicate things for our first rodeo, okay? Stick to the basics.

Tucking it In: The Gentle Art of Wire Management
Okay, your wires are connected! You’re practically an electrician now. But before you start admiring your handiwork, you need to gently tuck those wires back into the electrical box. Don’t just shove them in there like you’re trying to win a wrestling match. Be gentle. Fold them neatly. Think of it as tucking in a sleepy baby wire.
Make sure no bare wire is exposed outside of the wire nuts or the screw terminals. This is where that voltage tester comes in handy again. Give them a quick wave just to be absolutely certain nothing is live. We’re still playing it safe here.
The Grand Finale: Reattaching the Switch and Testing
Now, line up your switch with the screw holes in the electrical box. Gently push it in. Secure it with the screws that came with the switch (or the ones that were there before). Don't overtighten! You don't want to crack the plastic. Just snug is good.
Finally, snap on the switch plate. You know, the little cover that makes it look all official. This is the aesthetic part. Make it pretty!
And now… the moment of truth. Go back to your breaker box. Flick that switch back on. Take a deep breath. And… flip your new light switch. Did it work? Is there light? If yes, then jazz hands! You did it! You connected a light switch! Feel that surge of accomplishment? That’s the DIY glow!
If, by some strange chance, nothing happens, don't panic. Go back to the breaker. Double-check your connections. Remember, sometimes it takes a couple of tries. It's all part of the learning process. And if you’re still stumped, there’s no shame in calling a qualified electrician. They’re the pros for a reason, and sometimes they can fix things in five minutes that would take us all afternoon.
Beyond the Basics: What’s Next?
So, you’ve conquered the single-pole switch. High five! But the electrical world is a vast and wondrous place. You might be wondering about three-way switches (those ones that control a light from two different locations, like at the top and bottom of stairs) or dimmers. Those are a little more complex, but the same principles of safety and understanding your wires still apply. It’s all about building on what you’ve learned.
The key is to take it step by step, never rush, and always prioritize safety. Every time you successfully tackle a DIY project like this, you gain a little more confidence. You become a little more empowered. And who knows? Maybe next you’ll be rewiring your entire house! (Okay, maybe let’s not get ahead of ourselves. Baby steps.)
So there you have it, my friend. Connecting a light switch. It’s a tangible skill, a practical achievement, and a pretty cool way to make your space a little brighter. Now, go forth and illuminate! And maybe grab another coffee. You’ve earned it.

