How Do I Change A Catheter Bag

Hey there, awesome friend! So, you’re wondering about changing a catheter bag? No need to panic, it’s not as daunting as it sounds. Think of it as a little bit of a plumbing project for your pet, or maybe even for yourself if you're in that situation. We’re going to tackle this together, step-by-step, with a smile and maybe a few giggles along the way. Because honestly, dealing with medical stuff doesn’t have to be a total drag, right? Let’s get this done!
First things first, let's have a little chat about why we’re doing this. A urinary catheter bag, or a drainage bag, is basically there to collect urine when someone can't empty their bladder the usual way. It’s attached to a catheter, which is a thin tube that goes into the bladder. The bag is the trusty sidekick, catching all the… well, you know. And like any good sidekick, it needs a little attention now and then, especially to keep things clean and flowing smoothly. Think of it as a routine check-up, a bit like giving your car an oil change, but with less grease and more… liquid.
Now, before we dive headfirst into the nitty-gritty, let’s talk about preparation. This is key! You wouldn't go on a grand adventure without packing the right gear, would you? Same goes here. You'll need a few things handy. First off, cleanliness is king. Wash your hands thoroughly with soap and water. Like, really wash them. Scrub those knuckles, get in between those fingers. We’re aiming for "surgical scrub" status, even if we're just in the living room. Consider wearing disposable gloves. They’re like little heroes for your hands, keeping everything hygienic. You can usually grab these at your local pharmacy.
Must Read
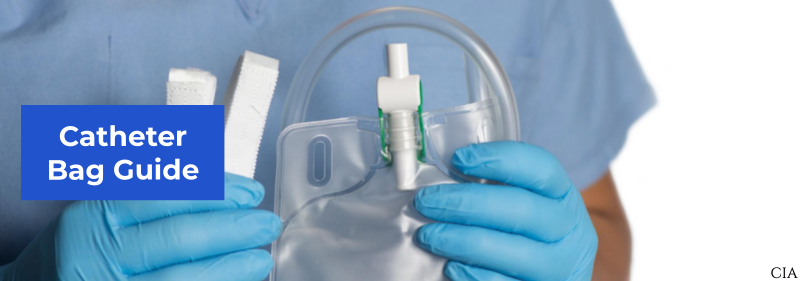
Next up, you’ll need a new catheter bag. Make sure it's the right kind for the job. Your doctor or nurse should have advised you on this. It's usually a sterile, closed system, which is super important to prevent infections. You'll also need some alcohol wipes or antiseptic solution. These are your trusty cleaning sidekicks for sterilizing things. And don't forget a clean container to place the old bag in, and maybe some paper towels or a disposable pad to catch any accidental drips. Nobody likes a little surprise puddle, right?
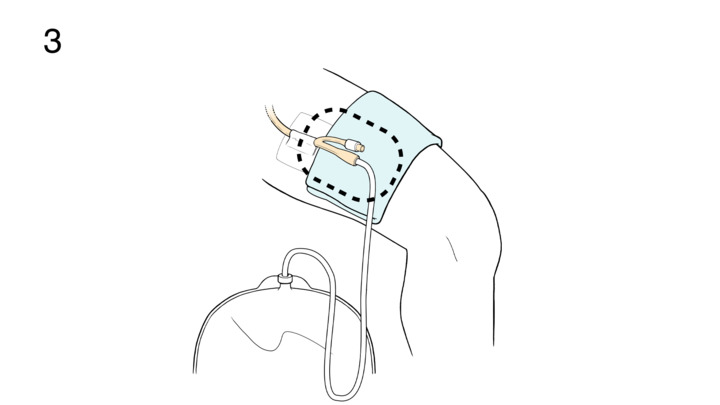
Alright, hands are clean, gloves are on (or you’re about to put them on), and all your supplies are within easy reach. Deep breaths! You've got this. The first step is to position the old bag. Most catheter bags have a little clip or a hook on them, designed to hang from a bed rail, a chair, or even a special stand. You want to make sure the bag is below the level of the bladder at all times. This is crucial for gravity to do its thing and prevent urine from flowing back up into the bladder, which can lead to nasty infections. Think of it as a one-way street for urine – going out, not coming back. Gravity is your friend here, not your frenemy.

Now, let's talk about emptying the bag. This is where the action really starts. At the bottom of the catheter bag, you’ll find a drainage spout. It usually has a little clamp or a cap. Gently unclamp it. And here's a little tip: have that clean container ready to catch the urine. Don’t be shy, just let it flow. You might want to hold the spout over the container. It’s a good idea to let it drain completely. Once it's empty, it's time to close it up. Securely close the drainage spout. Make sure it's completely sealed. We don't want any leaks when we reattach it or move it around. Think of it as putting a lid back on a perfectly filled jar.
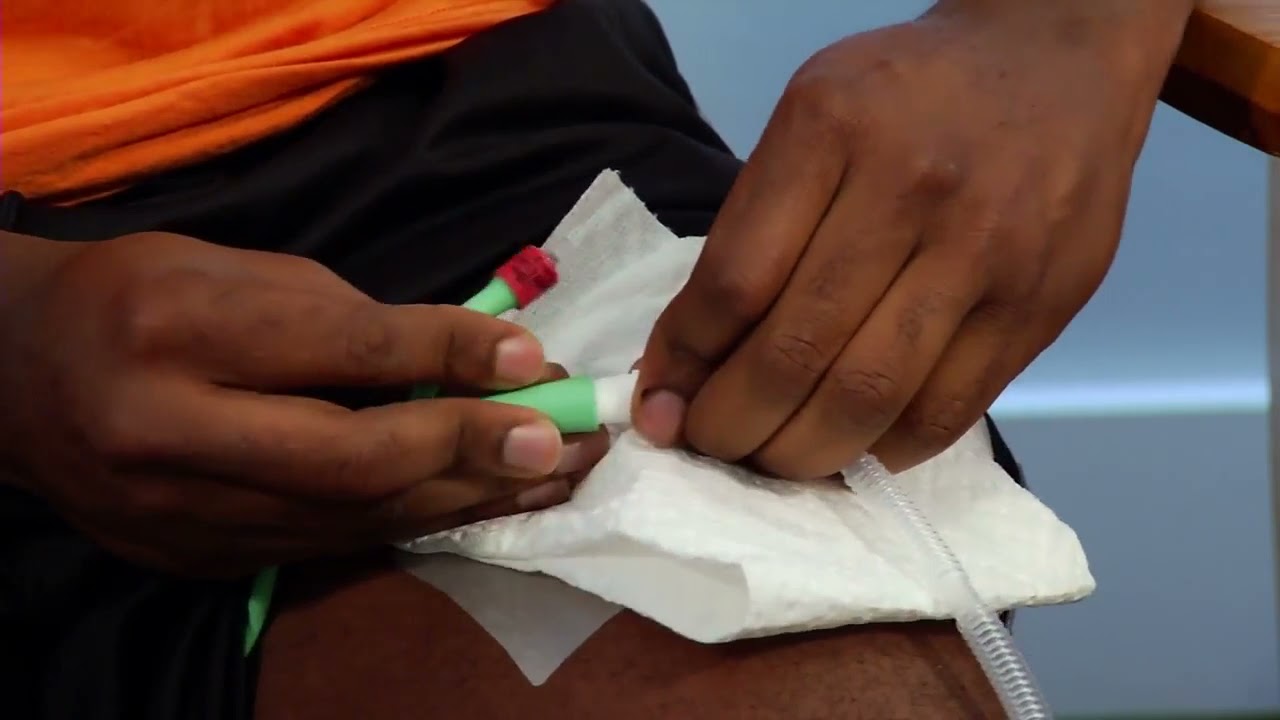
Okay, emptying done. Now, the disconnection and reconnection part. This is where it can get a tiny bit tricky, but we’ll keep it simple. First, you need to detach the old bag from the catheter tubing. This tubing connects to the catheter itself, which is inside the bladder. You'll see a connector where the bag tubing meets the catheter tubing. Gently pull them apart. It might feel a bit snug, but it should come apart with a gentle twist and pull. Don't yank it like you're trying to win a tug-of-war!
Before you connect the new bag, it’s a really good idea to clean the end of the catheter tubing. This is where those alcohol wipes come in handy. Give the end of the tubing a good wipe. This is your chance to prevent any little unwelcome guests from hitching a ride into the bladder. Then, take your new, sterile bag and connect its tubing to the end of the catheter tubing. Again, a gentle push should do it. Make sure it’s securely connected. You want a good seal so there are no leaks. You’ve just performed a little bit of medical marvel!

Once the new bag is connected, you can then hang it up. Remember, always keep the bag below the bladder level. So, reattach the hook or clip to its designated spot. You’ve officially completed the bag change! Give yourself a pat on the back. You navigated the world of catheter bags and came out victorious. High fives all around!
Now, let's talk about cleaning up. Dispose of the old bag and any used wipes or paper towels properly. If you used gloves, take them off carefully, inside out if possible, and dispose of them. Then, wash your hands again. It’s always a good practice to do a final hand wash after a procedure like this. It’s like the victory lap of hygiene.
A few more dos and don'ts to keep in mind. Do keep the tubing free of kinks. Kinks are the sworn enemy of good drainage. If the tubing is bent or twisted, urine can’t flow properly, and that’s a one-way ticket to discomfort and potential problems. So, give it a quick visual check every now and then. Make sure it’s lying nicely. Do monitor the amount of urine being produced. This can be important information for your healthcare provider. You might see markings on the bag to help you keep track. Don't let the drainage bag touch the floor. The floor is a germ metropolis. We’re trying to keep things clean, not introduce our friend to a bacterial rave.
And here’s a really important one: observe for any signs of infection. These can include fever, chills, cloudy or foul-smelling urine, pain or burning during urination (if the person can still feel it), or redness and swelling around the catheter insertion site. If you notice any of these, don't hesitate to contact your healthcare provider immediately. They are the experts, and they can help you figure out what’s going on and get you the right treatment.
Remember, practice makes perfect. The more you do it, the more comfortable and confident you’ll become. It might feel a bit awkward the first few times, and that’s totally normal. Think of it like learning to ride a bike. You might wobble a bit, you might even fall off once or twice, but eventually, you’ll be cruising along smoothly.
It’s also worth mentioning that sometimes, catheters can cause a little irritation or discomfort. If this is the case, again, speak to your healthcare provider. They can offer advice and solutions to make things more comfortable. Your comfort and well-being are paramount.
And a little word of encouragement: you are doing a wonderful, caring thing. Whether you’re changing a catheter bag for a loved one, a patient, or even for yourself, you’re taking on a responsibility that requires patience, attention to detail, and a whole lot of heart. It’s not the most glamorous task, but it’s an essential one, and by taking it on, you’re making a real difference in someone’s quality of life. That’s pretty darn amazing, if you ask me!
So, there you have it! Changing a catheter bag, demystified. It’s a process that requires a bit of preparation, a steady hand, and a good sense of humor. You’ve got the knowledge, you’ve got the courage, and you’ve got this. Keep your chin up, stay organized, and remember to celebrate those small victories. You’re a champ, and you’re doing a fantastic job. Now go forth and conquer that catheter bag with confidence, and a big, bright smile!