Hole Filler For Walls
Hey there, friend! Grab your mug. Let’s chat about something that’s probably hiding in plain sight in your house. You know those little dings, dents, and mysterious holes that just seem to appear on your walls? Yep, I’m talking about the uninvited guests of interior décor. They’re like tiny gremlins who specialize in wall mischief, aren’t they? And what’s our secret weapon against these little invaders? Drumroll please… hole filler!
Seriously, this stuff is a lifesaver. It’s like the fairy godmother of drywall, turning those unsightly imperfections into smooth, perfect surfaces. You ever stare at a tiny hole and think, “How did that even get there?” Was it a rogue tennis ball? A toddler’s enthusiastic toy airplane launch? Or maybe just the sheer, inexplicable force of… wall gravity? Who knows! But the point is, it’s there, and it’s annoying.
And let’s be real, we’ve all been there. You’re about to host people, or maybe you’re just having a moment of intense tidiness, and your eyes land on that one blemish. You’re like, “Ugh, no. Not today, Satan hole!” And that’s when you need your trusty hole filler to save the day. It’s not glamorous, but it’s incredibly satisfying. Think of it as a tiny bandage for your walls. A very effective, paintable bandage.
Must Read
So, what exactly is this magical concoction? Well, it’s not exactly rocket science, but it’s definitely some clever chemistry. Most hole fillers are basically a paste. Some are pre-mixed, ready to go straight from the tub. Others are powders you have to mix with water yourself. Like a tiny, DIY science experiment. Remember those in school? This is way more useful, though. Unless you were aiming to win a science fair with a perfectly smoothed wall, that is.
We’re talking about everything from those tiny nail holes left behind by pictures you’ve moved a million times (because who never changes their mind about wall art?) to those slightly larger ones that look like a woodpecker had a rough day. And even bigger ones, if you’re feeling brave! It’s all about matching the filler to the size of the crime scene, you know?
Tiny Holes, Big Impact (of Annoyance!)
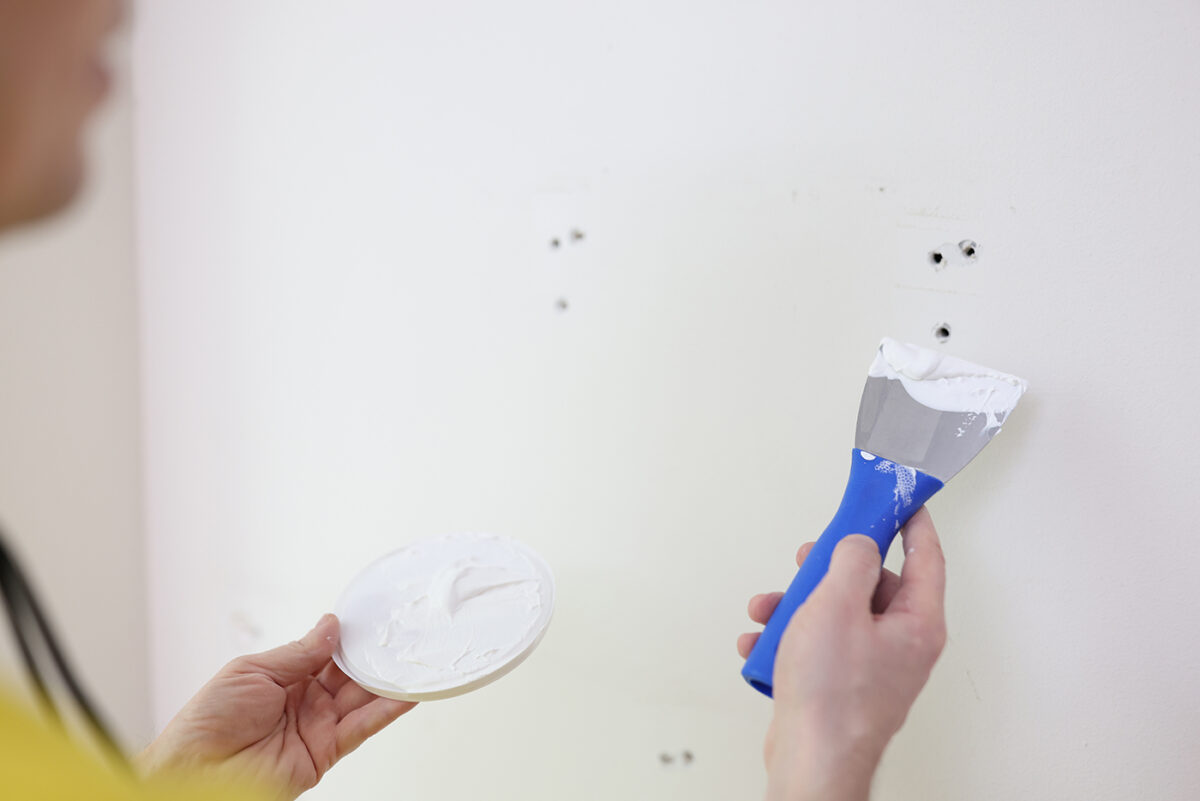
Let’s start with the smallest offenders. Those little pinprick holes from nails or screws. Honestly, sometimes they feel like they multiply. You fill one, and suddenly you notice three more. It’s a conspiracy, I tell you! But fear not, for the smallest of hole fillers are often the easiest to conquer. You can get these little squeeze tubes, and they’re just perfect. You just… squeeze! Onto a tiny putty knife, or even just directly into the hole if it's really small. It's so simple, it feels almost too easy. Are we sure this is allowed?

These little tubes are usually water-based, meaning they dry pretty quickly. And they’re super forgiving. If you use a little too much, you can just wipe it off with a damp cloth before it dries. It’s like playing with really, really forgiving spackle. So satisfying. You can just feel your wall thanking you for its newfound smoothness. It's like giving your wall a spa day. A very, very affordable spa day.
Then there are the slightly bigger holes. You know, the ones where you might have bumped something a little too hard, or maybe a doorknob decided to have a moment with the wall. These guys need a bit more substance. You’ll probably want something a bit thicker, something that’s going to hold its shape and fill the void properly.
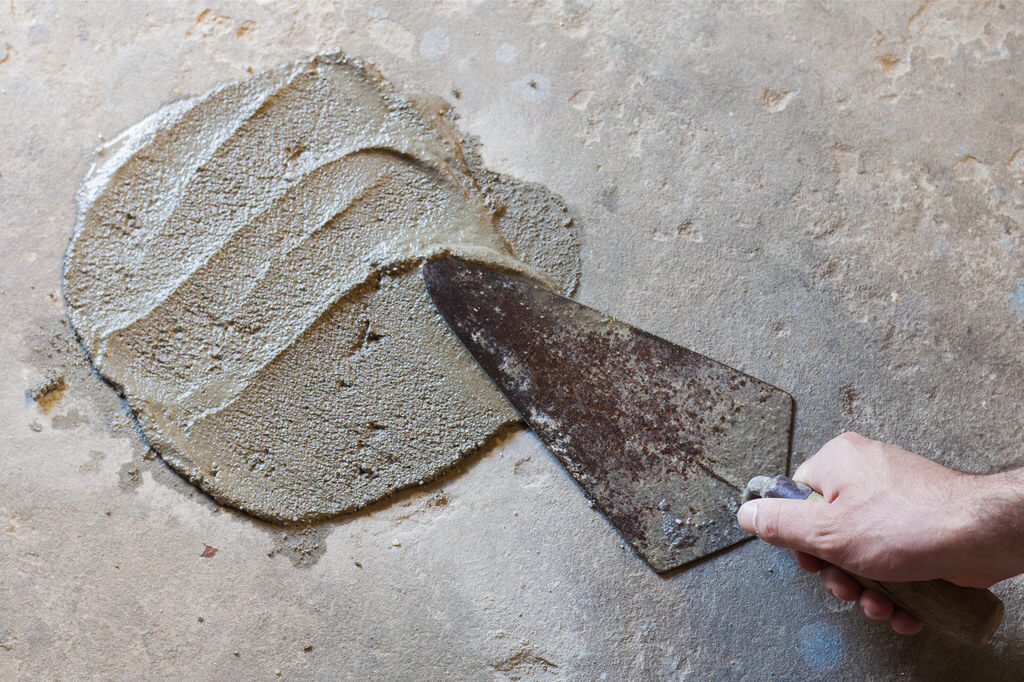
This is where you might reach for a small tub of pre-mixed spackle or joint compound. These are your workhorses. They’re a bit more substantial, and they’ll fill those slightly larger craters without shrinking too much as they dry. You just scoop a little onto your putty knife (a flexible one is your best friend here!) and gently press it into the hole. Work it in, make sure it’s all snug and covered. Don’t be shy!
The "Oops, I Dropped Something Heavy" Zone
Okay, so sometimes we’re dealing with more than just a tiny ding. We’re talking about those moments where you might have accidentally… well, let’s just say something impactful happened. Like when you’re moving furniture and a corner decides to become best friends with your drywall. Or when a kiddo’s toy decides to explore the structural integrity of your walls. These holes can be a bit more serious. They’re not just holes, they’re divots. They’re craters. They’re the scene of the crime.
For these guys, you might need something a bit more robust. Sometimes, you’ll find larger tubs of joint compound. This stuff is thicker and can handle bigger repairs. The key here is layering. You can’t just stuff a giant hole with one go. You’ll want to fill it, let it dry, maybe sand it a bit, and then apply another layer. It’s like building a tiny wall within a wall. Patience is key, my friends. Patience and a good putty knife.
You might even need to reinforce larger holes. Some people use mesh tape or a drywall patch kit for bigger breaches. Think of it as giving your wall a little internal scaffolding. You apply the patch, then you build up the joint compound around it. It’s a bit more involved, but totally doable. And when it’s all done and painted? Nobody will ever know the trauma your wall endured.
The Tools of the Trade (You Probably Have Half of Them!)
So, what do you actually need to tackle this hole-filling mission? It’s not a whole workshop, I promise! First, obviously, your hole filler. Choose wisely, as we discussed! Then, you'll want a couple of putty knives. A small, flexible one is great for tiny holes and precision. A wider, stiffer one is better for spreading larger amounts of filler and smoothing. Think of them as your wall-smoothing spatulas.
You’ll also need some sandpaper. Not the super-gritty stuff that you use to sand wood, but a finer grit, like 120 or 150. You want to smooth out the filler so it blends seamlessly with the wall. Nobody likes a bumpy patch, right? It’s like wearing a sweater with a weird lump in it. Uncomfortable.
And, of course, paint! You’ll need to touch up the area once it’s all dry and smooth. Try to match your existing wall color as closely as possible. Or, you know, use it as an excuse to repaint the whole room. Treat yourself! A little bit of painter's tape is also a good idea if you're worried about getting paint on surrounding areas. Precision is the name of the game, and a little tape helps with that.
The "How-To" (It’s Easier Than You Think!)
Alright, let’s get down to business. You’ve got your supplies, you’ve identified your enemy (the hole!), and you’re ready for action. Here’s the super-simplified rundown:
- Clean it up: First, dust out the hole. Get rid of any loose bits of drywall or paint. A clean surface helps the filler stick properly. Imagine trying to stick a bandaid on a dusty arm. Not ideal.
- Apply the filler: For small holes, a dab from a tube or a small dollop on a putty knife is enough. For larger ones, scoop some onto your wider knife and press it into the hole. Overfill slightly. This is important! The filler will shrink a little as it dries, so you want to give it a little extra to work with. It’s like baking – you want a little bit of dough left over, just in case.
- Smooth it out: Use your putty knife to gently scrape off the excess filler, leaving it as flush with the wall as possible. You want it to be smooth, not lumpy. Think of it like frosting a cake – you want a nice, even layer.
- Let it dry: This is the waiting game. Check the product instructions for drying times. Some are quick, others take longer. Resist the urge to poke it! Let it do its thing. Impatience is the enemy of a good patch.
- Sand it smooth: Once it’s completely dry, gently sand the patched area with your fine-grit sandpaper. You want it to be perfectly smooth and level with the surrounding wall. If you can feel a bump with your finger, keep sanding gently.
- Clean again: Wipe away any dust from sanding. You’re almost there!
- Paint it up: Apply your paint. You might need a couple of coats to get good coverage, especially if you’re painting over a darker filler. Feather the edges so it blends in nicely. You want it to be invisible, a master of disguise!
And voilà! Your wall is healed. It’s like a magic trick. Poof! The hole is gone. You might even do a little victory dance. I won’t judge. It’s the small victories, right?

When to Call in the Big Guns (or Just a Friend with Experience)
Now, while hole filler is amazing for most everyday wall woes, there are times when you might want to pause. If you’ve got a truly massive hole, like something that looks like it was made by a wrecking ball (or a very enthusiastic dog who doesn’t understand walls), you might need a more professional approach. We’re talking about drywall patching kits or even calling in a handyman. It’s no shame! Some jobs are just bigger than a little dab of filler.
Also, if you’re dealing with water damage or mold around a hole, that’s a whole different ballgame. You don’t want to just cover that up! That requires a bit more investigation and potentially professional remediation. So, always assess the situation. Is it just a superficial ding, or is there something more sinister going on?
But for those everyday, run-of-the-mill holes? Hole filler is your best friend. It’s affordable, it’s easy to use, and the results are incredibly satisfying. It’s the unsung hero of keeping your home looking tidy and polished. You can tackle those tiny imperfections and feel a real sense of accomplishment. It’s like giving your home a little confidence boost, one patch at a time.
So next time you spot one of those little wall nuisances, don’t despair! Reach for your trusty hole filler. You’ve got this. And who knows, you might even start looking forward to finding new little spots to patch. It’s a weird hobby, but hey, whatever floats your boat! Just don’t go around making holes on purpose. That’s just… weird. But for the accidental ones? We’ve got the solution!