Kenmore Elite Water Inlet Valve Replacement

Ah, the Kenmore Elite. That gleaming beacon of kitchen cool, the unsung hero of your laundry room. It’s the kind of appliance that whispers promises of sparkling dishes and impossibly fresh clothes. But even the most elite among us can have a moment, a little hiccup in their otherwise flawless performance. And sometimes, that hiccup manifests as a… well, a trickle. Or worse, a silent but deadly leak. We're talking, of course, about the
Now, before your inner MacGyver starts twitching, and you envision yourself wrestling with wrenches and plumbing like you’re diffusing a bomb, let’s take a deep breath. Replacing a Kenmore Elite water inlet valve is actually one of those DIY tasks that’s surprisingly… achievable. It’s not a symphony of complex engineering; it’s more like a well-choreographed dance with a few simple steps. And the reward? A smoothly running appliance, a dry floor, and the smug satisfaction of a job well done. Plus, think of the money you’ll save. That’s more cash for artisanal coffee, a new pair of those ridiculously comfy socks you’ve been eyeing, or maybe even a weekend getaway. Every little bit counts, right?
So, what exactly is this mysterious water inlet valve? In layman’s terms, it’s the valve that controls the flow of water into your appliance. When your dishwasher or washing machine tells the valve it’s time to get to work, the valve opens, letting the perfect amount of water in. When the cycle is done, or it’s time for a drain, it shuts off. Simple. Elegant. Until, that is, it decides to stage a quiet protest. This can happen due to mineral buildup, age, or just the sheer wear and tear of life. You might notice your machine not filling, filling too slowly, or – the dreaded one – leaking from the back.
Must Read
The good news is, you’ll likely get a warning sign. A slow drip, a strange noise, or an error code on your appliance’s display are all potential clues. Ignoring these can lead to bigger problems, like water damage to your floors or even your home’s structure. So, consider this your gentle nudge from the universe (and this article) to get it sorted. It’s like that one friend who always reminds you to drink more water – a little bit of proactive care goes a long way.
Before we dive into the nitty-gritty, a little disclaimer. While this is a relatively straightforward fix, it’s always wise to consult your Kenmore Elite appliance’s manual. It’s your appliance’s autobiography, filled with specific quirks and instructions tailored just for it. If you’re feeling unsure, or if your appliance is still under warranty, it’s always best to call in the professionals. There’s no shame in that game; sometimes, the most “elite” move is knowing your limits and calling in reinforcements. Think of it as outsourcing your plumbing problems to a seasoned general.
The Pre-Dance Checklist: What You’ll Need
Alright, let’s get our tools ready. Think of this as packing for a mini-adventure, except your destination is the back of your appliance. You’ll want to gather a few key items before you embark on your valve-replacement quest.
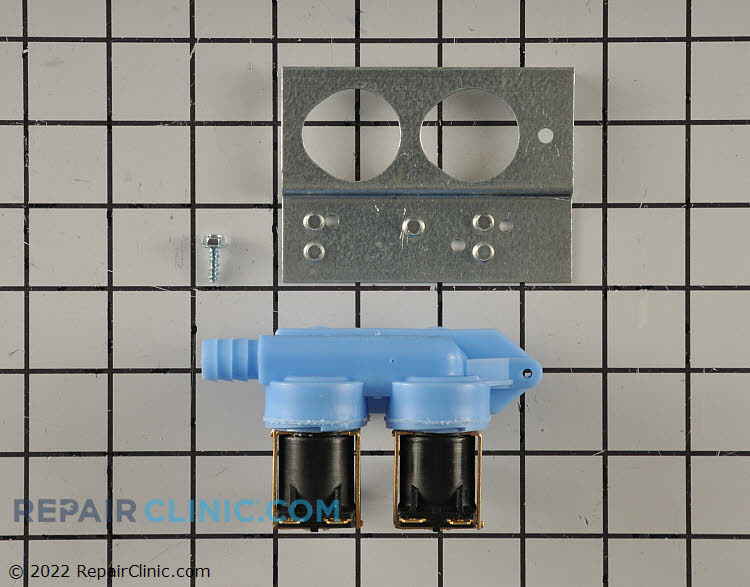
First and foremost, you’ll need the replacement water inlet valve. Make sure it’s the exact model for your Kenmore Elite. Appliance parts can be like specific puzzle pieces; the wrong one just won’t fit. A quick search online with your appliance’s model number should do the trick. Many reputable appliance parts websites will guide you. Think of it as finding the perfect vinyl for your record player – the right sound matters.
Next up, a Phillips head screwdriver. Most Kenmore Elite appliances use these. You might need a few different sizes, so have a small set on hand. It’s like having a varied playlist – you need options to match the mood (or the screws).
A pair of pliers will also be your friend. These are great for gripping and twisting stubborn connections. Channel locks or adjustable pliers are your best bet. They’re the multi-tool of the DIY world, handy for all sorts of unexpected situations. Like that friend who can fix anything with duct tape and a can-do attitude.
Don’t forget a bucket or towels. When you disconnect the old valve, there’s bound to be some residual water. You don’t want to flood your kitchen or laundry room, turning your DIY triumph into a miniature water park. Place the bucket strategically, like a carefully placed coaster under your drink.
A flashlight or headlamp can be a lifesaver. Appliance interiors can be dark and cavernous. You need to see what you’re doing! A good light source is like having an extra pair of eyes, ensuring you don’t miss a crucial screw or connection. Think of it as the spotlight on your DIY stage.
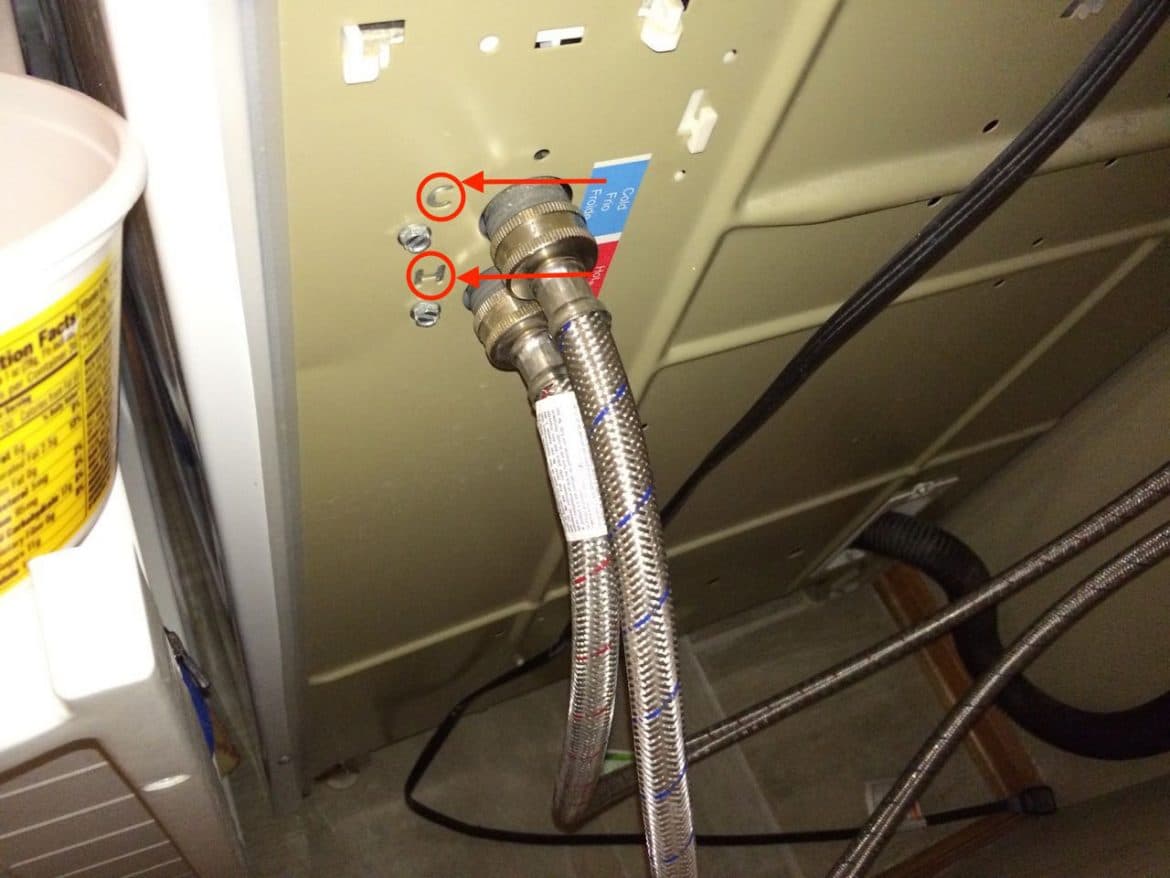
Finally, and this is crucial: water supply shut-off valves. These are usually located behind your washing machine or dishwasher. You must turn these off before you start. This is non-negotiable. It’s the ultimate “pause” button for your appliance’s water supply. Safety first, always. This is the equivalent of looking both ways before crossing the street, even on a quiet road.
The Step-by-Step Symphony: Let the Replacement Begin!
Okay, instruments tuned, checklist complete. It’s time for the main event: replacing that water inlet valve. Let’s break it down into manageable movements.
Movement 1: The Power Down and Water Stop
This is your overture. First, unplug your Kenmore Elite appliance from the wall. Electricity and water are not friends, and we want to keep them from having a dramatic argument. Next, locate those water supply shut-off valves. Turn them clockwise until they are firmly closed. Give them a gentle wiggle to ensure they’re fully shut. If you’re unsure which way to turn or if they feel seized, consult your appliance manual or a plumber. Don’t force it; patience is key here.
Movement 2: Accessing the Valve
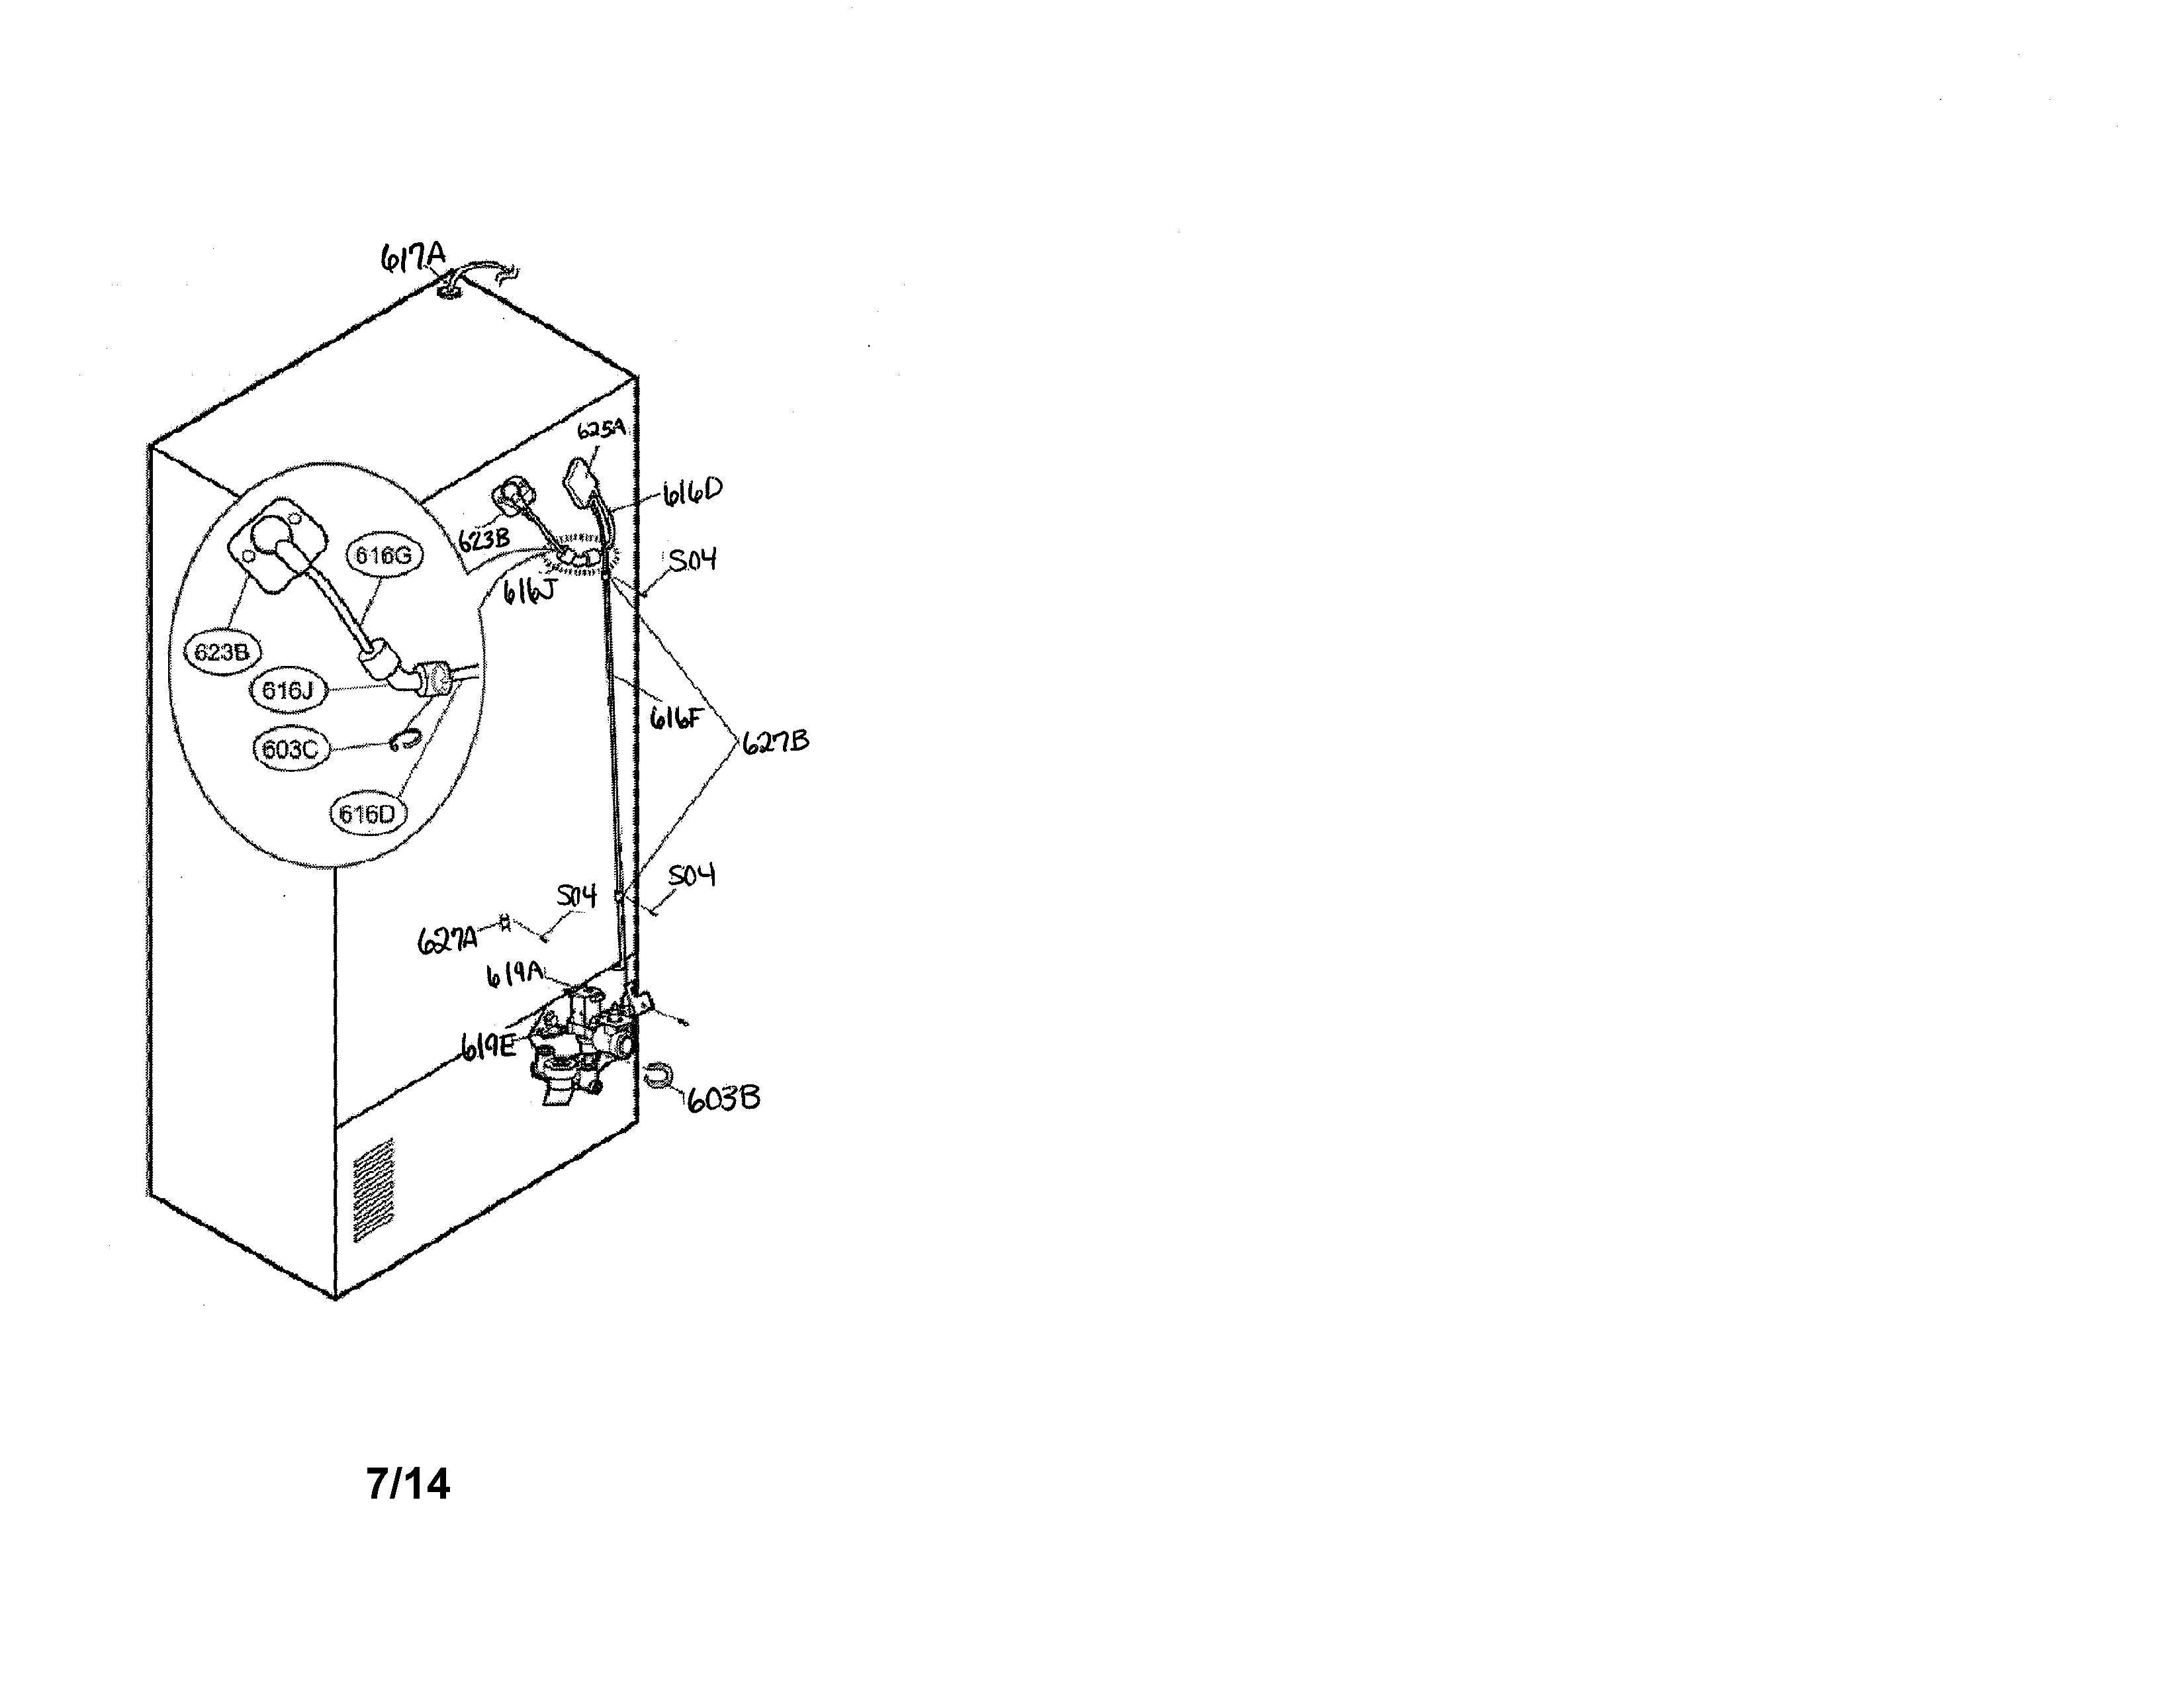
Now, you need to get to the valve. For most Kenmore Elite dishwashers, this means carefully pulling the appliance out from its housing. You might need to remove some screws that secure it to the countertop or cabinets. For washing machines, the valve is often located at the back, and you might need to remove a back panel or a specific access plate. Again, your manual is your best friend here. Think of it as carefully unfolding a treasure map.
As you’re working, take note of how everything is put together. Snap pictures with your phone if it helps! This is especially useful when you’re putting things back together. It’s like creating a mental blueprint, but with photographic evidence.
Movement 3: Disconnecting the Old Valve
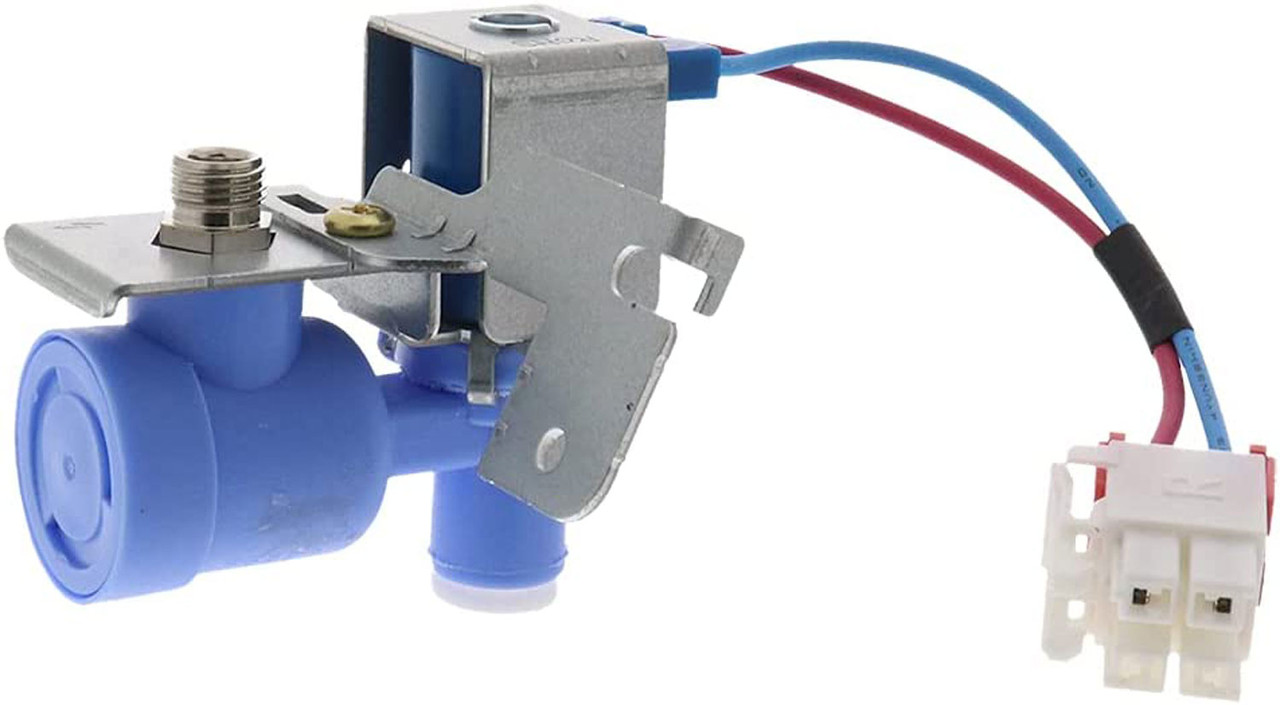
This is where your pliers and bucket come into play. You’ll see a hose connecting the water supply to the valve. This connection might be secured with a clamp. Use your pliers to loosen the clamp and gently pull the hose off the valve. Be prepared for a small amount of water to drip out – hence the bucket! Then, you’ll need to disconnect the electrical connectors that power the valve. These are usually plastic clips; press them gently to release. Finally, the valve itself is likely screwed or clipped into place. Unscrew or unclip it carefully.
Pro tip: As you disconnect things, label them if you’re feeling extra cautious. A small piece of tape and a marker can save you a world of confusion later. It’s like leaving breadcrumbs on a hike.

Movement 4: Installing the New Valve
This is your crescendo! Take your new Kenmore Elite water inlet valve and position it where the old one was. Secure it with screws or clips, just like the old one was attached. Reconnect the electrical connectors – they should only fit one way, so don’t force them. Then, reattach the water supply hose to the new valve, ensuring the clamp is tightened securely. Make sure there are no kinks in the hose.
It's important to ensure a snug fit. Think of it like fitting a new earbud – you want it to be secure and comfortable. For the hose clamp, you want it tight enough to prevent leaks, but not so tight that you damage the hose or the valve.
Movement 5: The Grand Finale and Testing
Now for the moment of truth. Carefully push your appliance back into its place (if you moved it). Double-check that all connections are secure and that no tools or stray parts are left behind. Slowly turn the water supply shut-off valves back on (counter-clockwise). Listen for any hissing or dripping sounds. Once the water is flowing, run a short test cycle on your appliance. Keep an eye out for any leaks around the new valve and ensure the appliance is filling correctly. It’s like the triumphant return of your favorite band to the stage.
If everything looks good and your appliance is performing as it should, congratulations! You’ve successfully replaced your Kenmore Elite water inlet valve. Take a moment to bask in your DIY glory. You’ve earned it!
Fun Little Facts and Cultural Musings
Did you know that the concept of a “valve” has been around for centuries? Ancient Romans used rudimentary valves in their aqueduct systems. So, in a way, you’re participating in a long tradition of keeping water flowing where it needs to go! It’s a nod to ingenuity that stretches back millennia. Think of yourself as a modern-day aqueduct engineer, just with a slightly more sophisticated appliance.

And the term “DIY”? It exploded in popularity in the mid-20th century, fueled by a desire for self-sufficiency and the rise of home improvement culture. It’s about empowerment, about taking control of your living space. So, when you tackle this valve replacement, you’re not just fixing a machine; you’re embracing a spirit of independence.
Also, have you ever noticed how different appliance noises can be? The gentle hum of a dishwasher, the rhythmic whoosh of a washing machine… they all have their own personality. A faulty water inlet valve can sometimes add a peculiar, off-key note to this symphony of domestic sounds. Replacing it not only fixes the problem but restores the familiar, comforting soundtrack of your home.
Consider the iconic scene in The Graduate where Benjamin Braddock asks "Mrs. Robinson, you're trying to seduce me, aren't you?". While not directly related to plumbing, it captures a certain era of home life and the complexities within it. Our appliances, in their own way, are silent characters in the narrative of our daily lives, and keeping them in good working order is part of maintaining the harmony of our domestic dramas.
And for the true enthusiasts, there’s a whole online community dedicated to appliance repair! Forums, YouTube tutorials, and even Facebook groups where you can share your successes (and your occasional stumbles). It’s like having a global repair café at your fingertips. You’re never truly alone in your DIY endeavors.
A Moment of Reflection
There’s a quiet satisfaction that comes with fixing something that’s broken. It’s more than just the monetary savings, though that’s certainly a bonus. It’s the feeling of competence, of understanding the mechanisms that make our lives run smoothly. In a world that often feels increasingly complex and reliant on unseen forces, the act of physically interacting with and repairing a tangible object can be incredibly grounding.
Our appliances are the silent workhorses of our homes. They clean our clothes, our dishes, and make our lives undeniably easier. When they falter, it’s not just an inconvenience; it’s a disruption to our rhythm. Taking on a task like replacing a water inlet valve, however small it may seem, is a way of honoring those workhorses, of keeping the gears of our domestic lives turning without a hitch. It’s a reminder that even the most “elite” of machines can benefit from a little bit of human touch, a little bit of care, and a willingness to get our hands a little bit dirty. And in the grand scheme of things, that’s a pretty powerful feeling, isn’t it?