How To Shrink An Image In Paint

Hey there, digital wizard (or aspiring one)! Ever found yourself staring at a super-sized image, wondering how to tame it down without resorting to some fancy, super-expensive photo editing software? You know, the kind that makes you feel like you need a degree in computer science just to resize a picture? Well, guess what? You’ve got a secret weapon hiding right there on your computer, and it’s probably more familiar than you think: Microsoft Paint!
Yep, that’s right. The same trusty program that’s been around since the dawn of digital time, where you probably doodled your first masterpiece or drew a rather questionable-looking smiley face. Paint is surprisingly capable, and shrinking an image is a piece of cake. Seriously, easier than making toast. Let’s dive in!
Unleashing the Power of Paint for Image Shrinking!
So, why would you even want to shrink an image? Great question! Maybe you’re trying to email a bunch of photos to your grandma and don’t want to clog up her inbox. Or perhaps you’re uploading a picture to a website that has a strict file size limit (those pesky things!). Or, just maybe, you want to fit a giant landscape photo onto a tiny little space on your desktop. Whatever the reason, Paint has your back. It’s like the trusty old friend who’s always there to lend a hand, no fuss, no drama.
Must Read
And the best part? You don’t need to download anything. It’s already there, waiting for you. Think of it as a hidden gem in your digital toolbox. So, let’s get started. Grab a cup of your favorite beverage, put on some chill music, and let’s make those images a bit more bite-sized.
Step 1: Opening Your Image in Paint – The Grand Entrance
First things first, we need to get our image into Paint. This is the moment of truth! You have a couple of super-duper easy ways to do this.
Method 1: The Classic "Open With" Ritual
Find the image you want to shrink. Right-click on it. You’ll see a menu pop up, like a friendly little ghost. Scroll down until you see "Open with". Hover your mouse over that, and a sub-menu will appear. Look for "Paint" and give it a good click. Bam! Your image is now gracing the canvas of Paint. Easy peasy, right?
Method 2: The "Drag and Drop" Dazzle
This one is even more fun. Open Paint first. You can do this by typing "Paint" into your Windows search bar and clicking on the app. Once Paint is open and looking all pristine and blank, just grab your image file from your folder and drag it straight into the Paint window. It's like giving your image a ride on a digital magic carpet! Poof! It’s there.
Whichever method you choose, you’ve successfully brought your image into the world of Paint. Give yourself a pat on the back! You’re already halfway there.
Step 2: The "Resize and Skew" Showdown – Where the Magic Happens!
Alright, now for the main event! With your image open in Paint, look at the top of the window. You'll see a ribbon of tools. We’re looking for the "Image" group. Within that group, you’ll find a button that says "Resize". Click it.
A little dialog box will pop up, looking all official and important. This is where we’re going to work our shrinking magic. You’ll see two main options: "Resize" and "Skew". We’re primarily interested in the "Resize" part for shrinking.
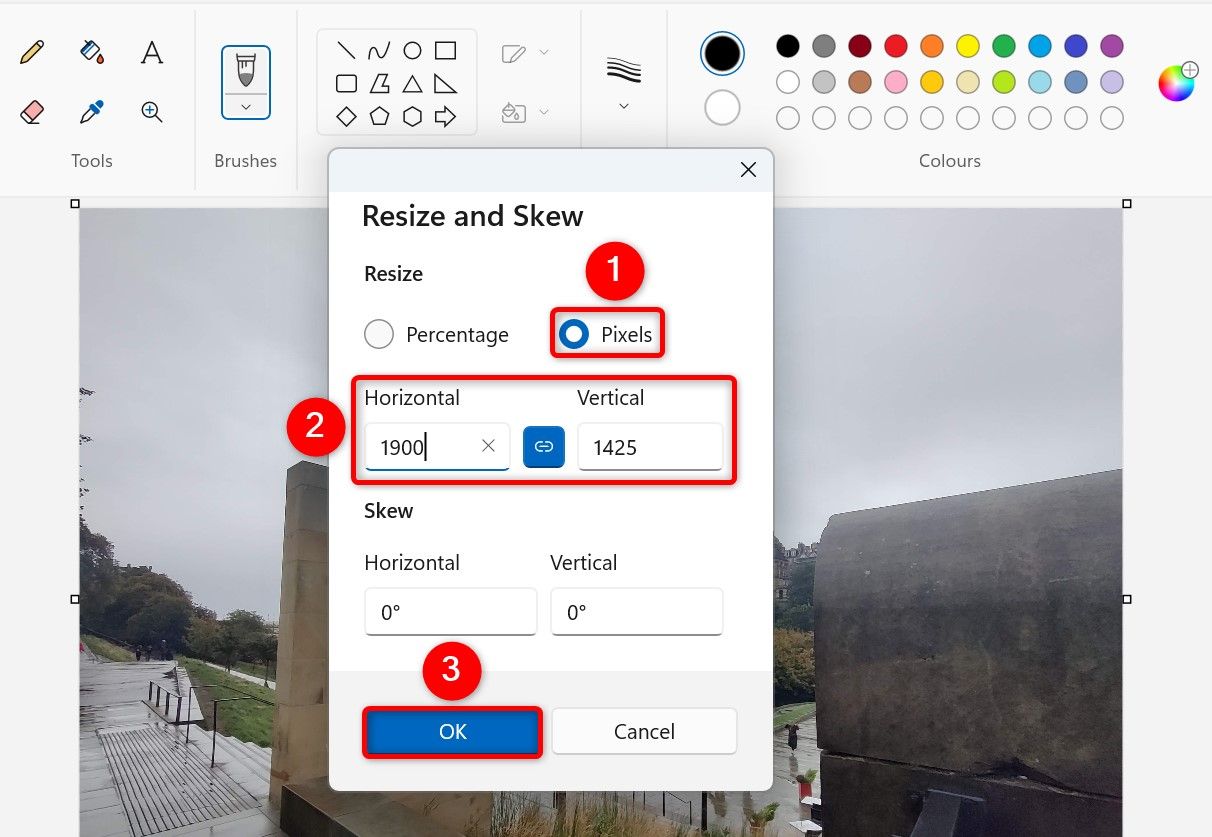
Under "Resize", you'll see two boxes: "Horizontal" and "Vertical". These represent the width and height of your image in pixels (those tiny little dots that make up your picture). You'll also see a checkbox that says "Maintain aspect ratio". THIS IS SUPER IMPORTANT! Make sure that box is checked. If you don't check it, you risk stretching or squishing your image into a weird, unrecognizable shape. It’s like trying to fit a square peg into a round hole – and nobody wants that!
Now, how much do you want to shrink it? You have two choices: resize by percentage or by pixels.
Resizing by Percentage: The "Easy Does It" Approach
This is usually the simplest way to go. If you want to make your image half the size, you’d type 50 into the "Horizontal" percentage box. Since "Maintain aspect ratio" is checked, Paint will automatically set the "Vertical" percentage to 50 as well. How clever is that? So, if you want to shrink it to 25% of its original size, you’d type 25. If you want to make it a whopping 75% of its size, you’d type 75. You get the idea!
Just remember, the lower the percentage, the smaller the image. Think of it as dialing down the zoom on your camera. If you shrink it too much, things might get a bit fuzzy, so don’t go overboard unless you absolutely have to.
Resizing by Pixels: For the Precision Masters
If you have a specific pixel dimension in mind, you can choose "Pixels" from the dropdown menu next to "Resize". Then, you can directly enter the desired pixel width or height. Again, with "Maintain aspect ratio" checked, changing one will automatically adjust the other to keep your image looking proportioned. This is great if you need an image to fit a very specific spot on a website or in a document.
A Word on "Skew": The Creative Detour (Use with Caution!)
The "Skew" option allows you to tilt your image horizontally or vertically. While this can be fun for artistic effects, it's generally not what you want for simple shrinking. Stick to the "Resize" option unless you're going for a deliberately distorted look. We’re aiming for neat and tidy shrinking here, not a funhouse mirror effect!
So, enter your desired percentage or pixel values, make sure that "Maintain aspect ratio" box is ticked, and click "OK". Watch in awe as your image transforms before your very eyes!
Step 3: Saving Your Shrunken Masterpiece – The Grand Finale!
You've done it! You've shrunk your image. Now, you need to save your work so you can actually use it. This is the part where you solidify your digital sculpting skills.
Go to the "File" menu in the top-left corner. You'll see a couple of options: "Save" and "Save As". Now, here's a little pro-tip from your friendly neighborhood Paint enthusiast: it's usually best to use "Save As". Why? Because "Save" will overwrite your original image. If you decide later that you actually liked the bigger version better, you're out of luck! "Save As" allows you to give your shrunken image a new name and save it in a new location, keeping your original safe and sound.

So, click on "Save As". Another menu will pop up, letting you choose the file format. For most uses, "JPEG (.jpg)" is a great choice for photos. It offers a good balance between quality and file size. If you need a transparent background (for logos or graphics), you might want to choose "PNG (.png)", but for general photo shrinking, JPEG is your go-to.
Now, navigate to the folder where you want to save your new, smaller image. Give it a descriptive name (e.g., "MyPhoto_Small.jpg" or "GrandmasBirthday_Email.jpg"). Then, click the "Save" button.
Ta-da! You've successfully shrunk your image and saved it. Go to the folder where you saved it, and behold its petite glory! You’ll notice the file size is significantly smaller, making it perfect for emailing, uploading, or just generally being more manageable.
Bonus Tips for Ultimate Image Shrinking Awesomeness!
Want to be a Paint resizing ninja? Here are a few extra tidbits:
- Experiment! Don't be afraid to try different percentages. If 50% is too small, try 75%. If it's still too big, try 40%. It’s a low-stakes game!
- Preview! Before you save, you can always undo (Ctrl+Z) if you don't like the result of the resize. Play around until you're happy.
- Crop First! If there's a lot of empty space around your subject in the photo, consider cropping it down before you resize. This will help you preserve more detail in the part of the image you actually care about. To crop, select the "Select" tool, drag a box around the area you want to keep, and then click "Crop" in the "Image" group.
- Zoom Out to See the Whole Picture (Literally!) Sometimes, when you shrink an image significantly, it can be hard to see the whole thing in Paint. Use the zoom slider at the bottom right of the Paint window to zoom out and get a better overview.
And there you have it! You’ve just conquered the art of shrinking images using the humble yet mighty Microsoft Paint. You’re now equipped to handle all sorts of image size dilemmas, from pesky email attachments to website upload limits.
Remember, technology doesn’t have to be intimidating. Sometimes, the simplest tools can be the most effective. You’ve taken a step towards digital empowerment, and that’s something to celebrate! So go forth, shrink those images with confidence, and spread your digital creations far and wide. You’ve got this!

