How To Set Print Area On Excel
Hey there, fellow spreadsheet wranglers! So, you’re staring at your glorious Excel masterpiece, all neat and tidy, and you’re thinking, “Right, time to hit print!” But then… plot twist… Excel decides to print the entire universe, including that random empty row at the bottom that’s been haunting you since Tuesday. Ugh. We’ve all been there, right? It’s like trying to serve a single perfectly baked cookie, but the oven decides to bake everything on the tray. Not ideal.
Don’t you worry your pretty little head about it! Today, we’re diving into the wonderfully simple (and dare I say, fun?) world of setting a print area in Excel. Think of it as telling Excel, “Hey, buddy, this is the good stuff. Print just this, and leave the rest to its own existential crisis.”
Why bother with a print area, you ask? Well, besides the obvious “don’t print everything” reason, it’s also super handy for:
Must Read
- Saving paper: Because, let’s be honest, nobody wants to waste that precious printer ink on empty space. Plus, Mother Earth will thank you with extra virtual hugs.
- Clarity: When you’re sharing a report or a specific section, you want the recipient to see exactly what you intend. No distractions, no confusion. Just pure, unadulterated data awesomeness.
- Focus: Sometimes, you just need to print a quick chart or a summary table. A print area lets you do just that without fiddling with page breaks like a mad scientist.
Ready to become a print area pro? It’s easier than finding matching socks in the morning. Let’s get started!
The Grand Unveiling: Setting Your First Print Area
Alright, imagine you’ve got your Excel sheet open, and you’ve highlighted the exact cells you want to print. Maybe it’s a snazzy sales report, a budget breakdown, or just a list of your favorite pizza toppings (highly important data, obviously).
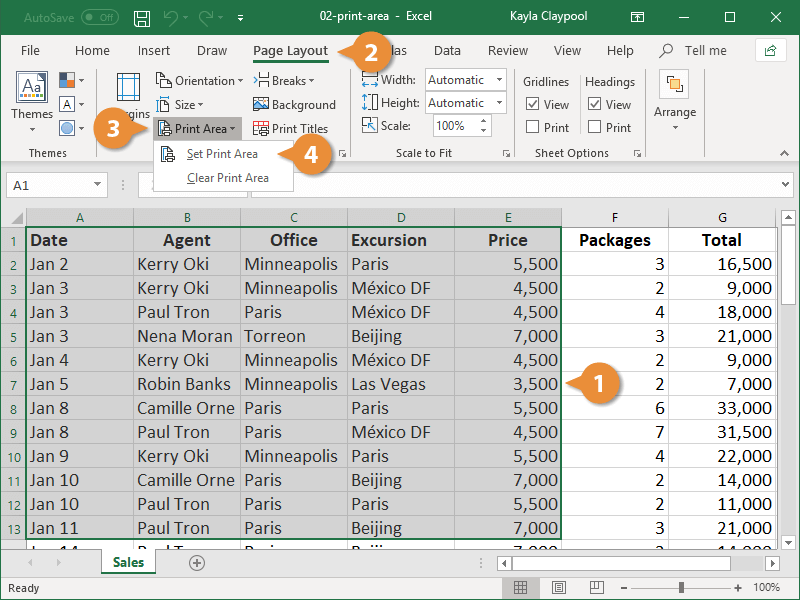
First things first, you need to select the range you want to be printed. This is like pointing at your cookie and saying, “This one!” Click and drag your mouse to highlight all the cells that contain the information you want. Be precise! Don't accidentally select that typo you meant to fix last week. Unless, of course, you want to print your mistakes for posterity. Your call!
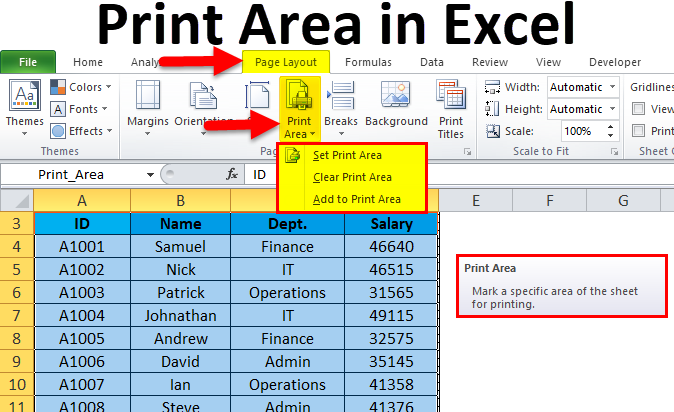
Once your desired cells are happily highlighted, it’s time to make them official. Head over to the Page Layout tab on your Excel ribbon. It's usually nestled between "Formulas" and "View," like a shy but important friend.
See that little group of icons that says "Print Area"? Give it a click! And behold, a magical dropdown menu appears. Your mission, should you choose to accept it, is to click on the option that says Set Print Area.
Poof! Just like that, you’ve told Excel, “This, my friend, is the promised land of printing.” You can even try to print a preview at this point (File > Print) and you'll see only your selected area. Ta-da! You’ve just mastered your first print area. Give yourself a pat on the back. Or a cookie. I’m not judging.
What If I Mess Up? Clearing and Modifying Your Print Area
So, you’ve set your print area, feeling all smug and accomplished. Then you realize you accidentally included that one row with the embarrassing nickname you gave your spreadsheet. Oops. Happens to the best of us. The good news? You can totally fix it!
If you need to clear the print area entirely, it’s just as easy. Go back to that same Page Layout tab. Find that friendly "Print Area" button again. Click it. And there, you’ll see an option that says Clear Print Area. Select that bad boy, and poof! Your print area is gone. It’s like it never even happened. A clean slate for your printing adventures!
But what if you don't want to clear it entirely? What if you just want to add to it or subtract from it? Excel is pretty forgiving. If you need to modify your print area, here’s the secret sauce:

- Select the new range you want to add or the range you want to remove (or the entirely new range you want to replace it with).
- Go back to Page Layout > Print Area.
- Now, instead of "Set Print Area," you’ll see Add to Print Area or, if you’ve selected a completely new area, you can just click Set Print Area again. Excel is smart enough to know you mean to update it. It’s like telling your dog, “No, not that ball, this ball!” and they get it. Mostly.
If you want to remove a section from an existing print area, it gets a tiny bit trickier, but still totally doable. The easiest way is often to just Clear Print Area and then re-select the correct range. Think of it as a mini-reset. Sometimes, starting fresh is the quickest way to get to perfection.
Remember, you can have only one print area defined at a time. So, if you set a new one, it automatically replaces the old one. It’s a bit like having a favorite ice cream flavor – when you get a new favorite, the old one gets retired (for now).
Pro Tips and Tricks for Print Area Mastery
Alright, you’re a print area ninja now. But let’s take it up a notch with some insider tips:
Printing Multiple Non-Adjacent Areas (The Advanced-ish Stuff)
Okay, this is where things get really exciting. What if you want to print your sales figures, and your customer feedback, and that inspirational quote you put at the top, but they’re all scattered around your sheet? You can’t just select them all at once, right? Well, you can’t set a single print area for them, but you can print them as separate areas. Here’s the clever workaround:

- Set the print area for your first section. Highlight it, go to Page Layout > Print Area > Set Print Area.
- Now, select your second section.
- Go to Page Layout > Print Area > Add to Print Area.
- Repeat for any other sections you want to include.
Now, when you go to Print Preview, you’ll see all these separate areas laid out on different pages, but they’re all part of your defined print area. It’s like having your cake and eating it too, but in printed form. Pretty neat, huh?
Using Named Ranges for Your Print Area
This is a little more advanced, but super powerful if you print the same specific sections repeatedly. You can use Named Ranges to label your print areas. Here’s how:
- Select the cells you want to name.
- Go to the Formulas tab.
- Click on Define Name.
- Give your range a descriptive name (e.g., "Sales_Summary", "Quarterly_Report").
- Click OK.
Now, when you go to set your print area, you can actually select this named range from the dropdown menu! This is a lifesaver for complex spreadsheets or when you have recurring reports. It’s like having a shortcut button for your print jobs.
What About Print Preview?
I’ve mentioned it a few times, but it’s worth emphasizing: Always use Print Preview! Before you hit that final print button, do yourself a favor and go to File > Print. This is your final chance to see exactly what will come out of the printer. You can check if your print area is correct, if the page breaks are where you want them, and if everything looks as it should. It’s your safety net, your guardian angel of printing.
Print Area vs. Page Break Preview
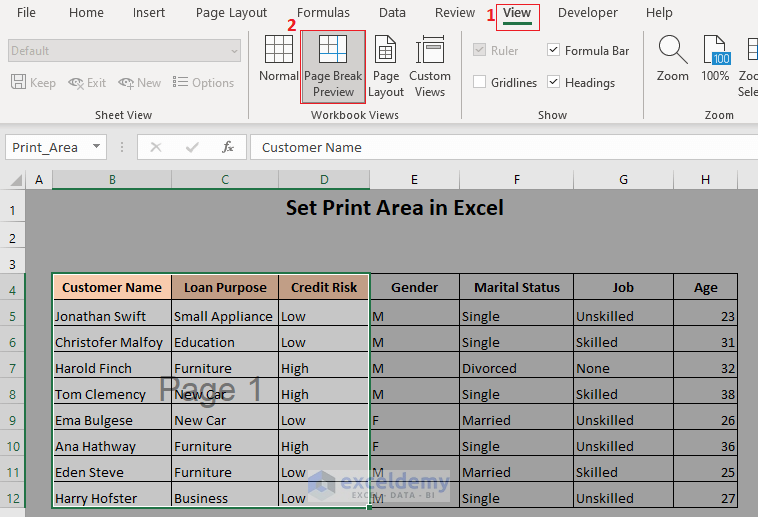
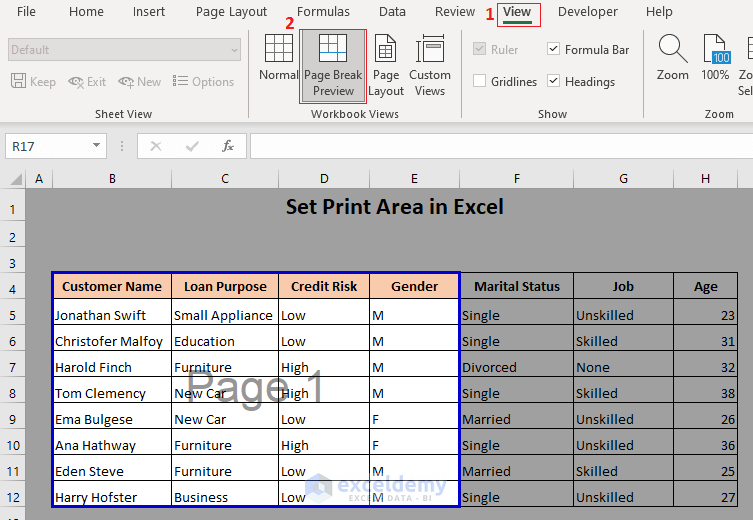
Sometimes, you might confuse print area with page break preview. They’re related, but different. The Print Area tells Excel what to print. The Page Break Preview helps you see and adjust how it’s broken across pages.
You can access Page Break Preview from the View tab. It shows you where Excel will automatically break your pages. You can drag those blue lines around to reposition page breaks and make your printed output look cleaner. It’s like arranging the furniture in a room so it flows nicely.
Troubleshooting Common Print Area Glitches
Occasionally, Excel can be a bit… quirky. If your print area isn’t sticking, or it’s printing things you didn’t expect, here are a few things to check:
- Are there any other print areas set? Remember, you can only have one. If you’re unsure, always try Clear Print Area first and then re-set it.
- Hidden rows or columns? Sometimes, hidden elements can still be picked up by Excel. Make sure you’re selecting the visible range you intend to print.
- Merged cells? Merged cells can sometimes play hide-and-seek with print areas. If you’re having trouble, try un-merging them temporarily to set your print area, and then re-merge them if needed.
- Check your selection! A misplaced click or an accidental drag can throw off your entire print area. Double-check that you've selected precisely what you want.
Don’t let a stubborn print area get you down! With a little patience and these tips, you’ll have it tamed in no time.
The Joy of Perfectly Printed Spreadsheets
And there you have it! You’ve officially conquered the art of setting a print area in Excel. From the simple click of a button to the more advanced named ranges, you’re now equipped to make your printed spreadsheets look exactly the way you want them to. No more surprise extra pages, no more missed information. Just clean, crisp, and perfectly portioned prints.
Think of the power you now wield! You can share vital information with clarity, create professional-looking reports, and save precious paper (and ink!). It’s a small skill, but it makes a big difference in your everyday Excel life. So go forth and print with confidence! You’ve got this, and your perfectly printed spreadsheets will be a testament to your newfound expertise. Now, go print that cookie recipe. Or your pizza topping list. Whatever brings you joy!