How To Remove Fluorescent Light Fixture Cover

Hey there, light-loving adventurers! Ever found yourself staring up at those long, skinny tubes of light and thinking, "You know what? I bet there's a secret handshake to get under that cover." Well, you're not wrong! Today, we're diving headfirst into the thrilling, the exciting, the downright electrifying world of fluorescent light fixture covers. Buckle up, buttercups, because this is going to be fun!
Why, you ask, would anyone want to talk about a light fixture cover? Oh, my friend, you underestimate the magic! These aren't just plastic shields; they're guardians of glow. They tame the harsh glare. They diffuse the light into something, well, less like a interrogation room and more like a cozy corner. And sometimes, let's be honest, they get a little dusty. A lot dusty. Think of it as your personal mission: Operation Dust Bunny Banishment.
So, you’ve decided it’s time. Time to liberate that dusty shield. Maybe you’re changing a bulb that’s gone poof like a magician’s rabbit. Or maybe you’re just feeling that sudden, inexplicable urge to see what’s behind the curtain. Whatever your noble quest, I’m here to guide you. Think of me as your friendly neighborhood light-fixture whisperer.
Must Read
The Great Cover Caper: What Are We Even Dealing With?
Before we get our hands dirty (or… clean, hopefully!), let's chat about what we're up against. Fluorescent light fixture covers come in a few main flavors. You’ve got your classic flat panels, like a clear or frosted sheet of plastic. Then there are the curvy, often egg-crate-like diffusers. These look a bit like a waffle grid designed by aliens. And sometimes, you find the domed or bowl-shaped ones, usually in older, more… charming fixtures. We’re going to focus on the most common ones today, so don’t panic if yours looks like it belongs in a sci-fi movie.
The crucial thing to remember is that these covers are usually attached in one of a few ways. It’s like a scavenger hunt, but instead of treasure, you’re looking for little bits of metal or plastic that are holding your prize in place.
The Peek-a-Boo Play: Finding Your Fixture’s Secrets
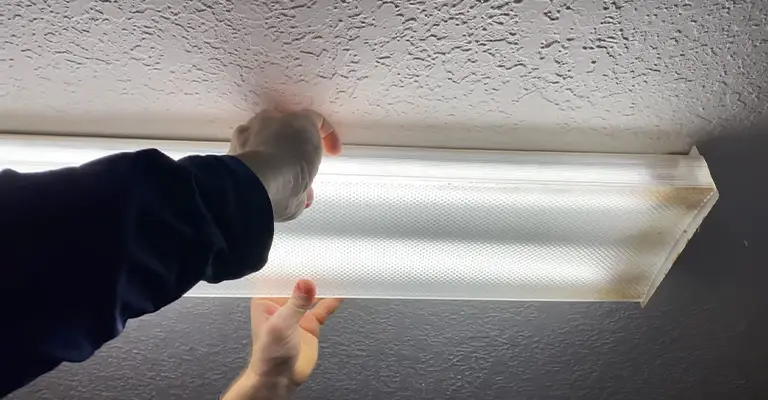
Alright, let’s get our detective hats on. Stand under your chosen fixture. Take a good, long look. Get acquainted. Admire its… structural integrity. Now, gently, with the curiosity of a kitten discovering a new box, start to investigate the edges. Where does the plastic meet the metal frame?

You’re looking for things that don’t quite fit perfectly. Are there little metal tabs? Tiny little clips? Sometimes, the cover just rests in a groove, held in place by gravity and the sheer willpower of the fixture designer. But usually, there’s a bit more action happening.
The Tab Tango: Unlocking the Clips
This is your most common opponent. You’ll see little metal tabs, usually at the ends of the fixture, or sometimes along the sides. These tabs are bent inwards, sort of hugging the edge of the cover. Your mission, should you choose to accept it, is to get these tabs to release their grip.
How to do it? Gently! You don't want to snap anything. Most of the time, you can use your fingers. Find a tab. Press it inwards, or sometimes upwards, depending on its angle. It’s like tickling a shy robot. You’re coaxing it to let go. As you press, the cover should start to loosen up on that side. Repeat this dance with all the tabs. Some fixtures have two tabs, some have four, some might even have a secret sixth tab that only appears on Tuesdays.
If your fingers are feeling a bit… uncooperative, or the tabs are a bit stubborn, a flathead screwdriver can be your best friend. But a word of caution from your experienced friend: be gentle. You’re not trying to pry it open like a stubborn clam. You’re just nudging those tabs. A little pfft sound is often a good sign. A CRACK sound? Not so much.
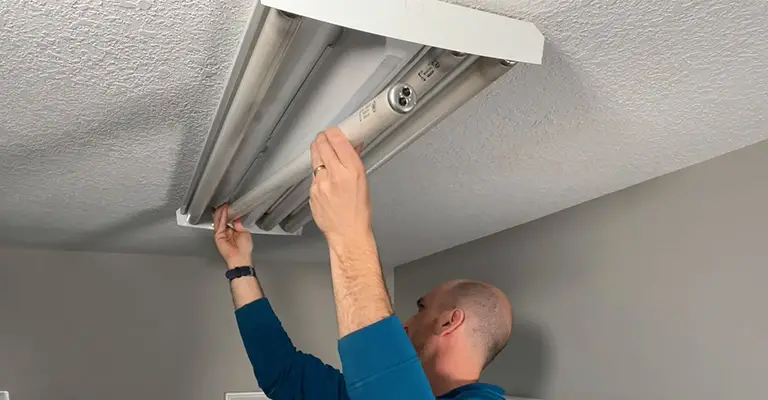
Sometimes, the tabs are on the inside of the metal frame, and the cover slides under them. In this case, you’ll need to gently push the cover upwards a bit to disengage it from the tab, and then pull it down. It’s a bit like playing peek-a-boo with a very large, very bright toy.
The Sliding Saga: When Covers Like to Glide
Some fixtures have covers that don't use clips at all. Instead, the plastic slides into channels in the metal frame. Think of it like a picture frame where the glass slides into grooves. In these cases, you'll usually need to slide the cover out of the channel to remove it. This often means pushing it to one end of the fixture and then tilting it down.
Where are the ends? Look at the long sides of the fixture. Is there space for the cover to slide? Often, you’ll need to lift the cover slightly at one end to get it out of its track. It might be a bit stiff, especially if it hasn't moved in years. Again, a gentle wiggle and a bit of encouragement usually does the trick.

Pro Tip: If you have a longer fixture, it's usually easier to remove the cover from the middle and slide it towards one end. This gives you more leverage. Imagine you're trying to pull a very long, very thin mattress out of a narrow frame. You wouldn't try to yank it straight out, right? You'd wiggle and slide.
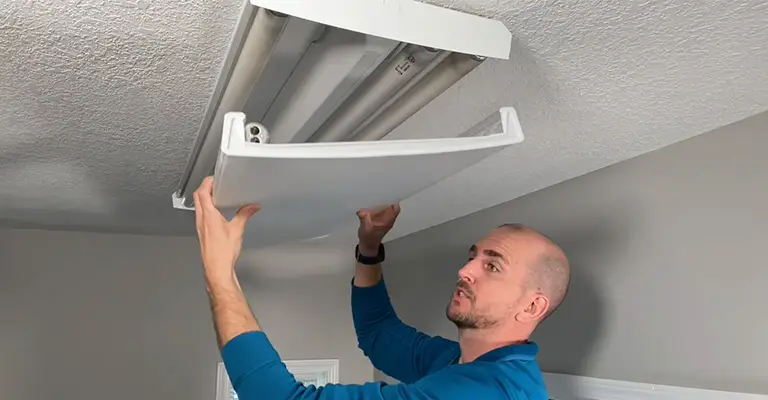
The Moment of Truth: Dropping the Cover (Metaphorically!)
Once you’ve convinced all the tabs or channels to release their hold, the cover will (hopefully!) be free! Now, this is where the fun part really kicks in. The cover will dangle precariously, or lie loosely in your grasp. This is your moment of triumph!
Important Safety Note (Okay, a tiny bit serious): Make sure you support the cover as it comes free. You don’t want it to just drop. Plastic can be brittle, especially older plastic. You don’t want to be the one who breaks the guardian of the glow. Hold it firmly, admire its (likely dusty) glory, and then gently set it aside. Find a safe spot for it, away from the path of curious pets or clumsy feet.
Quirky Fact Time!
Did you know that fluorescent lights were originally seen as a revolutionary, super-modern lighting solution? They promised energy efficiency and a longer lifespan. We’ve come a long way from gas lamps, haven’t we? And those covers? They were part of making that harsh light more palatable for homes and offices. They’re like the unsung heroes of interior design, quietly softening the starkness.
Another little tidbit: some older fluorescent fixtures have covers made of materials that can become brittle over time. So, when you’re wrestling with those tabs, remember that you’re dealing with history! Treat it with respect… and a good dose of caution.
Reassembly: The Glorious Return!
So, you’ve changed your bulb, you’ve wiped down the cover (or decided it adds character – no judgment here!), and now it’s time to put everything back together. This is usually the reverse of removal, which, let’s be honest, is almost always easier!
If you have clips, line up the cover with the fixture and gently push it back into place. You should feel or hear the clips snapping back on. It’s a satisfying little click that tells you you’ve done a good job. If it’s a sliding cover, simply slide it back into its channels. Again, a bit of wiggling might be needed.
A Final Word of Encouragement: Don’t be intimidated! Removing a fluorescent light fixture cover is a small but satisfying victory. It’s about taking control of your environment, one dusty glow-tamer at a time. It’s a chance to get a little hands-on, to understand how things work, and to appreciate the humble, yet essential, role these plastic shields play in our lives. So go forth, brave light-enthusiast! Conquer those clips! Master those slides! And may your light be ever clear (and dust-free!).