How To Recall A Mail On Outlook
Hey there, fellow email warrior! Ever sent an email, hit send, and then immediately felt that icy grip of doom? You know, the one where you realize you accidentally attached your grocery list to a proposal for your boss, or worse, hit "Reply All" with a rather… colourful opinion about a colleague? Yep, been there, done that, and bought the slightly-too-embarrassed T-shirt. But fear not, my friend! Today, we're diving into the magical world of Outlook's "Recall This Message" feature. It’s like having a tiny, digital remote control for your outgoing emails. Pretty neat, huh?
So, let's get this party started. We’re going to break down how to un-send those oopsie-daisy emails. It’s not a foolproof superhero move, but it’s definitely a good first line of defense against those cringe-worthy moments. Think of it as your digital “undo” button, but with a little more drama and a lot more potential for a suspenseful outcome.
The Oops Moment: When You Need to Recall
We’ve all had them. Those moments of pure, unadulterated email panic. Maybe you:
Must Read
- Sent it to the wrong person – "Whoops, I meant to send this to Brenda in accounting, not Brenda from the book club who thinks cat memes are the height of comedy."
- Forgot something crucial – Like that attachment that proves you're not just making things up. Or the entire point of the email.
- Said something you definitely shouldn't have – We've all had those moments where our fingers type faster than our brains can catch up. A little too much caffeine, perhaps? Or maybe you just channeled your inner unfiltered comedian for a second.
- Made a glaring typo – "Dearest Clent, I hope this email finds you well..." Facepalm.
Whatever the reason, the feeling is universal: a sinking stomach, a racing heart, and a desperate plea to the email gods. And that's where our trusty Recall feature swoops in, cape fluttering (metaphorically, of course).
Understanding the "Recall This Message" Feature (The Guts of It)
Okay, so Outlook’s Recall feature is essentially you sending a second email to the recipient(s) asking them to delete the first email. It’s a bit like sending a polite but firm note saying, "Hey, remember that thing I just sent you? Yeah, please ignore that. And forget you ever saw it."
Here’s the kicker, though: it’s not always going to work. Think of it as a request, not a command. The recipient’s email client has to cooperate, and they have to be using Outlook too. If they’re a Gmail guru or a Yahoo wiz, your recall request might just… well, not do much. It's like trying to use a Netflix remote on a VCR. Different systems, my friends!
For the magic to happen, a few things usually need to be in play:
- Both you and the recipient are using Outlook. This is the big one. If you're sending to someone outside your organization, or someone on a different email platform, your recall is likely to go straight to the digital void.
- The recipient hasn’t read the original email yet. If they’ve already devoured your missive, it’s too late. The genie is out of the bottle, and you can’t un-read something.
- The recipient’s email client is online and able to process the recall request. If they’re offline, on a slow connection, or their email is just being a bit stubborn, the recall might not go through.
So, while it’s not a guaranteed save, it’s definitely worth a shot, especially for internal emails. It’s your best bet to wriggle out of a sticky situation without having to send a follow-up email that starts with, “Dear recipient, please disregard my previous email, which was sent by a clone of myself who clearly had too much coffee and a serious lack of judgment.”
The Step-by-Step Guide: How to Actually Do It
Alright, enough theory. Let's get down to the nitty-gritty. Here’s how you initiate a recall. Imagine you've just sent that email and are now performing the ritualistic "please take it back" dance. Find the sent email, and let’s get to work!
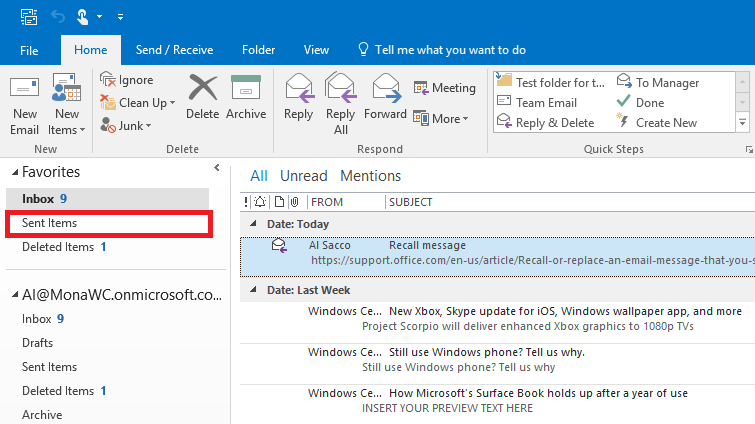
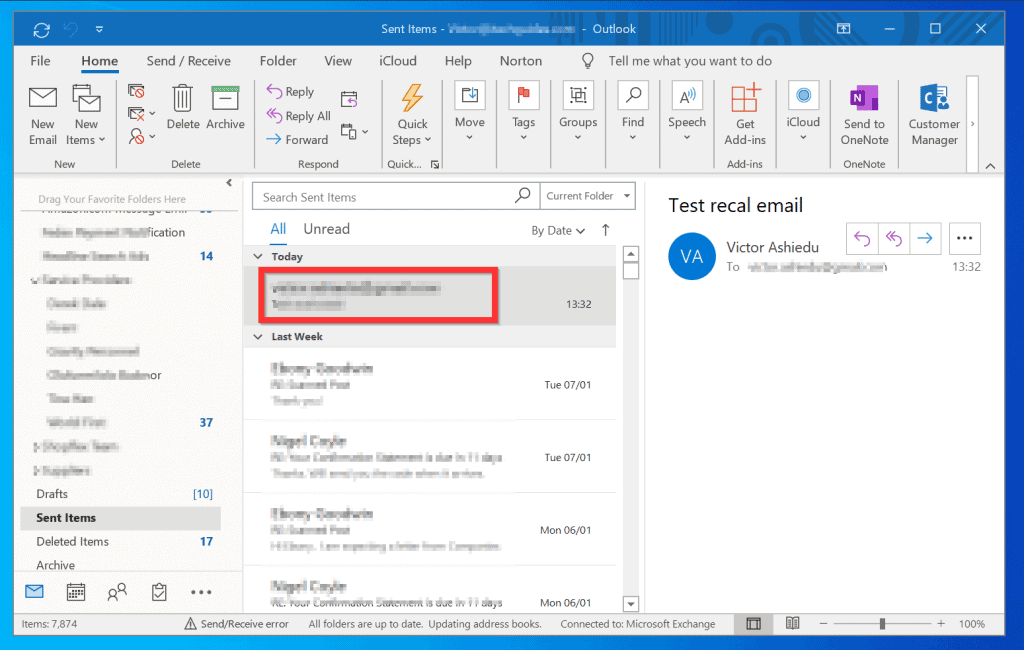
1. Locate the Sent Email
First things first, you need to find the email you want to recall. Head over to your Sent Items folder. You know, that magical place where all your outgoing messages reside. It’s usually on the left-hand side of your Outlook window, nestled amongst your Inbox, Drafts, and probably a few folders you forgot you even created.
Once you're in the Sent Items folder, use the search bar if you know what you’re looking for, or scroll through until you find that particular digital beast. Click on the email to open it in its own reading pane.
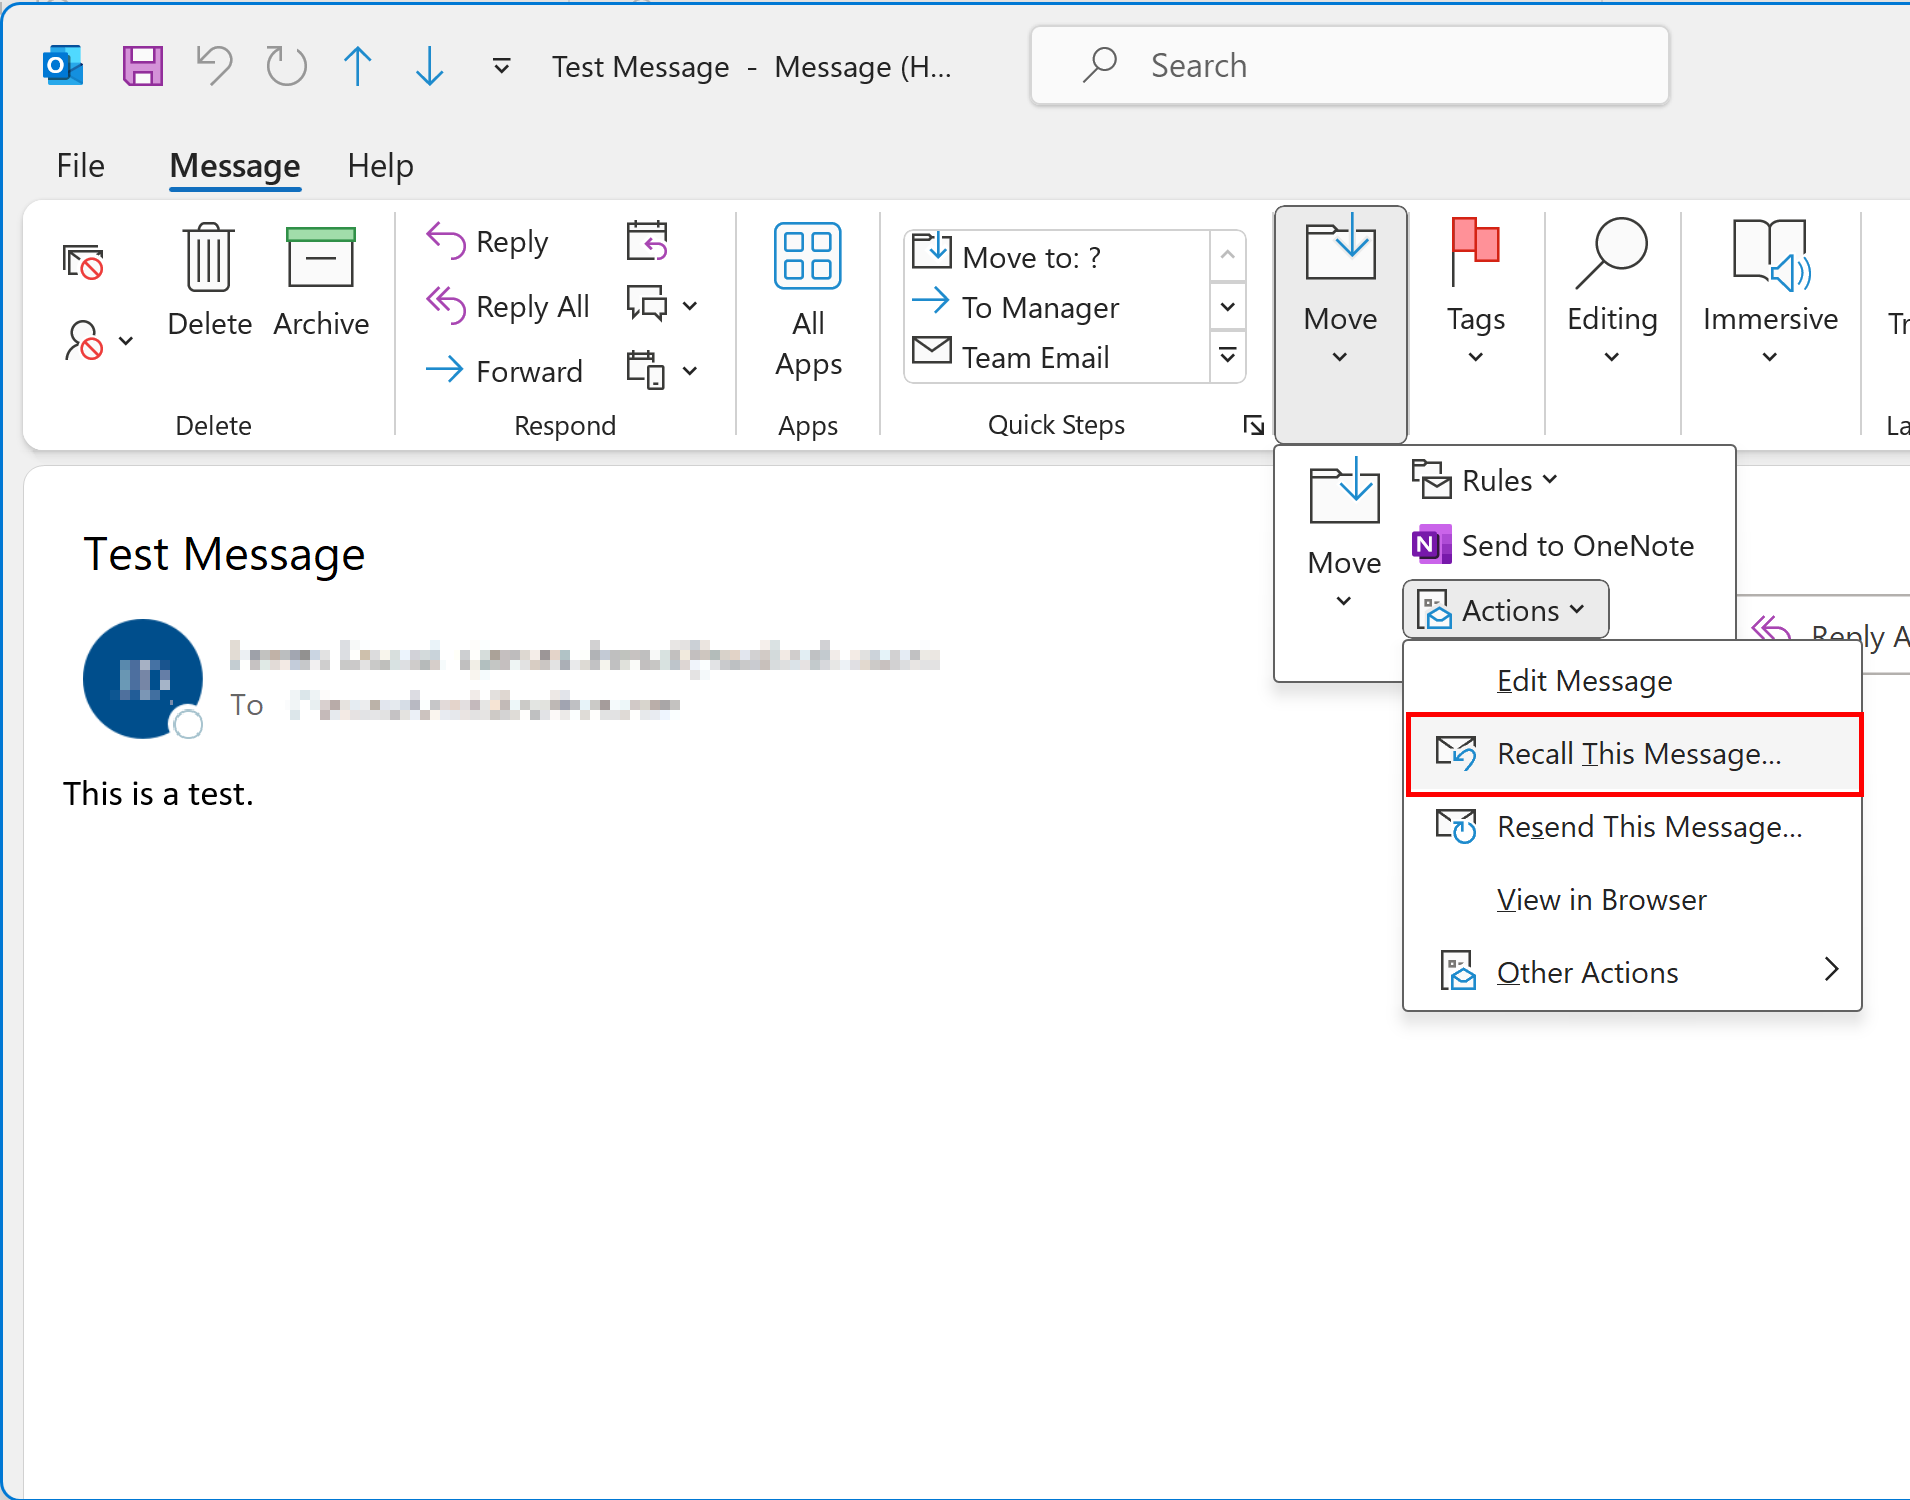
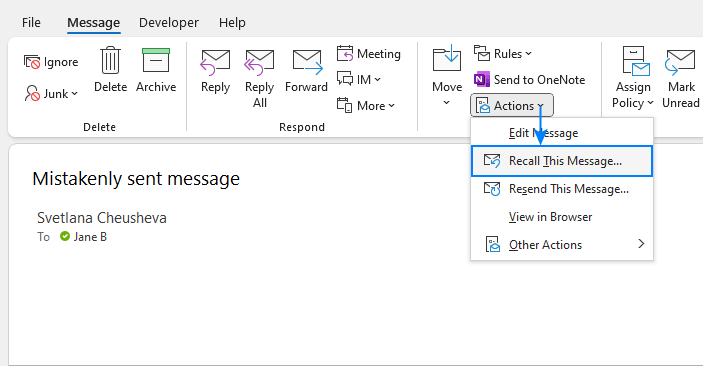
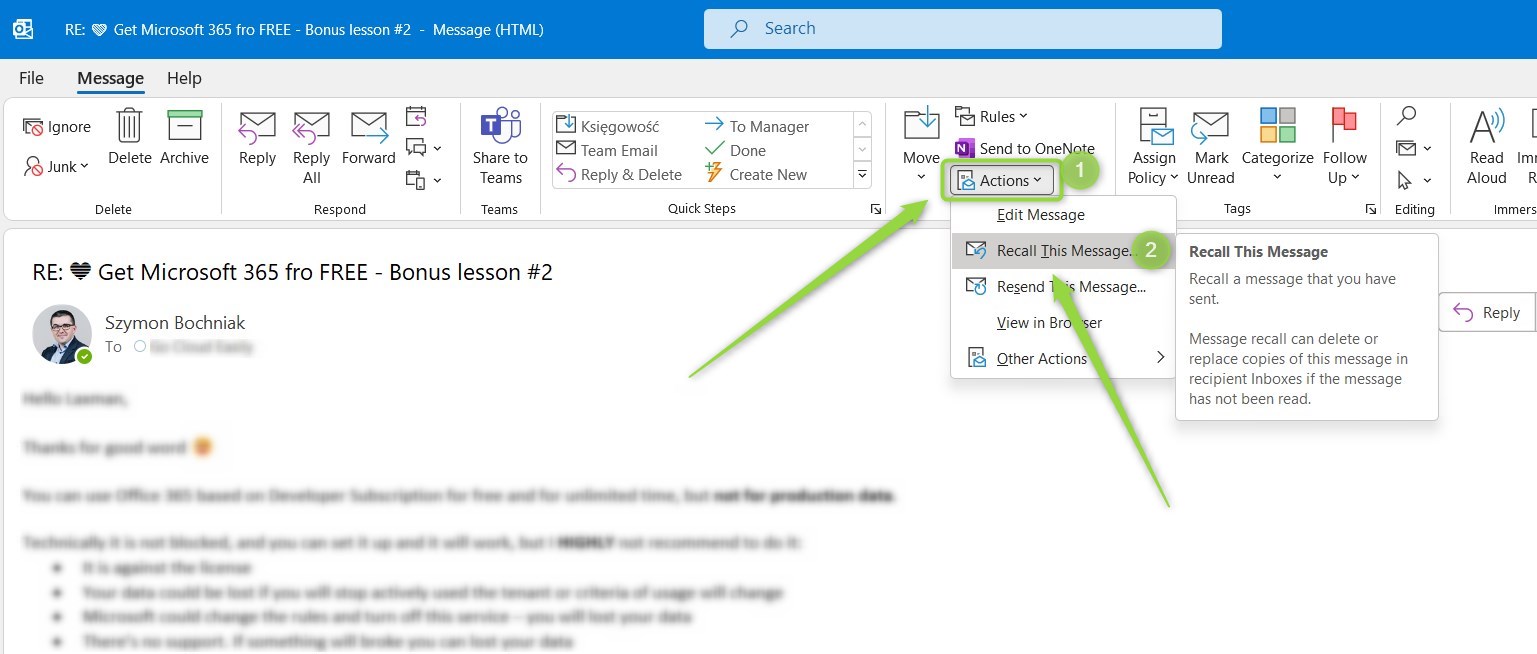
2. The "Recall This Message" Command
Now, this is where the fun begins! With the email open, look at the ribbon at the top of your Outlook window. You'll see a bunch of tabs like Home, Send/Receive, Folder, View, etc. You want to find the Message tab. Click on it.
Within the Message tab, there’s usually a section called "Move" or "Actions" (depending on your Outlook version – they do love to rearrange things, don't they?). Look for an option that says "Recall This Message". It might be a little icon that looks like a circular arrow, or it might just be text. If you don't see it immediately, don't panic! Sometimes it's hidden under a "More Actions" dropdown. Just keep your eyes peeled!
Once you've found it, click on "Recall This Message". Ta-da! The Recall dialog box will appear. It’s like the control panel for your digital rescue mission.
3. Choosing Your Recall Strategy
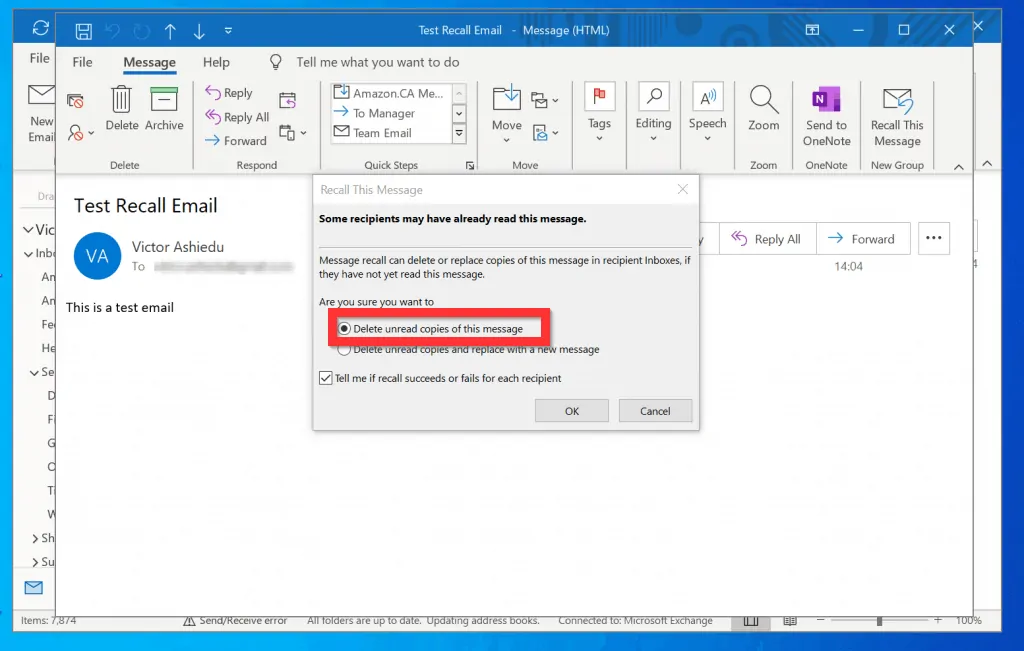
This is where you decide how you want to attempt this digital retrieval. The dialog box will give you a couple of options:
:max_bytes(150000):strip_icc()/RecallOutlook-5ac1bc24eb97de0037dba86c-5ad0d0e504d1cf00379809d8.png)
- "Delete unread copies of this message": This is the most straightforward option. You’re basically saying, "Please delete the original email before the recipient has a chance to see it." It's the classic recall.
- "Delete unread copies and replace with a new message": This is for when you realize you not only sent the wrong thing, but you also need to send the right thing. If you choose this, Outlook will then prompt you to create a new email to replace the old one. This is like saying, "Okay, I messed up, but I'm going to fix it with this new and improved email. Please ignore the first one and read this one instead!"
Now, there's another little checkbox down there that's super important: "Tell me if recall succeeds or fails for each recipient". Oh, you absolutely want to check this box! It's like getting a confirmation slip for your recall attempt. You'll get an email (or multiple emails, if you sent to a bunch of people) telling you whether Outlook managed to snag the original message or if it failed. This is crucial for knowing if your mission was successful or if you need to start planning your apology tour.
4. Executing the Recall
Once you've made your choices, hit the "OK" button. And then… you wait. And you might want to do a little nervous foot-tapping or a quick prayer to the email gods.
You’ll likely receive an email (or several) in your inbox telling you the outcome of the recall attempt. If it says "Successfully recalled," congratulations! You've just pulled off a digital feat. If it says "Recall failed," well, it's time to deploy Plan B (which usually involves a slightly sheepish follow-up email).
Important Things to Keep in Mind (The Fine Print)
So, you've gone through the steps. You've clicked all the buttons. But before you celebrate too hard, let's talk about some of the finer points, the little caveats that can make or break your recall attempt. Because, as we all know, technology rarely comes with a 100% guarantee.
- The "Outlook Only" Rule: We touched on this, but it bears repeating. If the recipient isn't using Outlook, or if they're on an older version, or if your email is going to a different company that uses a different email system, your recall request will likely fall on deaf ears. It’s like sending a smoke signal to someone who’s expecting a text message.
- The "Read Before Recall" Problem: If the recipient has already opened and read your email, the recall is pretty much toast. They’ve seen the evidence, and you can’t un-see it. It's like trying to put toothpaste back in the tube.
- The "Offline Recipient" Challenge: If the recipient is offline when you recall, and then they go online later and open the original email before the recall message has had a chance to be processed, guess what? They'll still see it. It’s a race against time, and sometimes, time is not on your side.
- The "Spam Folder Surprise": Sometimes, recall messages can get caught in spam filters. So, even if the recall technically works, the recipient might not even see the notification asking them to delete the original message.
- The "Exchange Server Matters": If you’re in a corporate environment using Exchange, the recall might work better internally. However, even then, it's not guaranteed. Your IT department might have specific settings that affect how recalls function.
- The "New Message Replacement" Nuance: If you choose to replace the original message with a new one, make sure the new message is actually better. Otherwise, you've just swapped one problem for another! And remember, the original recall message itself still needs to be deleted for the replacement to fully take effect. It's a layered approach.
So, while "Recall This Message" is a fantastic tool to have in your arsenal, it’s not a magic wand. Think of it as a helpful assistant, but one who sometimes gets distracted. The best approach? Proofread before you send! It sounds simple, but trust me, a few extra seconds of checking can save you a whole lot of future embarrassment. Get into the habit of doing a quick scan for typos, the right recipient, and the correct attachments. It’s like wearing a seatbelt – you hope you never need it, but you’re awfully glad it’s there when you do.
What If Recall Fails? Your Backup Plan
Okay, so the recall didn't work. Bummer. Don't start drafting your resignation letter just yet! There are still ways to salvage the situation. It might just involve a little more… personal charm.
- The Direct Apology Email: This is your go-to. Send a new email to the recipient(s) and be upfront. Something like: "Hi [Name], I'm so sorry, but I accidentally sent you an email a few minutes ago that I really didn't mean to. Please disregard it entirely. I've since sent you the correct information." Honesty is often the best policy, even if it stings a little.
- The "Oops, My Bad!" Phone Call: For really important or sensitive emails, a quick phone call can smooth things over much faster than a string of emails. A simple, "Hey, just wanted to apologize, I sent you something by mistake. Please ignore that last email." It shows you're taking responsibility.
- The Humorous Approach (Use with Caution!): If you have a good rapport with the recipient, a little lightheartedness can go a long way. "My apologies! My email sentience clearly had a moment of rebellion. Please disregard the previous message. I'm currently retraining it." This works best with colleagues you know well and who appreciate a bit of humor.
The key here is to act quickly. The sooner you address the mistake, the less likely it is to cause any real issues. A timely apology or correction can often turn a potential disaster into a minor blip.
The Joy of a Successful Recall
Ah, the feeling! You’ve sent that email, the dread washes over you, you remember the Recall feature, you execute the steps, and then… you get that glorious notification: "Recall succeeded for recipient X." Yes! It’s a small victory, but oh, so sweet. You’ve dodged a bullet. You’ve prevented a potential workplace faux pas. You’ve saved yourself from having to explain why you thought it was a good idea to share your questionable karaoke rendition of "Bohemian Rhapsody" with the entire executive team.
It’s moments like these that remind us that even in the often-hectic world of emails and digital communication, there are little helpers, little features that can bail us out when we least expect it. So, the next time you find yourself in that all-too-familiar panic, remember your trusty "Recall This Message" feature. It might just save the day, and more importantly, it might just save you from a good, solid dose of embarrassment. Go forth and email with a little more confidence, knowing you have a digital safety net (albeit a slightly wiggly one)! And hey, if all else fails, remember that everyone makes mistakes. Just keep hitting send, and keep learning. You’ve got this!