How To Install Trimmer Line Black And Decker

Ever looked out at your lawn and thought, "Man, those edges are looking a little… unkempt?" You know, like that one shirt in your closet that’s just begging for a good iron? That's where your trusty Black and Decker trimmer comes in, ready to give your yard that crisp, manicured look. But just like a car needs fuel, your trimmer needs line to do its magic. And sometimes, that line runs out. Don't panic! Swapping out the trimmer line on your Black and Decker is way less intimidating than assembling IKEA furniture, and honestly, a lot more rewarding. You’ll be done before you can even finish a cup of coffee.
Why should you even care about this little piece of plastic string? Well, think of it as the unsung hero of your curb appeal. A well-trimmed yard makes the whole neighborhood sigh in contentment. It’s the difference between a house that just sits there and a home that shines. Plus, a trimmer with no line is about as useful as a chocolate teapot. So, let’s get you back to achieving those perfectly straight lines along your flowerbeds and sidewalks, making your yard look like it’s ready for its close-up on a garden magazine cover (or at least, your own personal Instagram feed).
Most Black and Decker trimmers use a system where the line is automatically fed as you trim. This is super convenient, meaning you don't have to stop and manually push more line out. It’s like having a little helper in your trimmer! But, when that helper runs out of string, you gotta be the one to restock it. And honestly, it’s a pretty simple task. Think of it like refilling your snack jar – a quick, easy, and necessary chore that leads to happy results.
Must Read
Let's Get This String Thing Sorted!
First things first, make sure your trimmer is unplugged or the battery is removed. This is the most important step, like making sure the oven is off before you try to clean it. Safety first, always! We're here to make your yard look good, not to have any unnecessary adventures with powered equipment. So, take that extra second. It’s worth it.
Now, locate the spool cap. This is usually the part on the bottom of the trimmer head that you can pop off. Some Black and Decker models have a little button or tab you need to press to release it. Others might just require a good tug. If yours is a bit stubborn, don’t go Hulk-smashing it. A gentle wiggle, or maybe a peek at your trimmer’s manual (those things are surprisingly helpful, even if they look like ancient scrolls), will usually do the trick.

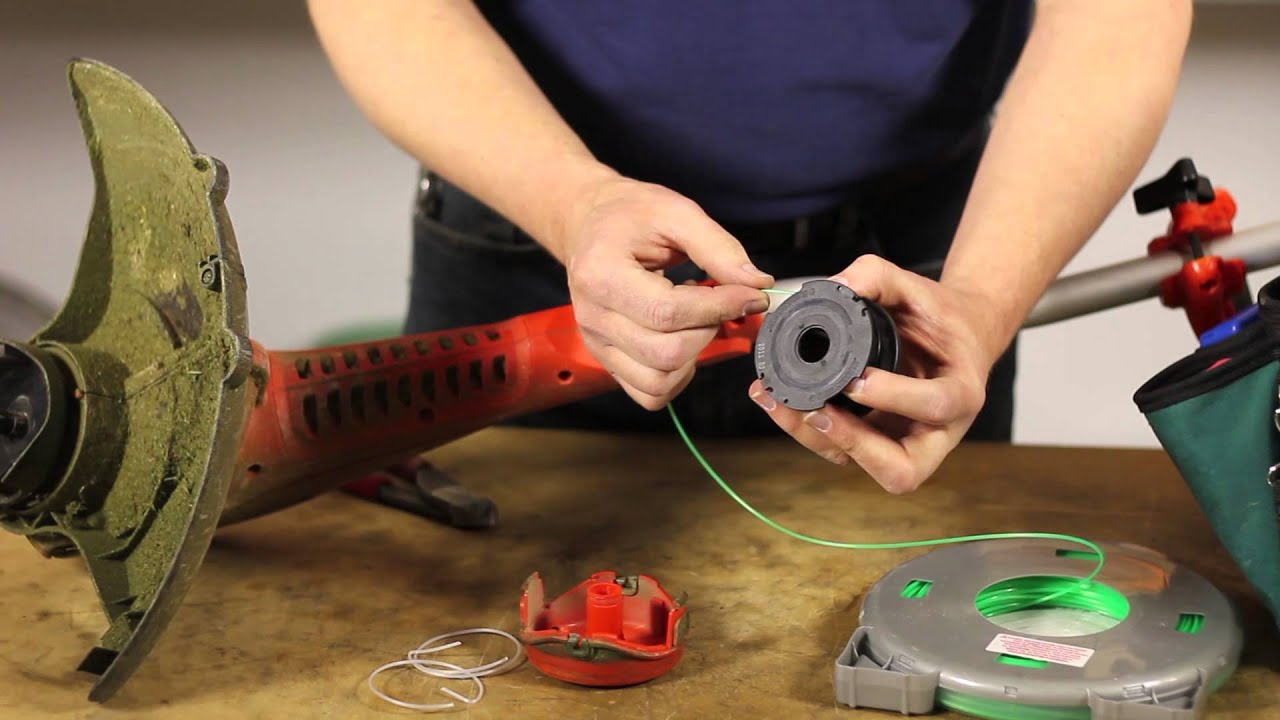
Once that cap is off, you'll see the spool of line. This is where the magic happens. You'll probably see a little bit of line already wound around it. This is your clue. You need to wind new line in the same direction as the old line was wound.
Winding the New Line: The Art of the Spool
This is where a little patience can go a long way. You’ll want to get a new spool of trimmer line, or if you have bulk line, cut a length of about 15-20 feet. Think of it as having enough string to tie up a very enthusiastic puppy – you want enough to get the job done, but not so much that it becomes a tangled mess.
Now, look for the little notches or slots on the spool. These are your anchor points. Take the end of your new trimmer line and thread it through one of the slots. If you're using a pre-wound spool, you'll often see an end already sticking out. Just use that one!

Here's the fun part: winding! You want to wind the line around the spool in the direction indicated by the arrows on the spool itself or on the trimmer head. If you wind it the wrong way, it can get tangled and won't feed properly. Imagine trying to rewind a ball of yarn backwards – it just gets messy. So, pay attention to those arrows! It’s like following directions for a treasure map.
As you wind, try to keep the line neat and orderly. Don't just chuck it on there like you're stuffing socks into a drawer. A neat wind means a neat feed. If you see it starting to crisscross or get messy, stop. Unwind a little and re-wind it neatly. This step is crucial for a smooth trimming experience. You're essentially giving your trimmer a perfectly organized set of tools for its job.
When you're done winding, leave a little tail of the line sticking out, maybe an inch or two. This makes it easier for the trimmer to catch the line when you start it up. It’s like leaving a little bit of the wrapping paper on a gift so the recipient can easily unwrap it.

Putting It All Back Together
Now, carefully place the wound spool back into the trimmer head. Make sure it sits snugly and the line feeds freely from the center. Some spools have a specific orientation, so if it doesn’t seem to fit, give it a little twist. It’s like putting a puzzle piece in – it only goes in one way!
Next, you need to get those line ends out. You'll see little notches or holes on the sides of the trimmer head. Thread the ends of your trimmer line through these. This is where that little tail you left sticking out comes in handy. You want just enough line sticking out to start feeding. About half an inch to an inch is usually good.
Finally, pop that spool cap back on. It should click into place. If it doesn’t click, it’s not secured properly, and you might have a line-feeding issue (or, worse, a flying spool cap!). Give it a gentle push around the edges until it’s securely fastened. You’re almost there!

The Moment of Truth: Testing Your Work
Now for the exciting part! Re-attach the battery or plug your trimmer back in. With the trimmer head off the ground (very important!), give it a quick burst. If all has gone well, you should hear that familiar whirring sound, and the line should start spinning. If it's not spinning, or if it sounds strange, turn it off immediately and retrace your steps. Don't be discouraged if it doesn't work perfectly the first time. We all have those days! It’s like learning to ride a bike – a few wobbles are part of the process.
Many Black and Decker trimmers are designed to automatically feed more line when you tap the trimmer head lightly on the ground while it's running. This is a great way to ensure you always have the optimal amount of line out. So, when you start trimming, give it a gentle tap if needed. You'll get a feel for when it's working its best.
And there you have it! You’ve successfully re-lined your Black and Decker trimmer. You’ve taken a little bit of time, a few simple steps, and now your yard is ready for its transformation. You’re not just a homeowner anymore; you’re a yard-sculptor, a master of the clean edge, a true hero of the suburban landscape. So go on, tackle those weeds, sharpen those edges, and enjoy the satisfaction of a job well done. Your lawn will thank you, and frankly, so will your neighbors!