How To Install Deck On Husqvarna Riding Mower

So, you've got one of those magnificent beasts, a Husqvarna riding mower. You know, the kind that makes you feel like you're piloting a small, but very capable, tractor across your suburban kingdom. But alas, your current setup is like trying to fight a dragon with a butter knife. It's time to upgrade your arsenal, my friend, and that means installing a new deck. Forget those flimsy plastic things that surrender to a rogue dandelion. We’re talking about bringing out the heavy artillery for your lawn care battles.
Now, I’m not saying this is going to be as easy as deciding what flavor of ice cream to get (though that’s a tough decision, let’s be honest). But with a little elbow grease, a dash of patience, and maybe a beverage of your choice for moral support, you’ll have your mower roaring with a brand-new cutting system in no time. Think of it as a spa day for your lawn-fighting machine. It’s going to emerge, sleek and ready to conquer.
The Great Deck Debacle: Why You Might Need a New One
Let’s face it, decks don’t last forever. Unless you're secretly lubricating yours with unicorn tears and serenading it with lawn-care anthems, it's probably seen better days. Maybe you hit a rogue rock that sounded like a tiny, angry drum solo. Perhaps a mischievous squirrel decided to test its structural integrity. Or maybe, just maybe, it’s simply gotten old and weary, like my Uncle Barry after Thanksgiving dinner.
Must Read
Whatever the reason, a worn-out deck means a sad lawn. You’ll be leaving behind sad little tufts of grass, looking like a bad haircut. Not to mention the possibility of flying debris. Nobody wants to play lawn roulette with their prize-winning petunias or the neighbor's prize-winning poodle. A new deck is an investment in pristine perfection and the safety of your general vicinity.
Pre-Game Rituals: Gathering Your Tools and Your Nerve
Before we dive headfirst into this mechanical adventure, let’s get our ducks in a row. You’ll need some basic tools. Think of these as your trusty sidekicks. A good set of wrenches (metric and standard, because life is full of surprises), a socket set, a screwdriver (flathead and Phillips, the dynamic duo), and maybe some penetrating oil for those stubborn bolts that have clearly been enjoying a long, rust-induced vacation. Don't forget gloves – unless you're aiming for that "hardened mechanic" look, complete with grease-stained fingernails that will last until your next birthday.
Now, about your nerve. If you’re prone to panicking at the sight of a loose bolt, take a deep breath. Remember, millions of people have done this before you. Some of them probably had less instruction than you do right now. And hey, if all else fails, there’s always the option of calling a friend who thinks they know what they’re doing. It’s a win-win… mostly.

Operation: Deck Removal - The Grand Uncoupling
First things first, safety is paramount. Park your mower on a flat, level surface. Engage the parking brake. Now, this is crucial: turn off the engine and remove the ignition key. You don't want your mower suddenly deciding to become a runaway lawn ornament. Think of it as putting the beast to sleep before you start poking it.
Now, let’s talk about the old deck. It’s usually attached with a few key points. There's the lift linkage, which is basically the arm that makes the deck go up and down. You’ll need to disconnect this. Often, there’s a pin or a clip holding it in place. Give it a wiggle. If it’s stubborn, a gentle tap with a hammer might encourage it. Don't go full Thor; we’re not trying to split the atom here.
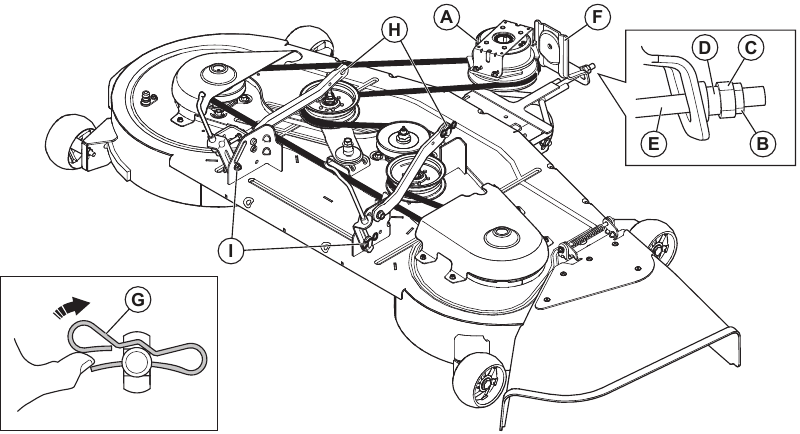
Then, you have the drive belt. This is what powers the blades. It’s usually routed around pulleys. You’ll need to release the tension on the belt to get it off the pulleys. This often involves loosening a tensioner pulley. Follow the belt’s path with your eyes and your fingers (carefully!). Once the belt is off, the deck should be pretty much free. There might be a couple of bolts holding it directly to the frame, so keep an eye out for those.

With everything disconnected, you’re going to want to lower the deck all the way to the ground. Then, carefully slide it out from underneath the mower. This is where having a second person can be a lifesaver, unless you’re aiming to set a new personal record for lifting heavy objects. It’s not that heavy, but it’s awkward. Imagine trying to wrestle a giant, metal frisbee. That’s the vibe.
A Moment of Reflection (and Cleaning)
Take a moment to admire your handiwork. You’ve successfully separated the deck from its steed! While you’re there, it’s a good time to clean up the underside of your mower. You know, all that grass and gunk that’s accumulated over the years? It’s like finding ancient artifacts. A stiff brush and some compressed air can work wonders. You might even discover a lost coin or two. Surprise!
Inspect the area where the deck attaches. Are the mounting points clean? Is anything bent or broken? Now is the time to address any issues before you go installing your shiny new deck. Think of it as spring cleaning, but for your mower. Your mower will thank you. Probably with a more enthusiastic roar.
The Grand Arrival: Installing the New Deck
Alright, the moment of truth has arrived! You've got your shiny new deck, probably still smelling faintly of factory and dreams of perfectly manicured lawns. Carefully slide the new deck back into place under the mower. Again, it might be a bit of a dance. Wiggle it, tilt it, persuade it gently. You want it to sit in the same general area as the old one did.
Now, we reverse the removal process. Reconnect any mounting bolts that hold the deck to the frame. Tighten them up, but don’t go crazy. We’re not building a nuclear reactor here.
Next, the drive belt. This is like putting on a very important, very stretchy accessory. Route the belt around the pulleys. Make sure it’s seated correctly in the grooves. Then, re-engage the tensioner. You’ll feel it when it’s right. It’s a satisfying ‘thunk’ and a reassuring lack of slack.
Finally, the lift linkage. This is the grand finale. Align the linkage with the attachment points on the deck and secure it with the pin or clip you removed earlier. Give it a good tug to make sure it’s firmly in place. This is the part that lets your mower heroically conquer hills and valleys. You don’t want that failing mid-crest.

The Post-Op Check: A Symphony of Tightening
Before you fire her up, do a final, thorough check. Go over all the bolts and connections you touched. Make sure everything is snug. Imagine you’re a meticulous detective, and loose bolts are your prime suspects. You want to make sure they’re all accounted for and securely fastened.
Check the belt again. Is it straight? Is it on all the pulleys? Give the deck itself a gentle shake. Does it feel secure? This is your last chance to catch any potential gremlins before they wreak havoc on your lawn. Trust me, a mid-mow emergency is much less fun than a pre-mow check.
The Moment of Truth: Firing Up Your Revitalized Ride
You’ve done it! You’ve bravely tackled the deck installation. Now, it’s time for the ultimate reward: the first cut with your newly equipped Husqvarna. Get on, turn the key, and let that engine roar to life. Listen to the sound. It should be a confident, powerful hum, a testament to your mechanical prowess.
Slowly engage the mower blades. You should hear a satisfying whirring. Then, ease forward. Watch that deck do its magic. Marvel at the clean, even cut. You’ve gone from a lawn-laggard to a lawn-legend. High fives all around! Go ahead, take a victory lap. You’ve earned it. And remember, the next time your mower needs a little TLC, you’ll be a seasoned veteran. Just don’t forget where you put those wrenches.