How To Hide Wires In A Wall

You know that feeling? The one where you’re just trying to enjoy your freshly set-up, gorgeous new TV, maybe with some popcorn and a chill movie, and then your eyes drift down… and BAM! There it is. A tangled, unruly mess of black cables, practically screaming for attention. They’re coiling around your new soundbar, slithering behind your sofa, and generally looking like a family of grumpy octopuses who’ve had a bad day. Yeah, I’ve been there. My own living room once resembled a tech convention’s forgotten storage closet until I finally decided enough was enough. That’s when I embarked on a quest, a noble mission if you will, to conquer the wire beast and reclaim my aesthetic sanity. And let me tell you, it’s not as scary as it sounds. So, grab a coffee (or your beverage of choice), settle in, and let’s talk about how to make those unsightly wires disappear into the welcoming embrace of your walls.
Seriously though, it’s like manufacturers want us to have this problem. Every new gadget comes with its own little power brick and a spaghetti-like assortment of cables. It’s a conspiracy, I tell you! But fear not, my friends. Hiding wires in walls is totally doable, and it’s one of those home improvement projects that gives you a ridiculously satisfying payoff for relatively little effort. You’ll walk into your room and think, “Wow, I’m a genius,” and you’ll be right.
The "Why" Behind the Wire Vanish
Before we dive into the "how," let’s quickly touch on the "why." Aside from the obvious aesthetic win (no more visual clutter!), hiding wires has some other sneaky benefits.
Must Read
Safety first, people! Think about it. Tripping hazards are a real thing, especially if you have little ones or furry friends tearing around the house. Those loose cords can be a nasty surprise. Plus, keeping them tucked away protects them from accidental damage, like being chewed on by that aforementioned furry friend (hypothetically, of course… unless your cat does have a thing for HDMI cables, in which case, maybe a bigger conversation is needed).
It’s just… cleaner. Your space feels bigger, calmer, and more intentional when you don’t have a web of wires dominating the landscape. It’s like decluttering your mind, but for your living room. And who doesn’t want a bit more zen in their life?
Resale value? Maybe! While it’s not a major selling point on its own, a clean, modern look with hidden tech can definitely contribute to a more appealing presentation of your home if you ever decide to sell. Just a little bonus thought for your future self.
Okay, Let's Get Down To Business: The "How"
So, you’re convinced. You want the magic. You want the clean lines. But how do we actually achieve this mystical wire vanishing act? The most common and effective method involves usingin-wall rated cable management systems. These are specifically designed for this purpose, and they’re surprisingly accessible.
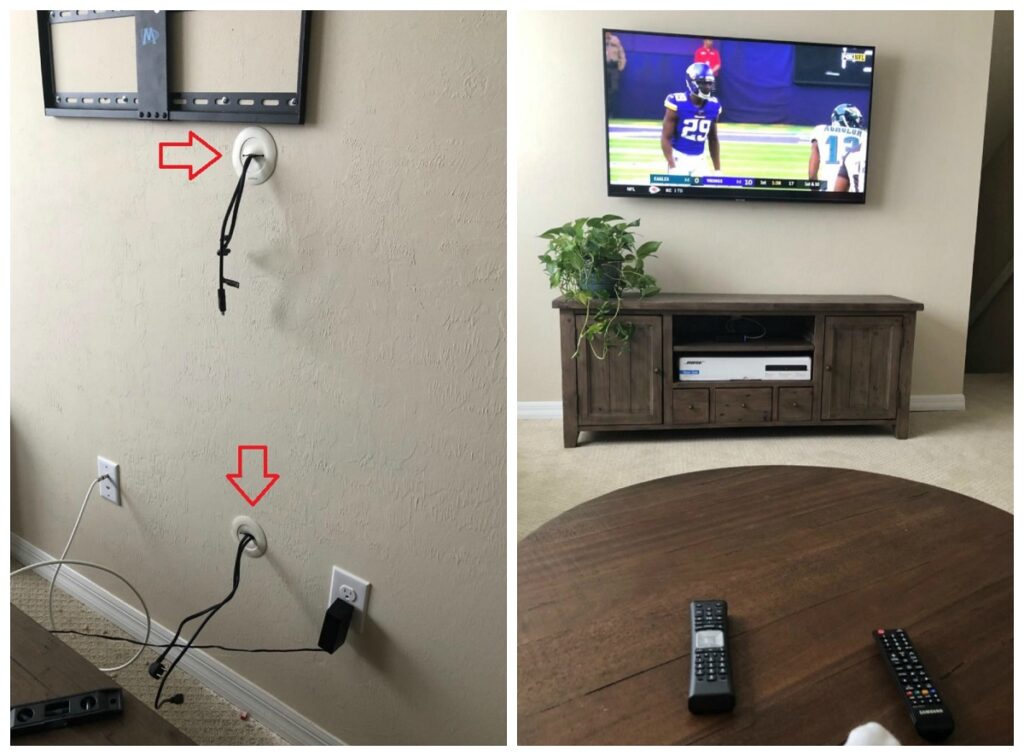
Method 1: The Simple Pass-Through (For Low-Voltage Only!)
This is probably the easiest entry point into the world of hidden wires. We’re talking about things like HDMI cables, speaker wires, or even Ethernet cables. These are generally considered "low-voltage" and don't generate significant heat.
What you’ll need:
- Wall plates with brush or grommet inserts: These look like regular wall plates (the kind you see around light switches) but have openings for cables to pass through.
- Drywall saw or utility knife: For making the initial cuts.
- Stud finder: Crucial for avoiding drilling into those pesky wooden beams inside your walls.
- Fish tape or wire puller: This is your magic wand for getting the cables from point A to point B inside the wall.
- Level: To ensure your plates are straight and look professional.
- Screwdriver: For mounting the plates.
The Steps (Keep it simple!):
- Plan your route: Decide where your devices are and where the power source or receiver will be. Mark these spots on the wall. Think about the shortest, most direct path possible, but also consider where studs might be.
- Locate studs: Use your stud finder to mark any studs in your intended path. You want to avoid drilling directly into them unless you have a specific reason (and the right tools).
- Cut your openings: At your marked spots (e.g., behind the TV, near the outlet), carefully cut out a rectangular opening for your wall plate. Measure twice, cut once! A drywall saw is ideal for this, allowing for clean cuts. If you’re feeling brave and confident with a utility knife, go for it, but be precise.
- Find the power source: This is where the fish tape comes in. You’ll feed one end of the fish tape into the lower opening (where the cable will come out) and try to snake it up to the upper opening (where it will go into the wall). You might need a second person for this part, or some good old-fashioned wiggling and patience.
- Pull the cable: Once you’ve got the fish tape through and a good amount sticking out of the top opening, attach your HDMI cable (or whatever you’re running) to the end of the fish tape. Then, gently pull the fish tape back down, bringing your cable with it. Success!
- Install the wall plates: Screw your wall plates with the brush or grommet inserts into the openings. These will give you a clean, finished look.
- Connect everything: Plug your cables into your devices and power outlets. Enjoy the clean aesthetic!
A word of caution here: This method is only for low-voltage cables. We're talking about signals, not electricity that's going to fry your house. If you're thinking about running power cords through the wall, you need to step up your game and your safety precautions considerably. We'll get to that.
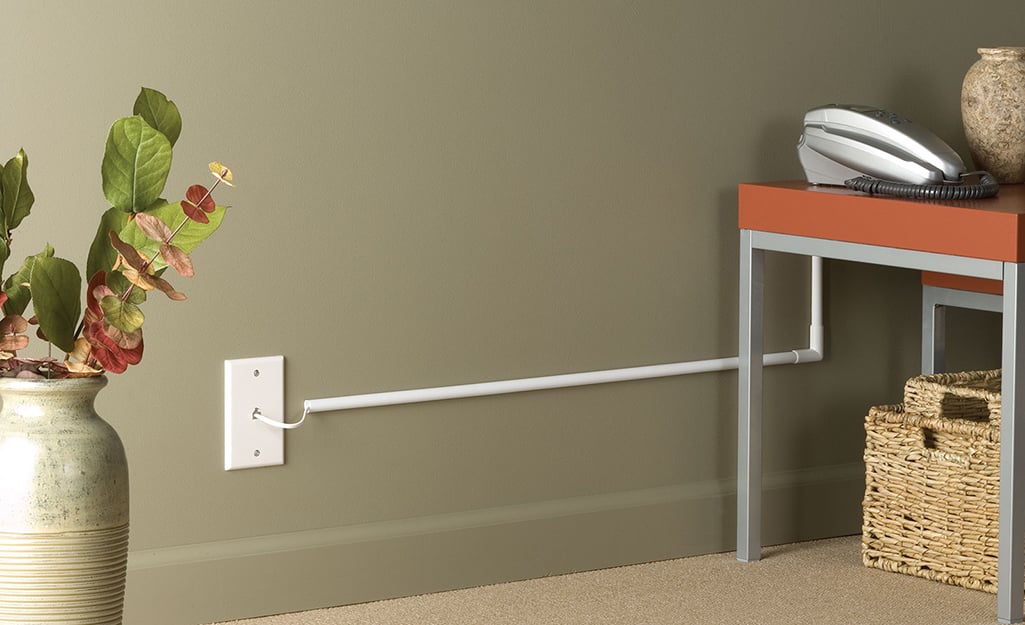
Method 2: The Power Bridge (For When You Need Actual Power!)
Ah, the power conundrum. You’ve hidden your signal cables, but now you’ve got that bulky power cord for your TV or soundbar still hanging out. This is where apower bridge kit comes in. These are designed to safely run power cables inside your walls, but they require a bit more care and adherence to electrical codes.
What you’ll need:

- In-wall rated power cord kit: These kits usually include a male and female end that are designed to be connected behind the drywall. They’re specifically designed to be safe for in-wall use.
- Two power outlet boxes: These will house the connection points for your power cord.
- Drywall saw or utility knife.
- Stud finder.
- Fish tape or wire puller.
- Screwdriver.
- Wire strippers and crimpers (sometimes included, sometimes not).
- Voltage tester (ESSENTIAL for safety!).
- Electrical tape.
The Steps (This is where you need to be extra careful!):
- SAFETY FIRST (Seriously, I can't stress this enough): TURN OFF THE POWER TO THE CIRCUIT YOU’LL BE WORKING ON AT YOUR BREAKER BOX. Use your voltage tester to confirm that the power is indeed off. Don’t be a hero. If you’re not comfortable with electrical work, even this seemingly simple step, it’s time to call a qualified electrician. Better safe than sorry, right?
- Plan your route: Similar to the low-voltage method, map out where your power outlet needs to be (behind the TV, for example) and where it will connect to an existing outlet.
- Locate studs: Again, use your stud finder. Power cables shouldn't be run through the same cavity as the main electrical wires without proper shielding and separation, so planning around studs is important.
- Cut your openings: Cut two openings in the drywall for your power outlet boxes. These should be sized appropriately for the boxes.
- Install the outlet boxes: Secure the outlet boxes into the wall openings. Some have clamps that grip the drywall.
- Run the power cable: This is the trickiest part. You’ll feed one end of the in-wall rated power cord kit through the wall from the existing outlet location towards the new outlet box. You’ll likely use fish tape to help guide it.
- Connect the power cord kit: This is where the specific kit instructions are paramount. Generally, you’ll be connecting the male end of the kit to the existing outlet’s wiring and the female end to the new outlet box. This often involves stripping wires and using wire nuts or crimp connectors. If you are at all unsure, STOP and call an electrician.
- Install the new outlet: Connect the female end of the power cord kit to the new outlet in the box and secure the outlet.
- Test (Safely!): With the power still off, double-check all your connections. Then, turn the power back on at the breaker box and use your voltage tester to confirm everything is working correctly and safely.
- Reinstall wall plates: Screw on your new outlet wall plates.
A HUGE disclaimer here: I am not an electrician, and this is a simplified guide. Electrical work can be dangerous. If you have any doubts whatsoever, or if your local building codes require it, hire a qualified electrician. They have the expertise and tools to do the job safely and correctly. Think of this article as a general overview to understand the process, not a step-by-step DIY manual for high-voltage wiring.
Method 3: The All-in-One Kit (For When You Want It Simple)
For those who like their solutions neatly packaged, there are plenty of all-in-one cable management kits available. These often combine the pass-through plates with a short, in-wall rated extension cord or even a power outlet assembly. They're designed to make the process as straightforward as possible for the DIYer.
What’s usually in these kits:
- Two wall plates with brush or grommet inserts.
- A short in-wall rated power cord.
- Sometimes, a template for cutting the drywall.
- Instructions (which you should definitely read!).
The process is generally similar to Method 1, with the addition of safely connecting the power cord. The kit will usually guide you through connecting the power cord between the two wall plates. Again, if there's any electrical connection involved, treat it with the utmost respect and caution. If it feels beyond your comfort zone, the electrician’s number is your friend.

Beyond the Drywall: Other Clever Wire Hiding Tricks
What if cutting into your walls feels a bit too… permanent? Or maybe you’re renting and don’t have that luxury? Don’t despair! There are still plenty of ways to wrangle those rebellious wires:
Cable Sleeves and Tubing
These are like stylish cocoons for your cables. You can get them in various lengths and colors. You simply gather all the cables going in the same direction and tuck them into the sleeve. Voila! One neat, manageable "cable sausage" instead of a dozen individual ones.
Pros: Super easy, no tools required, portable, good for bundles of cables. Cons: They’re still visible, just tidier.
Cable Raceways and Trunking
These are plastic channels that stick to your walls or baseboards. You open the channel, lay your cables inside, and snap it shut. They come in different widths and can be painted to match your walls. They’re like little hidden highways for your wires.
Pros: Relatively easy to install, looks much cleaner than loose wires, protects cables. Cons: Still an external solution, can be noticeable depending on the color and placement.
Furniture Fences and Clever Placement
Sometimes, the simplest solutions are the best. Can you strategically place a floor lamp behind that tangled mess? Can that bookshelf be moved just a smidge to conceal the offending cords? Get creative! Think of your furniture as a wire-hiding accomplice.
Pros: No installation, free! Cons: Might require rearranging your room, not always a perfect solution.
Tech Pouches and Boxes
There are some really neat decorative boxes and pouches designed specifically to house power strips and excess cable. They’re like little storage units that look intentional and stylish. You plug your devices into the power strip inside the box, and then just run one power cord out.
Pros: Hides everything nicely, looks like a decor item, good for power strips. Cons: Might add a bit of bulk, need to ensure good ventilation.
A Final Word on Safety and Sanity
Look, I know I’ve hammered this home, but I’ll say it one more time: When dealing with electrical wiring, safety is paramount. If you’re not 100% confident, or if the job involves anything beyond simple low-voltage cable runs, please, please, call a professional electrician. Your peace of mind (and your home’s safety) is worth far more than the money you might save. Plus, you avoid that awkward moment where you call them anyway after realizing you’ve tripped a breaker for your entire neighborhood.
But for those low-voltage cables? You’ve got this! The satisfaction of seeing those unsightly wires disappear behind your walls is truly a game-changer. It’s like unlocking a new level of home elegance. So go forth, conquer the cable chaos, and enjoy your beautifully uncluttered space. You deserve it!

