How To Empty An Sd Card On Mac
/removesdcardmac-c574f7e8a4eb41b4b8a552b9cf3de8e2.jpg)
Ever feel that satisfying click when a digital memory is safely tucked away, or perhaps you're getting ready to capture a brand new adventure? If you're a Mac user who dabbles in photography, videography, or even just loves keeping precious moments on tiny, portable storage, then understanding how to wisely empty your SD card on your Mac is a skill worth having. It’s not just about freeing up space; it’s about keeping your digital life organized and ready for whatever inspiration strikes next!
So, what exactly does it mean to "empty" an SD card on a Mac? In essence, it’s the process of deleting the files stored on it, making that space available for new photos, videos, or documents. Think of it like tidying up your digital backpack so you can pack it with even more exciting treasures. The benefits are straightforward: more storage for your latest creations, a cleaner workflow, and the peace of mind knowing your card is ready to go.
Imagine you're a student attending a conference. You've been snapping pictures of presentations, jotting down notes on your tablet, and maybe even recording short video clips for your research. Once you're back home, you’ll want to transfer all that valuable information to your Mac. But before you head out to your next event, you’ll need a clean slate on your SD card. That’s where emptying comes in. Or perhaps you're a hobbyist filmmaker, constantly shooting footage for your passion projects. After you've edited and saved your masterpiece, your SD card will be brimming with raw footage. Emptying it allows you to immediately start capturing the next scene without a second thought.
Must Read
It's surprisingly simple to get the hang of this. For most Mac users, the easiest way to empty an SD card is through the Finder. Just pop your SD card into your Mac’s card reader or a USB adapter. You’ll see it appear on your desktop or in the Finder sidebar, just like any other drive. Click on it to open its contents. Then, you have a couple of options. You can select all the files you want to delete by pressing Command + A, or you can manually select specific files or folders by holding down the Command key and clicking on them. Once you've made your selections, simply press the Delete key, or right-click and choose "Move to Trash." And there you have it! Your card is practically empty, ready for its next mission.
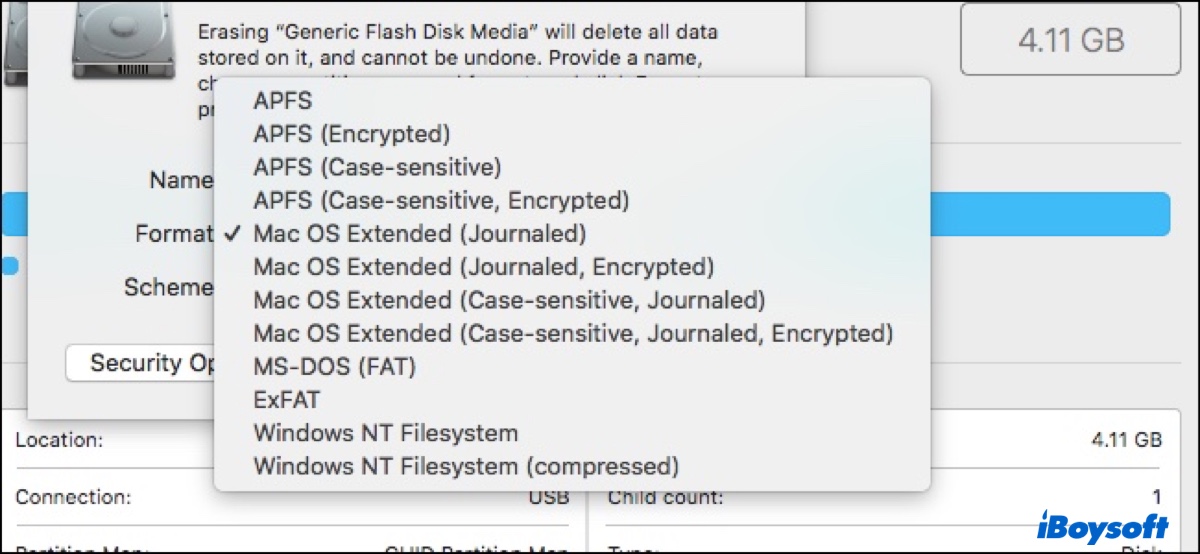
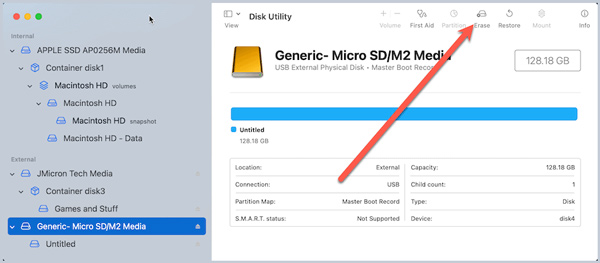
For those who are a bit more curious, you might wonder about different formatting options. While deleting files is the most common way to empty a card, you can also format it. Formatting essentially erases everything and sets up the card to be read by your Mac (or other devices) again, like a brand new card. To do this, with the SD card connected, open the Disk Utility application (you can find it in your Applications folder, usually within Utilities). Select your SD card from the sidebar, and then click the "Erase" button. You can choose a format like "ExFAT" which is compatible with both Macs and Windows PCs, or "MS-DOS (FAT)" for older devices. Always be sure you've backed up anything important before formatting, as it's a more thorough erase than just deleting files!
Exploring how to manage your SD cards is a small but significant step in mastering your digital workflow. So next time your card is full, don't stress! A few simple clicks and you'll be ready to capture, create, and share to your heart's content.
![SD Card From Mac: [Open/Find/Eject/Clear/Recover]](https://images.anyrecover.com/anyrecoveren/assets/article/ejectsdcard-article-content.jpg)
![SD Card From Mac: [Open/Find/Eject/Clear/Recover]](https://images.anyrecover.com/anyrecoveren/assets/article/macsdcard-article-cover.jpg)