How To Clean A Glass Oven Door
:max_bytes(150000):strip_icc()/RealSimple_how-to-clean-oven-door_M4-Step02_preview-a364ca39e21548c7b0fcc3eb07912db2.jpg)
Let's be honest. That glass oven door. It's a battlefield, isn't it? A battlefield of splatters, streaks, and the occasional mystery smudge that makes you wonder if a tiny alien spacecraft landed and then took off again. We've all been there. You're about to bake your famous cookies (the ones that disappear faster than a free donut at a meeting), and you glance at the oven door. Suddenly, your culinary masterpiece feels a little less… professional. More like something baked after a food fight. Don't worry, my friends, we're here to rescue your oven's good looks!
Why bother cleaning that glass, you ask? Well, think of it this way. It's like wearing a clean apron while you cook. It just makes the whole experience feel a bit more polished, a bit more enjoyable. Plus, when you can actually see your cookies rising, your roast browning to perfection, or that cheesecake setting beautifully, it’s a little victory in itself. No more squinting through a greasy haze, playing a guessing game with your dinner. It's about reclaiming the joy of seeing your kitchen creations in all their glory.
The Great Oven Door Mystery: What's That Gunk?
So, what exactly is lurking on your oven door? It's usually a delightful (and by delightful, I mean gross) cocktail of baked-on grease, food bits that decided to take flight, and perhaps a little bit of sugar that caramelized into a stubborn, amber-colored enemy. Think of that time you tried to make that fancy baked Alaska and a little torch action went a bit… enthusiastic. Or that Sunday roast that decided to perform a dramatic grease ballet right on the glass. It happens to the best of us!
Must Read
Sometimes, it’s the little things. A rogue drop of spaghetti sauce from a particularly energetic stirring session. A tiny speck of flour that somehow found its way onto the glass during a flour-dusting frenzy. And then there are the times you're not entirely sure what it is. A smear? A streak? A pre-historic fossilized breadcrumb? The mystery is part of the challenge, and thankfully, the solution is often simpler than you think.
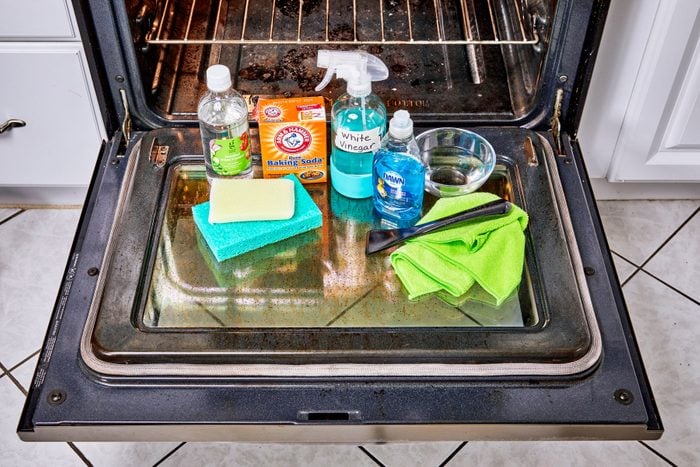
Your Kitchen, Your Arsenal: What You'll Need
Before we dive in, let's gather our troops. You don't need any fancy, expensive gadgets for this mission. Most of what you'll need is probably already lurking in your kitchen cupboards. It’s like a treasure hunt, but instead of pirate gold, you’re looking for cleaning supplies!
The Dynamic Duo: Baking Soda and Vinegar
These two are the superheroes of your kitchen cleaning world. They’re natural, they’re effective, and they’re ridiculously affordable. Baking soda is our gentle but firm abrasive, perfect for tackling those stubborn baked-on bits without scratching your precious glass. Vinegar is our acidic warrior, cutting through grease and grime like a hot knife through butter. Together, they're unstoppable!
You'll also want some:

- Warm water: The universal solvent.
- A soft cloth or sponge: We’re cleaning, not performing surgery, so be gentle!
- A scraper (optional, but handy): Think a plastic spatula or an old credit card. This is for those truly epic battles.
- A spray bottle (optional): Makes applying the vinegar a breeze.
- A clean, dry cloth: For that final, streak-free shine.
Operation: Clean Oven Door - Step-by-Step
Alright, team, it’s time to get to work. Deep breaths. This is going to be less of a chore and more of a satisfying transformation.
Step 1: The Preheat (Not for Baking!)
First things first, make sure your oven is completely cool. Seriously. No one wants to clean a hot oven door. That’s just asking for a singed eyebrow and a whole lot of regret. So, give it a good rest. Let it cool down like a patiently waiting pie.
Step 2: The Baking Soda Paste - Your Secret Weapon
In a small bowl, mix about half a cup of baking soda with a few tablespoons of water. You’re aiming for a thick, spreadable paste. Think of it like making a very gentle mud pie. You want it to stick to the glass, not drip everywhere like a leaky faucet.
Now, this is where the magic begins. Grab your cloth or sponge and generously apply this baking soda paste to the inside of your oven door. Focus on the grubby areas. You know the ones. Give them a good, thorough coating. Let it sit there for at least 15-30 minutes. This is the paste’s quiet time, where it’s working its magic, softening all those stubborn splatters.
:max_bytes(150000):strip_icc()/clean-glass-oven-door-6823345-08-hero-7f946f76528847258a356cb069bb576c.jpg)
If you have some really tough spots, like those little black char marks that look like tiny constellations, don't be afraid to apply a thicker layer of paste. Let it do its thing. Imagine it’s like a spa treatment for your oven door. It’s getting pampered and prepped for its big reveal.
Step 3: The Vinegar Spritz - The Grease Buster
While the baking soda paste is doing its job, grab your spray bottle and fill it with white vinegar. Once the paste has had its sitting time, it’s time for the vinegar to join the party. Spray the vinegar directly onto the baking soda paste.
What happens next? You’ll likely see a little fizzing action. That's the vinegar reacting with the baking soda, creating a gentle (but effective!) cleaning power. It’s like a miniature science experiment happening right on your oven door. Pretty cool, right? This fizzing helps lift all that baked-on gunk and grease.
Step 4: The Gentle Scrub Down
Now, using your damp cloth or sponge, start gently scrubbing the glass. The baking soda paste, softened by the vinegar, should make it much easier to wipe away the grime. Work in circular motions, paying extra attention to those problem areas. You’ll be amazed at how much of that gunk just lifts away.
:max_bytes(150000):strip_icc()/clean-glass-oven-door-6823345-07-a8d30903c80747dfa1f138cd1b0f390e.jpg)
For those really stubborn, baked-on messes that refuse to budge, this is where your scraper comes in handy. Gently, and I mean gently, use your plastic spatula or old credit card to scrape away the residue. Think of it as a gentle nudge, not a full-on attack. You don't want to scratch the glass!
Step 5: The Rinse and Reveal
Once you’ve scrubbed away as much as you can, it’s time to rinse. Dip your cloth in clean, warm water and wipe down the glass thoroughly to remove all the baking soda paste and loosened grime. You might need to rinse your cloth a few times. The goal here is to get all the residue off.
You can also use your spray bottle filled with plain water to give it a final spritz and wipe down.
Step 6: The Streak-Free Finale
This is the moment of truth! Grab a clean, dry cloth (microfiber is fantastic for this) and give your oven door a good polish. Work in a consistent direction – either horizontal or vertical – to avoid any streaks. You want that glass to sparkle like it’s brand new. Admire your work. You’ve conquered the oven door beast!
A Little Extra Love (For the Tough Guys)
What if, despite your best efforts, there are still a few stubborn spots? Don’t despair! You can repeat the baking soda paste and vinegar process for those particularly challenging areas. Sometimes, a second helping of cleaning power is all it takes. You can also try letting the paste sit for a bit longer, perhaps 30 minutes to an hour, for those truly heroic messes.
Some folks swear by commercial oven cleaners, and if you choose to go that route, just be sure to follow the product instructions carefully and ensure good ventilation. However, for everyday grime and a more natural approach, baking soda and vinegar are usually more than sufficient.
Keeping It Clean: Prevention is Key
Now that your oven door is gleaming, let’s talk about keeping it that way. It’s a lot easier to maintain a clean oven door than to tackle a grease apocalypse every few months.
- Wipe spills immediately: If you see a little splatter happen, grab a damp cloth and wipe it up right away. It’s much easier to clean a fresh spill than one that's been baked on a dozen times.
- Use oven liners or baking sheets: Place a baking sheet on the rack below your pies or roasts to catch any drips. It’s like giving your oven a built-in bib!
- Regular mini-cleans: A quick wipe-down with a damp cloth every week or so can prevent major build-up.
Cleaning your oven door might not be the most glamorous chore, but it’s one that can make a surprisingly big difference in how your kitchen looks and how you feel when you’re in it. So, go forth, armed with your baking soda and vinegar, and let your oven door shine! Happy baking (and happy cleaning)!
:max_bytes(150000):strip_icc()/RealSimple_how-to-clean-oven-door_M4-Step01_preview-4f7676dc52674375a56004cf2039c885.jpg)
