How Do You Use A Selfie Stick

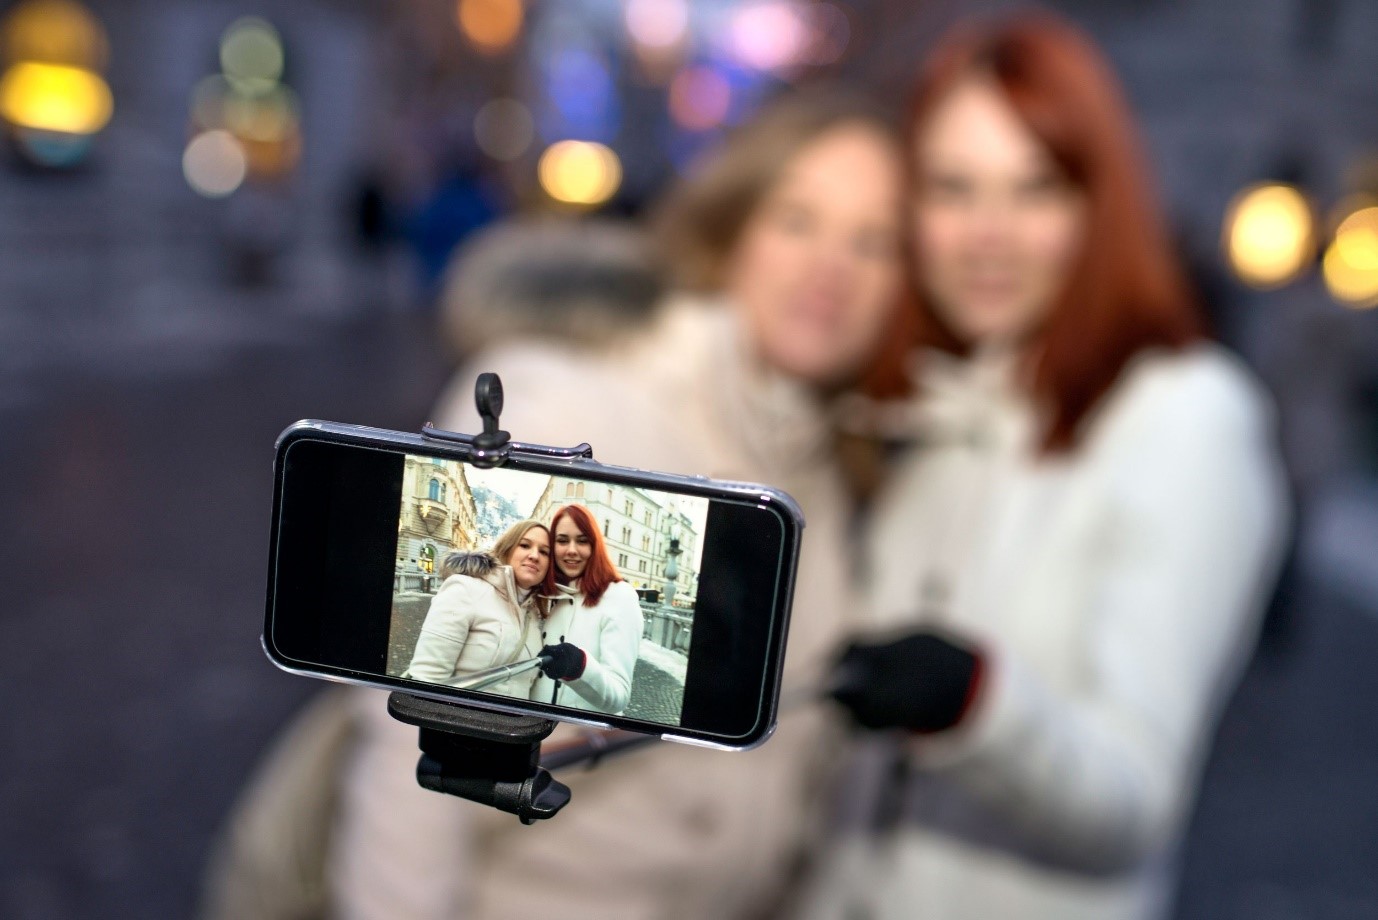
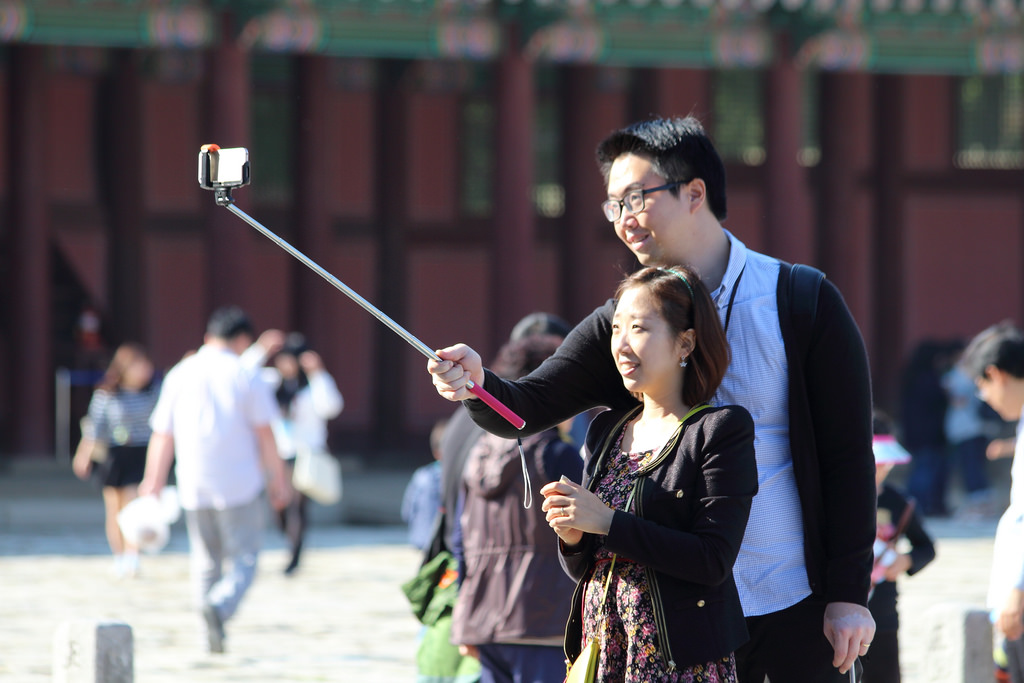
So, you've seen them everywhere, right? Those long, often brightly colored contraptions extending your phone just a little further than your arm can reach. Yep, we're talking about the trusty selfie stick! Once a novelty, they've become a staple for travelers, social media enthusiasts, and anyone who's ever struggled to cram themselves and that epic backdrop into a single shot. But beyond the initial "ooh, look at that cool gadget," how do you actually use one to unleash its full photo-taking potential? Fear not, intrepid snapper! This guide is here to turn you from a selfie-stick-wielding novice into a confident creator of perfectly framed memories.
Let's dive into the wonderful world of extending your reach and capturing those moments like a pro. Whether you're exploring ancient ruins, posing with your besties at a festival, or just trying to get that elusive shot of your entire delicious meal, a selfie stick can be your secret weapon. It's not just about taking a picture of your face anymore; it's about composing a scene, including your surroundings, and telling a more complete story with your images. Think of it as an extension of your creativity, allowing you to step back (metaphorically) and see the bigger picture.
The Magic Behind the Stick: Purpose and Benefits
At its core, the purpose of a selfie stick is simple: to extend the reach of your smartphone or camera. This seemingly small extension unlocks a whole new realm of photographic possibilities. No more awkwardly contorting your arm, cutting off half your head, or having to ask a stranger (who might be a bit shaky with the camera) to take your photo.
Must Read
Here are some of the fantastic benefits you'll experience:
- Wider Field of View: This is the big one! By moving your phone further away, you can fit more of your surroundings into the frame. Imagine trying to capture that stunning mountain vista with just your arm – good luck! With a selfie stick, you can get both yourself and the breathtaking scenery in one glorious shot.
- Better Group Photos: Forget the "my arm is longer than yours" competition. A selfie stick makes it incredibly easy to get everyone in the picture, even if you have a large group. Everyone can be included without someone having to be left out or having to stand way too far back.
- Unique Angles: Ever wanted to get a shot from a slightly higher or lower perspective? A selfie stick allows you to experiment with different angles that would be difficult or impossible to achieve with just your arm. This can add a dynamic and interesting feel to your photos.
- Improved Stability: While not as stable as a tripod, a longer selfie stick can sometimes offer a more stable base than holding your phone at an awkward angle. This can help reduce blur, especially in lower light conditions.
- Hands-Free Convenience (with Bluetooth): Many modern selfie sticks come equipped with Bluetooth remotes or built-in buttons. This means you can trigger the shutter without having to touch your phone screen, further reducing camera shake and allowing for more spontaneous shots.
- Perfect for Video: If you're vlogging or recording a video, a selfie stick provides a smoother and more consistent filming experience. You can move around and capture footage without the jerky movements that often come with handheld filming.
- Solo Adventures: Traveling alone? No problem! A selfie stick empowers you to capture your adventures from your own perspective, documenting your experiences without relying on others.
Essentially, a selfie stick democratizes the act of photography. It puts more control back into your hands (literally!) and allows for more creative and inclusive photo-taking. It's a tool that enhances your ability to document your life and share your world.

Getting Started: The Anatomy of Your Selfie Stick
Before we get to the "how," let's quickly get acquainted with the different parts of your typical selfie stick. Most sticks will have:
- The Handle: This is where you grip the stick. Some are made of comfortable rubber or silicone, while others might have a more rigid design.
- The Extendable Pole: This is the telescoping part that allows you to adjust the length. It usually locks into place at your desired extension.
- The Phone Mount: This is the clamp or holder that securely grips your smartphone. It's usually adjustable to fit various phone sizes.
- The Shutter Button (Optional): Many modern selfie sticks have a button on the handle that connects to your phone via Bluetooth to take pictures.
- The Bluetooth Remote (Optional): Sometimes the shutter button is a separate, small remote that pairs with your phone.
- The Tripod Legs (Optional): Some selfie sticks can also transform into mini tripods, offering even more stability and versatility.
Understanding these components will make the following steps a breeze. Don't worry if yours looks a little different; the core principles remain the same.
Step-by-Step Guide: Unleash Your Inner Photographer
Ready to give it a whirl? Here’s how to use your selfie stick like a seasoned pro:
-
Step 1: Extend and Secure Your Phone
First things first, decide how long you want your selfie stick to be. Gently pull the extendable pole out to your desired length. Most poles have a locking mechanism to keep them in place – make sure it's secure! Now, take your smartphone and carefully place it into the phone mount. The mount usually has adjustable arms or a spring-loaded clamp. Gently squeeze the arms or expand the clamp to fit your phone snugly. Ensure your phone is centered and held firmly; you don't want any accidental drops!
-
Step 2: Connect to Your Phone (If Using Bluetooth)
If your selfie stick has a Bluetooth shutter button or remote, it's time to pair it with your phone.
- Turn on your phone's Bluetooth.
- Turn on the selfie stick's Bluetooth (usually a small switch or button).
- On your phone, go to Bluetooth settings and search for nearby devices.
- You should see your selfie stick appear in the list (it might be called something like "AB Shutter" or have a generic name). Tap on it to pair.
- Once paired, your phone's camera app should recognize the button as a shutter trigger. You might need to open your camera app and test it out. In some cases, you might need to go into your camera app's settings and assign the volume button to act as the shutter if the Bluetooth doesn't work automatically.
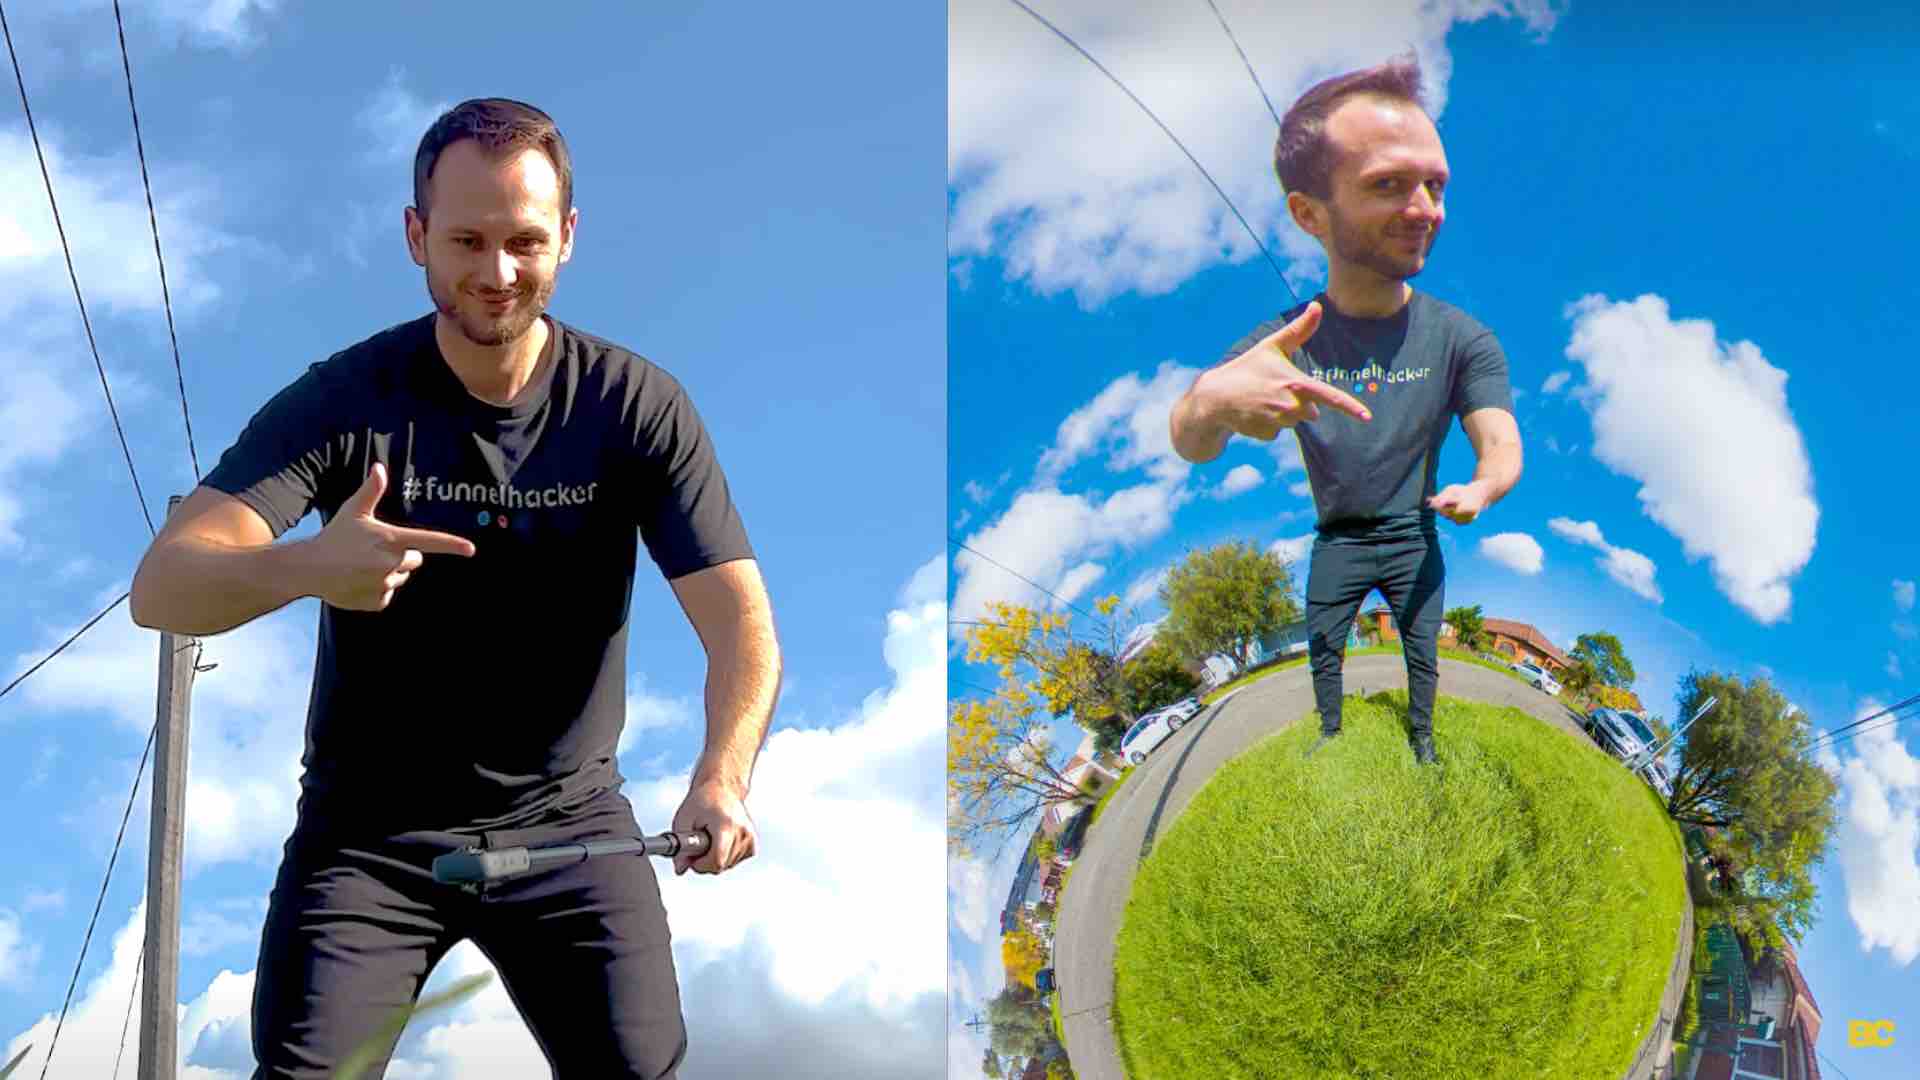
How To Get The “Invisible Selfie Stick” Effect -
Step 3: Frame Your Shot Like a Master
This is where the magic happens! Hold the selfie stick comfortably. With your phone extended, start to frame your shot. Think about what you want to include.
- For landscapes: Extend the stick fully and angle it slightly upwards to capture more of the sky and background.
- For group photos: Position yourself so you're facing your friends or family, then extend the stick outwards and slightly upwards to fit everyone in. It might take a few tries to get everyone positioned perfectly.
- For a classic selfie: Extend it just enough to get a better angle and include a bit more of your surroundings.
-
Step 4: Capture the Moment!
Once you're happy with your framing, it's time to take the photo.
- If you have a Bluetooth button, simply press it.
- If you don't have Bluetooth, you'll need to use your phone's timer function. Open your camera app, tap the timer icon, set it for a few seconds (3 or 5 seconds is usually good), then frame your shot, press the shutter button on your phone, and quickly get into position.
-
Step 5: Review and Refine
After taking your photos, take a moment to review them. Are you happy with the composition? Is everyone in focus? Is the lighting good? If not, don't despair! Adjust the stick, reframe, and try again. Practice makes perfect, and the more you use your selfie stick, the better you'll become at composing shots.
5 smart selfie stick alternatives. Because oh no! Not a ban!
Tips and Tricks for Selfie Stick Success
To truly master the art of the selfie stick, here are a few extra pointers:
- Consider the Light: Always try to have the light source in front of you, not behind you. This will illuminate your face and prevent your photos from being dark silhouettes.
- Keep the Background in Mind: A great backdrop can elevate any photo. Make sure your background is interesting and not distracting.
- Avoid "Up the Nose" Shots: We've all seen them! Try to keep the phone at a slightly higher angle than your face to avoid unflattering perspectives.
- Be Mindful of Your Surroundings: When using a selfie stick in public, be aware of other people. Don't swing it around wildly or block pathways. Be considerate!
- Don't Overextend: While the extra reach is great, overextending too much can make the stick unstable and the photo blurry.
- Clean Your Lens: A smudged lens is the enemy of clear photos. Give your phone's camera lens a quick wipe before you start snapping.
- Experiment with Video: Use your selfie stick for short video clips. It can give your videos a more dynamic and personal feel.
- Think About Stability: If you're in a windy or unsteady environment, try to keep the selfie stick as stable as possible, or consider using the timer function to minimize movement while pressing the button.
The selfie stick is more than just a gadget; it's a tool that can significantly enhance your photography. It encourages you to think more creatively about how you capture your experiences, whether you're a seasoned traveler or just enjoying a day out with friends. So go forth, extend that stick, and start creating some amazing memories!
Happy snapping!