How Do You Format A Usb Stick
Hey there, digital nomads and tech dabblers! Ever stare at a USB stick, that little beacon of portable data, and wonder, “What’s its deal? And more importantly, how do I make it my deal?” You know, the kind of thing that feels both super simple and somehow utterly mystifying? We've all been there. Like trying to remember the password to that one streaming service you only use for that one show. It’s a vibe.
Formatting a USB stick sounds… well, it sounds a bit like prepping for a digital spa day. You’re wiping it clean, getting it ready for a fresh start. Think of it as decluttering your digital closet, but way faster and with fewer existential crises. And don't worry, it's not some arcane ritual only wizards with glowing keyboards can perform. It's totally within your reach, and we're here to guide you through it, with a smile and maybe a virtual high-five.
So, grab your favorite beverage – is it artisanal cold brew? A classic cup of tea? Or maybe just whatever’s closest? – and let’s dive into the wonderfully un-intimidating world of USB formatting. We’ll cover the what, the why, and the how, all without making your brain do the mental gymnastics of trying to assemble IKEA furniture.
Must Read
Why Bother Formatting? It’s Not Just for Fun!
You might be thinking, “If it ain’t broke, don’t fix it, right?” And usually, you’d be absolutely spot on. But sometimes, a USB stick can get a little… clunky. Maybe it’s been around the block a few times, storing everything from your vacation photos to that one meme your friend sent you six months ago. Over time, the data can get a bit jumbled, like a toddler’s playroom.
Formatting is essentially a fresh coat of digital paint. It wipes everything clean, creating a pristine file system that makes it easier for your computer to read and write data. This can solve a surprising number of pesky problems, from slow transfer speeds to the dreaded “This drive is unreadable” message. Think of it as hitting the reset button for your tiny data friend.
Plus, there’s the compatibility factor. Different operating systems (like Windows, macOS, and Linux) and different devices (like your smart TV or car stereo) like their USB drives formatted in specific ways. If you’re trying to move files between a Windows PC and a Mac, or load music into your car, formatting correctly is key. It’s like speaking the right language so everyone understands.
And let’s not forget the security aspect. If you’re passing on an old USB stick, or if you just want to make sure no sensitive data lingers, formatting is your best bet. It’s like shredding your sensitive documents, but with a lot less paper dust. So, it’s not just about tidiness; it's about functionality, compatibility, and a touch of digital privacy.

The File System Fiesta: FAT32, exFAT, NTFS, Oh My!
Now, before we get our hands dirty, we need to talk about the language your USB stick will speak. This is where file systems come in. Don’t let the jargon scare you; it’s simpler than understanding TikTok trends. The most common ones you'll encounter are:
- FAT32: This is the old guard, the OG of USB file systems. It's super compatible, meaning it'll work with almost anything – old computers, gaming consoles, smart TVs, you name it. The catch? It has a 4GB file size limit. So, if you’re trying to copy a giant movie file or a massive project, FAT32 will throw a digital tantrum.
- exFAT: Think of exFAT as the cool, modern cousin of FAT32. It got rid of the 4GB file size limit, so you can store those huge files. It's also pretty widely compatible, especially with newer devices and operating systems. It’s often the go-to choice for larger USB drives and for cross-platform use.
- NTFS: This is Windows' native file system. It's great for Windows computers, offering features like better security and support for very large files. However, it’s not as universally compatible. Macs can usually read NTFS drives, but writing to them can sometimes be a hassle without extra software. Linux users generally have good support.
So, which one is right for you? Generally:
- For smaller drives (under 32GB) and maximum compatibility (especially with older devices): FAT32.
- For larger drives (32GB and up), and if you'll be using it with both Windows and macOS (newer versions): exFAT.
- If you’re primarily using the drive with Windows computers only and need advanced features: NTFS.
It’s a bit like choosing your streaming service: Netflix for everything, Hulu for live TV, or Disney+ for nostalgia. Pick the one that best suits your digital binge-watching (or data-transferring) habits.
Let’s Get Down to Business: Formatting on Windows
Alright, for all you Windows warriors out there, this is your moment. Formatting on Windows is as straightforward as ordering pizza. Let’s do this:
/formatusbmac-5b3877ddea5742768f3c65177442d0d0.jpg)
- Plug it in! Shove that USB stick into a USB port. You know the drill.
- Open File Explorer. You can do this by clicking the folder icon on your taskbar or by pressing Windows Key + E. It's like opening your digital filing cabinet.
- Find your USB drive. It'll usually show up under "This PC" or "Computer" with a letter designation (like E: or F:). It might have a name, or it might just be "Removable Disk."
- Right-click on the USB drive. This is where the magic happens. A context menu will pop up.
- Select "Format..." Ta-da! A formatting window will appear.
Now, in the formatting window, you'll see a few options:
- File system: This is where you choose between FAT32, exFAT, or NTFS based on what we discussed earlier. Choose wisely!
- Allocation unit size: For most users, "Default allocation size" is perfectly fine. Don't overthink this one unless you're a digital architect.
- Volume label: This is the name of your USB drive. Give it a fun name! "Vacay Pics," "Work Stuff," or even "The Secret Agent Files" – the choice is yours.
- Quick Format: This is usually checked by default. It’s faster because it just deletes the file table without scanning for bad sectors. If you’re having persistent issues or want a really deep clean, you can uncheck this, but it will take significantly longer. For most everyday formatting, keep "Quick Format" checked.
Once you've made your selections, hit the "Start" button. You'll get a warning message saying that formatting will erase all data. Yes, it will! This is the digital equivalent of hitting the "I'm sure" button. Click "OK" if you’re ready to proceed.
And that's it! In a few moments (or longer if you skipped Quick Format), your USB drive will be formatted and ready for action. Easy peasy, right?
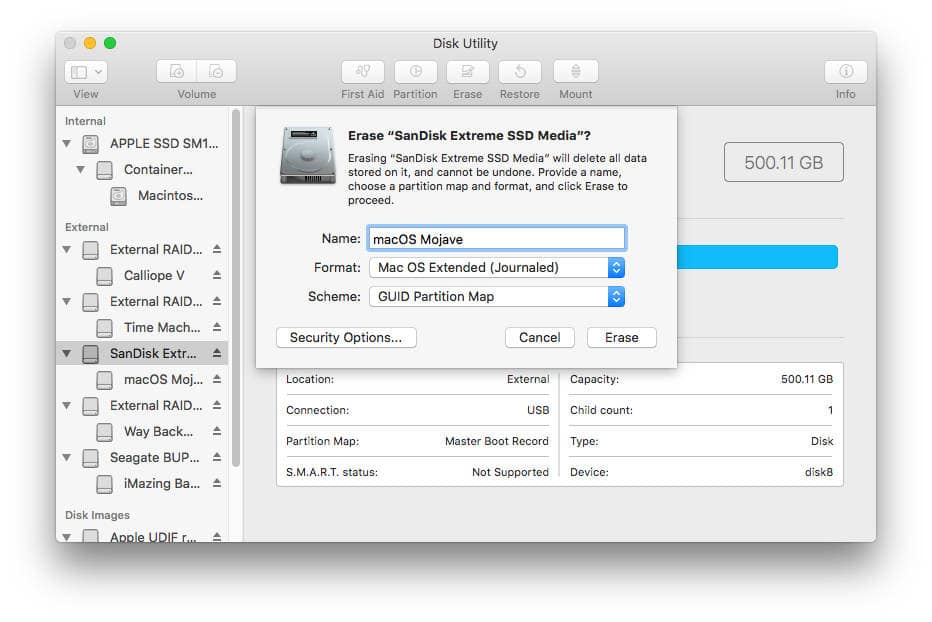
Mac Users, Assemble! Formatting on macOS
If you're rocking a Mac, the process is just as smooth, like butter on a warm croissant. Here’s how you do it:
- Plug it in. Of course!
- Open Disk Utility. You can find this in your Applications folder, under Utilities, or by searching for it using Spotlight (Command + Space, then type "Disk Utility"). Think of it as your Mac's digital toolbox.
- Select your USB drive. In the left-hand sidebar of Disk Utility, you'll see a list of drives. Find your USB drive. Make sure you select the correct drive – you don't want to accidentally format your Mac's internal hard drive! Look for its name and capacity.
- Click the "Erase" button. It’s usually at the top of the Disk Utility window. This is your trigger to start the formatting process.
A new window will pop up with your formatting options:
![How to Format USB Stick in Windows [Stepwise Guide]](https://www.diskpart.com/screenshot/en/others/windows-10/select-file-system.png)
- Format: This is where you choose your file system. For Macs, the common choices are:
- Mac OS Extended (Journaled): If you're only using the drive with Macs.
- ExFAT: The best choice for cross-platform compatibility (Windows and Mac).
- MS-DOS (FAT): This is the Mac equivalent of FAT32. It's good for older devices but has the same 4GB file size limit.
- Scheme: For most USB drives, especially if you plan to use them with multiple devices, choose "GUID Partition Map." This is the modern standard.
- Name: Give your drive a descriptive name. Something catchy!
Once you’ve made your choices, click the "Erase" button. You’ll get a confirmation prompt. Click "Erase" again. Disk Utility will then work its magic. It’s often quick, but give it a minute.
And voilà! Your USB drive is now formatted and ready for its next adventure. See? Not so scary!
Pro Tips for the Savvy Data Handler
Formatting is great, but here are some extra tidbits to make your USB life even smoother:
- Backup Your Data First! This is the golden rule, the mantra, the universe’s gentle reminder: Formatting erases EVERYTHING. Seriously. Make sure you've copied any important files off your USB drive before you start. Think of it like packing a suitcase before you move house – you don't want to leave your favorite socks behind.
- Safely Remove Hardware. This isn't directly formatting, but it's crucial for USB health. Before you unplug your USB stick, always use the "Safely Remove Hardware" option (on Windows) or eject it from Finder (on Mac). Yanking it out mid-transfer can corrupt data and lead to frustrating issues. It's like closing a book properly before putting it back on the shelf.
- Check for Errors Before Formatting. Sometimes, a quick check can save you the whole formatting fuss. On Windows, right-click the drive, go to Properties > Tools > Check. On Mac, Disk Utility has a "First Aid" option. If it finds errors it can fix, you might be able to avoid a full format.
- Consider the Drive Size. For very small drives (like 4GB or 8GB), FAT32 is often the default and works fine. For anything larger, exFAT is usually the better choice for its lack of file size limitations.
- Don't Fear the Quick Format. Unless you're trying to recover a drive that's been acting really strange, the Quick Format option is perfectly adequate for most situations. It's efficient and gets the job done.
A Little Bit of Cultural Context: USBs and Our Lives
It’s funny how these little rectangles have become so ingrained in our daily lives. From students swapping notes to professionals sharing presentations, to musicians carrying their latest tracks, USB drives are the unsung heroes of data portability. They’re the digital equivalent of a handy pocket knife, always there when you need to transfer something, make a backup, or boot up a different operating system.
![How to Format USB Stick in Windows [Stepwise Guide]](https://www.diskpart.com/screenshot/en/others/windows-10/format-fat32-to-ntfs/file-system.png)
Remember the days of floppy disks? Those big, clunky things that held a whopping 1.44MB? Compared to today's multi-gigabyte USB sticks, it's a testament to how far technology has come. It's like comparing a dial-up modem to fiber optic internet – the difference is mind-blowing!
And the ubiquitous USB stick has even spawned its own cultural quirks. Think of the "USB Killer" prank devices (definitely don't try these!), or the sheer volume of promotional USB drives given away at conferences, often shaped like tiny cartoon characters or miniature tools. They’re not just storage; they’re mini-artifacts of our digital age.
The Daily Grind, Digitally Tidied
So, why does all this matter in the grand scheme of our easy-going lifestyle? Because sometimes, the simplest things can save us the most hassle. A properly formatted USB stick means smoother file transfers, less frustration when you need to share a document, and the confidence that your data is stored in a way that’s compatible with whatever device you throw at it.
It’s about small wins. It’s about reducing those little friction points in our day that can, cumulatively, add up to a stressful experience. Knowing how to format a USB stick is like knowing how to change a tire or how to properly fold a fitted sheet – a practical skill that brings a quiet sense of competence and control. It’s one less thing to worry about, leaving more mental space for enjoying that coffee, catching up with friends, or just staring out the window and contemplating the mysteries of the universe.
Next time you pick up a USB stick, don't just see it as a piece of plastic and silicon. See it as a potential ally in your digital journey, ready to be prepped and polished for whatever task you have in mind. And with this guide, you’re now equipped to give it that perfect digital makeover. Happy formatting!