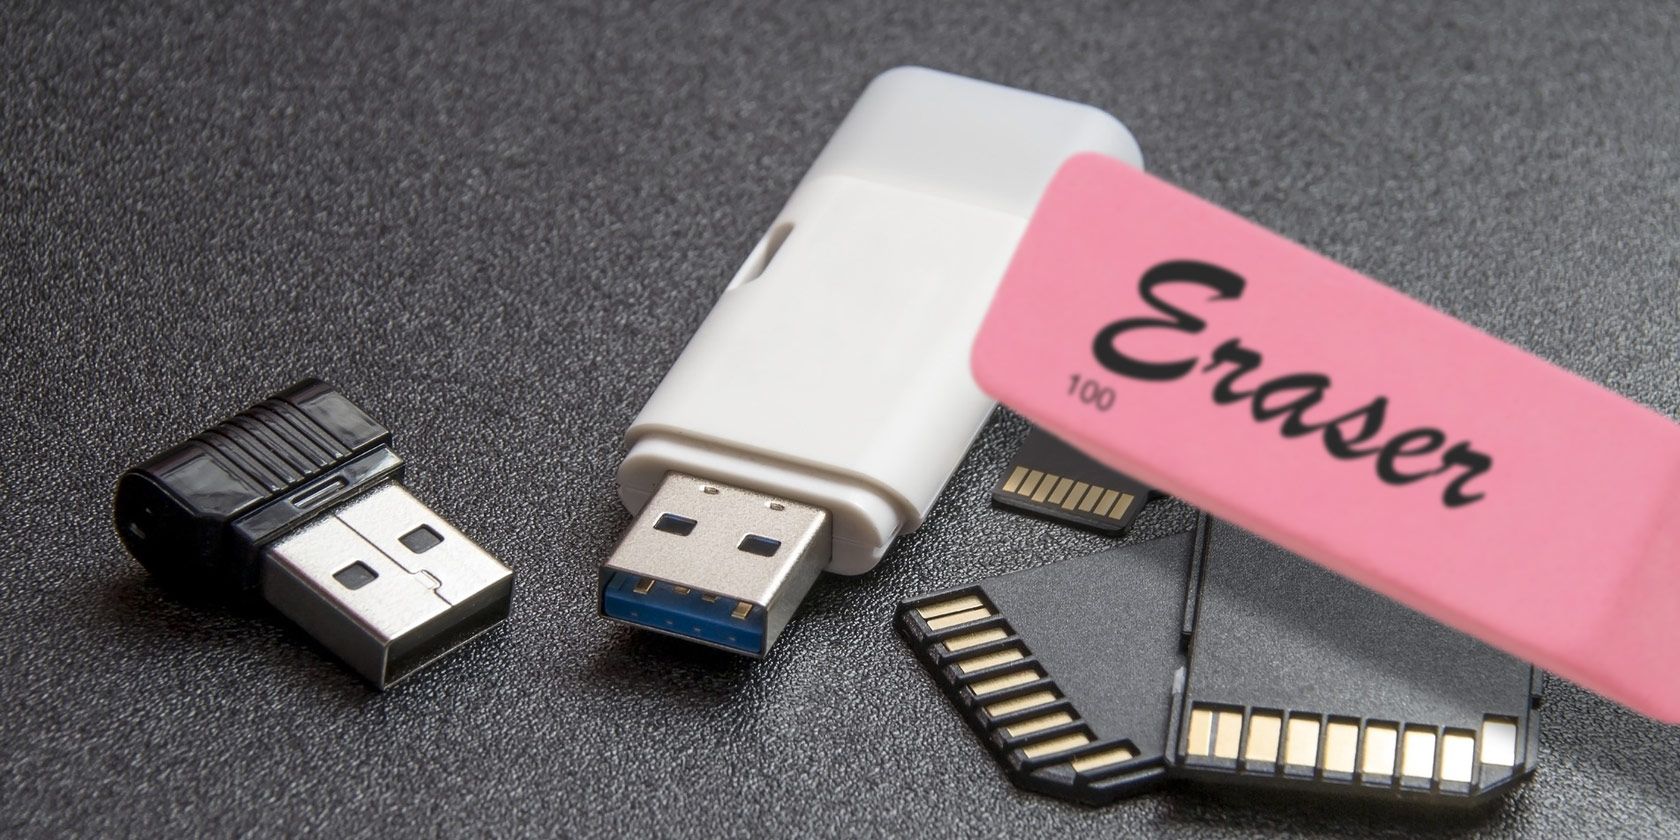
How Do You Erase A Flash Drive
So, you’ve got a flash drive. A trusty little sidekick, crammed with everything from your latest masterpiece of a playlist to those embarrassing photos from your college days (we all have them, right?). It’s been your digital wallet, your portable library, your secret weapon for transferring files like a ninja. But now, it’s time for a clean slate. Maybe you’re upgrading to a shiny new, much larger drive, or perhaps you’re handing this trusty steed over to a friend, a colleague, or even donating it. Whatever the reason, the question arises: how do you, my friend, erase a flash drive?
It sounds simple enough, and for the most part, it is! Think of it like tidying up your digital attic. You don't need to be a tech wizard with a cape and a secret lair to do this. We’re talking about a process that’s as accessible as ordering your favorite latte online or scrolling through TikTok. And trust me, understanding this little piece of tech know-how can feel surprisingly empowering, like finally mastering that tricky sourdough starter. Plus, knowing how to properly wipe a drive is crucial for privacy and security – no one wants their sensitive data floating around in the digital ether, right?
Before we dive headfirst into the digital deconstruction, let's have a quick chat about why you might want to erase. It’s not just about making space. Imagine this: you’ve meticulously crafted a presentation, saved it, tweaked it, and now it’s perfect. You lend your flash drive to a coworker, who accidentally (or perhaps not so accidentally, if they’re really into your work!) copies it and claims it as their own brilliant idea. Uh oh. Or, consider the more mundane, but equally important, scenario: you’re selling your old laptop or donating your old thumb drive. You absolutely, positively do not want your banking details, your secret cookie recipes, or those deeply personal diary entries to fall into the wrong hands. It’s like leaving your front door wide open with a neon sign pointing to your valuables. So, erasing is essentially the digital equivalent of locking up.
Must Read
There are actually a couple of ways to go about this digital decluttering, depending on your operating system and how thorough you want to be. Think of it like choosing between a quick sweep of the floor or a deep spring clean. Both get the job done, but one is a bit more… intense. We’ll start with the most common, everyday methods, the kind you can do while you’re waiting for your pizza to arrive. Then, we’ll touch on the more robust options for when you really need to ensure nothing’s left behind.
The Quick and Easy Way: Formatting
This is your go-to method, the digital equivalent of hitting the "reset" button. Formatting a flash drive essentially reorganizes the file system and wipes out all the data. It’s fast, it’s simple, and it’s what most people need. Think of it like formatting a new hard drive before you load it up with your life – you’re setting it up for a fresh start.
On Windows: A Few Clicks and You’re Done
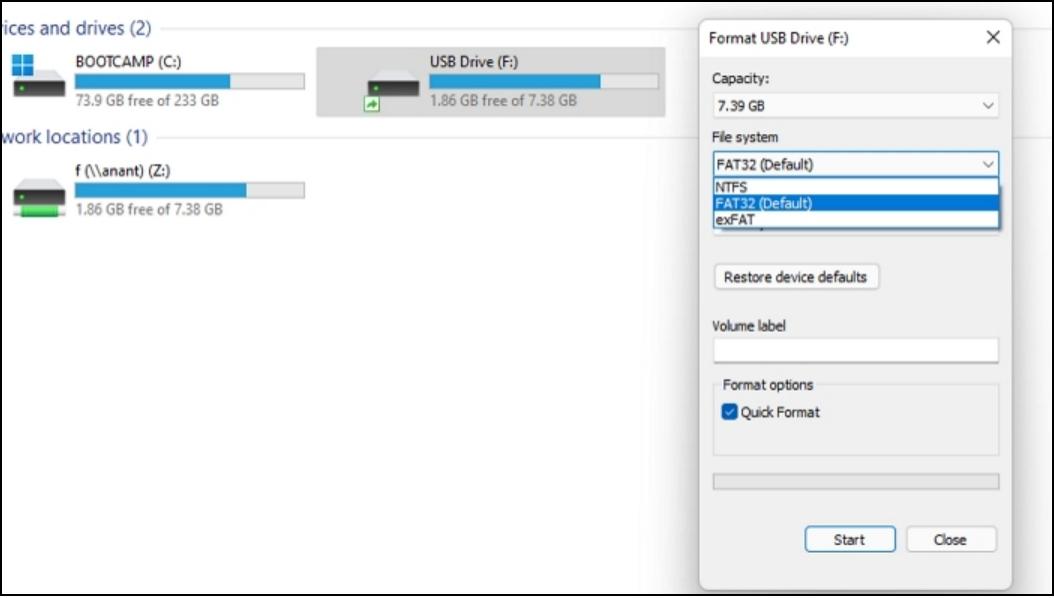
Alright, Windows users, gather ‘round! This is super straightforward. Grab your flash drive and plug it into a USB port. You know, the little rectangle slots that your mouse and keyboard are probably already plugged into. Now, head over to ‘This PC’ (or ‘Computer’ if you’re rocking an older version of Windows). You’ll see all your drives listed there. Find your flash drive – it’s usually labeled with a letter and a name, like ‘Removable Disk (E:)’ or ‘My Flash Drive (F:)’. Don’t worry if it’s not the exact same names, just look for the one that represents your USB drive.
Once you’ve located it, right-click on the drive icon. A menu will pop up, and you’re looking for the option that says ‘Format…’. Click that. A new window will appear. Now, don’t get overwhelmed by all the options. For most of us, the default settings are perfectly fine. You’ll see ‘File system’ and ‘Allocation unit size’. For a flash drive, sticking with NTFS or FAT32 is usually the way to go. FAT32 is more compatible with older devices and Macs, while NTFS is generally better for larger files and security features on Windows. If you’re unsure, FAT32 is a safe bet for general use.
There’s also a little checkbox that says ‘Quick Format’. Now, this is where the "quick" in "quick format" comes in. It basically deletes the file index, making the data inaccessible but not actually overwriting the entire drive. It’s super fast. If you’re just clearing it for a new owner or for general use, this is perfect. It’s like tidying up your desk by throwing all the papers into a drawer – they’re out of sight, but they’re still technically there. We’ll get to the "deep clean" later.
So, leave ‘Quick Format’ checked, and then click ‘Start’. You’ll probably get a warning message saying that formatting will erase all data. Shocking, right? Confirm that you’re absolutely sure you want to proceed by clicking ‘OK’. And poof! In just a few moments, your flash drive is as good as new, ready for a fresh start. Easy peasy, lemon squeezy.

On macOS: Just as Sleek and Simple
Mac users, your turn! Don’t worry, Apple’s design philosophy extends to its utility tools. Plug in your flash drive. Now, you’ll need to open ‘Disk Utility’. You can find this by opening ‘Finder’, then going to ‘Applications’, then ‘Utilities’, and finally clicking on ‘Disk Utility’. Or, if you’re feeling fancy, just hit ‘Command + Spacebar’ to open Spotlight Search and type ‘Disk Utility’.
Once Disk Utility is open, you’ll see a list of drives on the left-hand side. Look for your flash drive in the sidebar. It might be named something like ‘UNTITLED’ or the brand name of your drive. Make sure you select the main drive, not any indented volumes if they appear.
With your flash drive selected, click the ‘Erase’ button at the top of the Disk Utility window. A little dialogue box will pop up. You’ll need to choose a ‘Format’. For general compatibility, especially if you might use the drive with Windows computers, ‘MS-DOS (FAT)’ or ‘ExFAT’ are your best bets. ExFAT is generally preferred for larger drives and files. If you’re only using it with Macs, ‘Mac OS Extended (Journaled)’ is also an option, but ExFAT offers broader usability.
For the ‘Scheme’, choose ‘GUID Partition Map’. This is the modern standard for most drives. Again, don’t overthink it if you’re not sure; these are the recommended defaults for most situations. Then, give your newly erased drive a name if you wish – maybe ‘New Beginnings’ or ‘Project Zero’. Hit ‘Erase’ and confirm.
Just like on Windows, this is usually a quick process. It will reformat the drive, making it ready for whatever you want to throw at it next. And there you have it – a wiped-clean flash drive, ready for its next adventure.
The Deeper Clean: When “Quick” Isn’t Enough
So, we’ve covered the quick format, which is like putting your clothes in the wash. But what if you’ve got some particularly stubborn stains, or you need to ensure absolutely no one can recover any trace of the past? This is where the more thorough methods come in. Think of this as a deep clean, maybe even a chemical treatment for your digital garments.

Why Go Deeper?
The “Quick Format” option, as we mentioned, doesn’t actually overwrite the data. It just tells the drive that the space is free. The actual data bits are still there, just waiting to be written over. For most everyday purposes, this is perfectly fine. However, if you're dealing with highly sensitive information – think confidential business documents, personal financial records, or anything you absolutely must keep private – you might want to consider a more secure erase. This ensures that even with specialized data recovery software, your old files remain irretrievable. It’s like shredding your important documents instead of just tossing them in the recycling bin.
Using the Command Line (for the Adventurous!)
This is where things get a little more technical, but don’t be intimidated! It’s like learning a few new chords on a guitar – it might sound daunting at first, but the result is rewarding. We’re going to use the command line, a powerful tool that lets you communicate directly with your operating system.
On Windows: Diskpart to the Rescue
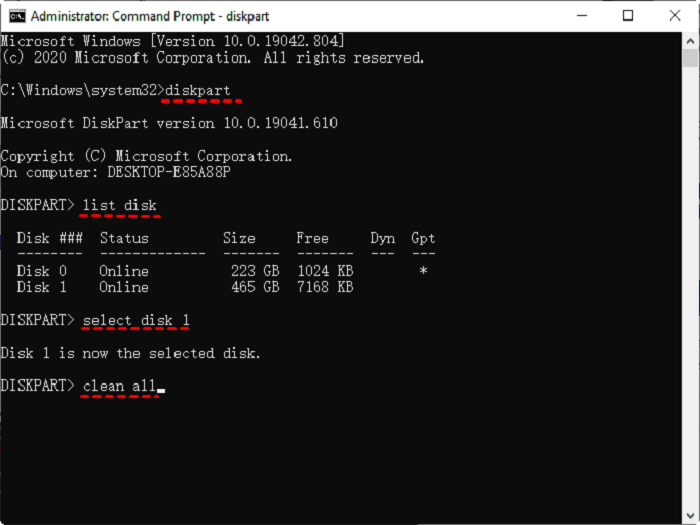
Open the Command Prompt as an administrator. You can do this by searching for ‘cmd’ in the Start menu, right-clicking on ‘Command Prompt’, and selecting ‘Run as administrator’. You’ll need to grant it permission.
Once the black window pops up, type the following command and press Enter: diskpart
This launches the Diskpart utility. Now, type: list disk and press Enter. This will show you a list of all the disks connected to your computer. Carefully identify your flash drive by its size. This is crucial. If you choose the wrong disk, you could erase your entire hard drive, and nobody wants that!
Let’s say your flash drive is listed as ‘Disk 1’. Now, type: select disk 1 (replace '1' with the correct disk number) and press Enter.
Next, you need to wipe the disk. The command for a secure erase is: clean all. Press Enter. This command will overwrite every single sector of the drive with zeros, ensuring that the data is effectively gone and virtually impossible to recover. This process can take a significant amount of time, depending on the size of your flash drive. Think of it as watching paint dry, but for data. Patience is key here!
Once it’s finished, you’ll need to create a new partition and format it. Type: create partition primary, then format fs=ntfs quick (or fs=fat32 quick if you prefer), and finally assign.
This might seem like a lot of typing, but it’s a powerful way to ensure a thorough erase. It’s like performing a digital detox for your flash drive.
On macOS: Terminal Tricks
On your Mac, you’ll use the ‘Terminal’ application. You can find it in ‘Applications’ > ‘Utilities’ or by searching in Spotlight.
Type diskutil list and press Enter. Similar to Windows, this will show you all connected disks. Identify your flash drive (e.g., /dev/disk2). Again, be absolutely certain you have the correct disk identifier!
Once you’ve confirmed the correct disk, you’ll use a command to securely erase it. The command looks like this: diskutil secureErase 3 /dev/diskX (replace ‘X’ with your disk number). The number ‘3’ indicates a secure erase that overwrites the data multiple times. For an even more secure erase (though usually unnecessary for a flash drive), you could use ‘4’ for a seven-pass erase, but that will take an eternity. Stick with ‘3’ for a good balance of security and time.
Press Enter and be prepared for this to take a while. It’s a thorough process. Once it’s done, you’ll need to reformat it. You can then exit Terminal and use Disk Utility to format it with your desired file system (like ExFAT) as we described earlier.
It's like giving your flash drive a full spa treatment, ensuring it's completely refreshed and ready for anything.
Third-Party Software: The User-Friendly Option
If the command line feels a bit too much like deciphering ancient hieroglyphs, there are plenty of user-friendly third-party software options available. These programs often offer a graphical interface, making the secure erase process much more intuitive. Look for reputable software like CCleaner (which has a drive wiper tool), Eraser (for Windows), or Darik's Boot and Nuke (DBAN) (though DBAN is more for entire hard drives and requires booting from a CD/USB, so it's usually overkill for a flash drive).
These tools typically guide you through the process step-by-step, allowing you to select the drive and choose the level of erasure. They’re a great middle ground for those who want a secure erase without diving into the complexities of the command line. It’s like having a digital personal assistant for your data deletion needs.
A Little Fun Fact: The Rise of the Flash Drive
Did you know that the term “USB flash drive” itself is pretty new? The first commercial flash drives, like the M-Systems DiskOnKey, appeared in late 2000. Before that, we were lugging around floppy disks (remember those? They were the size of a coaster and held about as much data as a single high-resolution photo!) or using clunky external CD-ROM drives. The flash drive truly revolutionized portable storage, making our digital lives so much more mobile. It’s pretty cool to think how far we’ve come, isn’t it? From carrying a stack of floppy disks to slipping a whole library onto a tiny stick.
Final Thoughts: The Digital Reset Button
So, there you have it! Erasing a flash drive is not some arcane ritual. It’s a practical skill, as essential in our digital age as knowing how to boil water or change a lightbulb. Whether you’re opting for the quick format to clear out old files or a more secure erase for ultimate peace of mind, the process is straightforward. It’s about reclaiming your digital space, ensuring your privacy, and preparing your devices for their next chapter.
And in the grand scheme of things, this act of digital cleansing mirrors so much of our daily lives, doesn’t it? We declutter our homes, we unsubscribe from unwanted emails, we hit "mute" on annoying social media feeds. These are all ways of hitting a reset button, of clearing out the old to make space for the new. Erasing a flash drive is simply another one of those small, empowering acts that helps us navigate the complexities of modern living with a little more ease and a lot more control. So go forth, erase with confidence, and embrace that fresh, clean digital slate!