How Do You Clean A Cd Disk
Alright, settle in, grab your latte, and let's talk about something that, for a brief, shining moment in history, was the peak of technological marvel: the CD. Remember those shiny little frisbees of pure audio bliss? Before Spotify became our digital overlord, before even MP3s were a twinkle in a programmer's eye, the CD was king. And like all kings, it could get a little grimy. So, how exactly do you coax the magic back from a disc that looks like it's been through a particularly enthusiastic toddler's art project? Let's dive in, shall we?
First off, let's acknowledge the elephant in the room. Cleaning a CD might seem like a lost art, akin to churning butter or perfecting your rotary phone dialling skills. But trust me, there are still folks out there, clinging valiantly to their physical media collections, who occasionally find themselves staring at a skipping Abba CD and wondering, "What now?" And to those brave souls, I salute you!
Now, before we get our hands dirty, let's address the cardinal sin of CD cleaning: avoiding the dreaded scratch. Imagine your CD as a microscopic city. The shiny side, the one with the rainbow sheen, is where all the important data lives. It's like the bustling downtown of CD-ville. The label side, well, that's more like the suburbs – important, but a bit more resilient.
Must Read
The absolute worst thing you can do is grab a paper towel or, heaven forbid, a t-shirt and start scrubbing like you’re trying to polish a knight's armour. Paper products are like tiny, aggressive sandpaper for the delicate surface of your CD. They'll leave micro-scratches that will make your music skip like a toddler on a sugar rush. Think of it this way: you wouldn't use a brillo pad to clean your contact lenses, would you? Same principle applies here, just with more laser beams involved.
The Gentle Touch: Your CD's New Best Friend
So, what should you use? The answer is surprisingly simple and incredibly affordable. Drumroll, please... a soft, lint-free cloth. Yes, that's it. Think microfiber. The kind you use to clean your glasses or your fancy TV screen. These cloths are designed to be gentle and trap dust without dragging it across the surface like a tiny, abrasive bulldozer.
Now, for the actual cleaning. The mantra here is: "Wipe from the centre outwards." Imagine your CD as a delicious, circular pizza. You wouldn't wipe in circles, would you? You'd go from the middle slice to the crust, right? Same logic. Hold the CD by its edges or the centre hole, where the label is. Never, ever touch the shiny data side with your greasy fingertips. Those fingerprints are the arch-nemeses of a happy CD.
If the disc is just dusty, a gentle wipe with the dry microfiber cloth in that centre-outward motion might be all you need. It’s like giving your CD a spa treatment. Ahh, the serenity!
When Things Get a Little Messy (Think Sticky Fingers or Accidental Juice Spills)
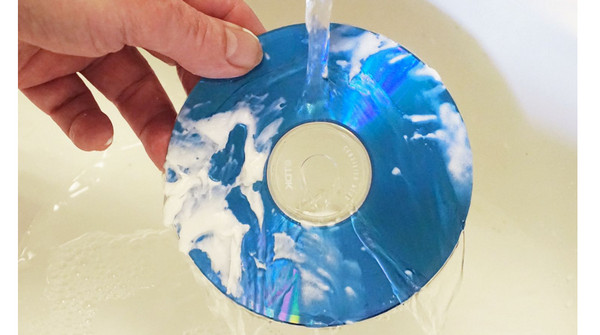
What if it’s more than just dust? What if your CD has mysteriously acquired a fingerprint smudge that’s so stubborn, it looks like it was applied with superglue? Or worse, a sticky residue from a rogue jam sandwich? Don't despair! This is where we bring in the big guns – a little bit of distilled water. Why distilled? Because tap water, with all its mineral content, can leave behind its own little deposits. We’re aiming for pristine, not a mineral water spa for our CD.
Dampen your lint-free cloth slightly with the distilled water. We’re talking barely damp, not soaking wet. Again, wipe from the centre outwards. Work your way around the disc. For really stubborn spots, you might need a couple of gentle passes. The key is gentleness. Think of it as coaxing the dirt off, not wrestling it into submission.
Now, some folks swear by a tiny drop of mild dish soap mixed with distilled water. And honestly, for really gunked-up CDs, this can be a lifesaver. Just make sure it’s a very mild soap, and I mean tiny amounts. Too much soap can leave its own residue. And again, always, always rinse thoroughly with just distilled water afterward, and dry with a clean, dry microfiber cloth.
A surprising fact for you: CDs are made of polycarbonate plastic, coated with a thin layer of aluminum (or sometimes gold, for the fancy ones!) which reflects the laser. The data itself is encoded as tiny pits and lands on this layer. So, when you’re cleaning, you’re essentially buffing around these microscopic marvels.
The Drying Ritual: Crucial for CD Karma
Once you’ve cleaned your CD, drying is paramount. Use a separate, dry, lint-free cloth. Again, the centre-outward motion is your friend. Make sure the disc is completely dry before attempting to put it back in its case or, more importantly, into your player. Water droplets can also interfere with the laser's ability to read the data, leading to those annoying skips.
Now, what about those really deep scratches? The ones that make your CD look like it’s been in a bar brawl with a badger? Well, my friends, there are some DIY remedies out there that sound like they belong in a mad scientist's lab. Some people suggest using toothpaste (yes, toothpaste!) or furniture polish. The idea is that these abrasive agents can fill in the scratch and make it less noticeable to the laser.
However, I’m going to be honest with you. These methods are a bit like playing CD roulette. They might work, but they also have a high chance of making things worse. You could end up with a cloudy mess or even more scratches. For truly damaged CDs, your best bet is often to accept your losses and invest in a replacement. Sometimes, even the most dedicated CD doctor can't save a disc that's been through too much trauma.
Remember the golden rule of CD cleaning: be gentle, be patient, and use the right tools. A little bit of care goes a long way in preserving your cherished audio memories. So next time you pull out that dusty old disc, don’t sigh in resignation. Grab your microfiber cloth and give it the TLC it deserves. You might just be surprised by the music that comes back to life!