How Do I Test An O2 Sensor

So, your car's been giving you a little bit of attitude lately. Maybe the "check engine" light decided to join the party, or perhaps you've noticed a slight hiccup in your usual smooth ride. Before you start picturing mechanics in overalls and dollar signs dancing in your head, let's take a chill pill and consider a culprit that’s often overlooked: the humble oxygen sensor, or O2 sensor.
Think of your O2 sensor as the car's tiny, but mighty, air quality inspector. It’s tucked away in your exhaust system, and its main gig is to tell your car's computer (the ECU, or Engine Control Unit – basically its brain) how much oxygen is actually making it through the combustion process. Why is this important? Because this little piece of tech helps your car optimize its fuel-to-air mixture. Get this balance right, and you're looking at better fuel efficiency, lower emissions, and a happier, healthier engine. Get it wrong, and well, things can get a bit… unpleasant.
Now, the good news is, testing an O2 sensor doesn't have to be a mission to the moon. It’s more like a relaxed Sunday drive to understanding what’s going on under your hood. We're talking about a DIY-friendly approach here, no need to channel your inner Fast & Furious mechanic unless you’re really feeling it. Let's break it down, nice and easy.
Must Read
When Your O2 Sensor Starts to Act Up
First off, how do you know if your O2 sensor is even the suspect? There are a few tell-tale signs. The most obvious, of course, is that glowing check engine light. This little orange beacon is your car's way of saying, "Hey, something's not quite right, buddy." It's the universal symbol for "pay attention, please."
Beyond the light, you might notice some changes in your car's performance. Is your fuel economy taking a nosedive? Like, you're suddenly stopping at the pump way more often than you used to, and your wallet is feeling the pinch? That's a classic symptom. An O2 sensor that’s not doing its job properly can lead to your car burning more fuel than it needs to, like someone who’s just had a huge Thanksgiving dinner and keeps reaching for more pie.
Other indicators can include a rough idle, where your car shakes a bit more than usual when it's sitting still. You might also experience hesitation or sputtering when you accelerate, like the car’s having a moment of indecision. And in some cases, you might even smell a bit of that unburned fuel – a distinct, sometimes unpleasant odor. It's like your car is politely (or not so politely) letting you know it’s a little out of sorts.
Gathering Your Gear: The O2 Sensor Toolkit (It's Not Scary!)
Alright, so you've decided to play detective. What do you need? Don't worry, we're not talking about a whole professional mechanic's garage. A few key items will get you well on your way.
The star of the show is undoubtedly a OBD-II scanner. This is a little gadget that plugs into a port under your dashboard (usually near the steering wheel) and talks to your car's computer. It can read those mysterious trouble codes that trigger the check engine light. You can find these scanners online for a pretty reasonable price, and honestly, it’s a great tool to have for any car owner. Think of it as your car's personal translator.

Next up, you'll likely need a special O2 sensor socket wrench. These are designed with a slot to accommodate the sensor's wire, allowing you to get a good grip without damaging the connection. You can usually pick these up at any auto parts store.
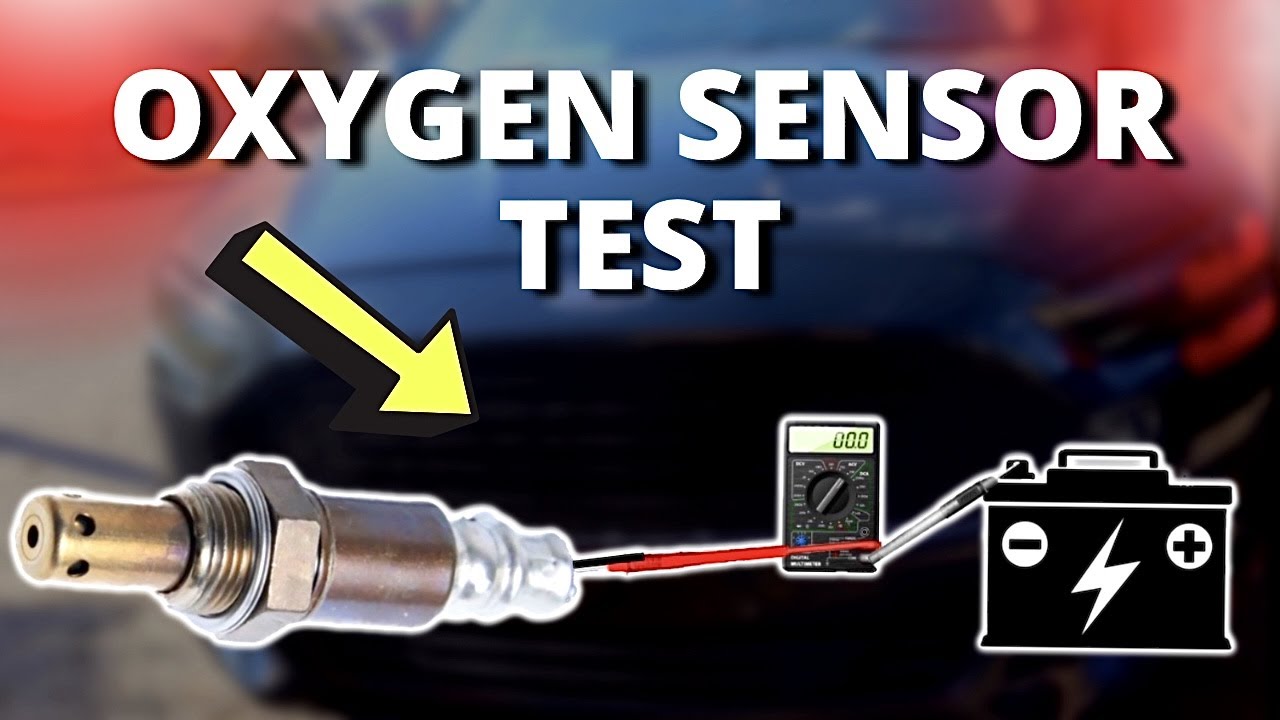
A multimeter is also going to be your friend. This handy device can measure voltage, resistance, and amperage. It's crucial for testing the electrical signals the O2 sensor is supposed to be sending and receiving.
Finally, some safety gear: gloves and safety glasses are always a good idea when working on your car. And make sure your car is parked on a flat, stable surface and the engine is cool. Safety first, always!
Step-by-Step: The O2 Sensor Health Check
Let's get down to business. Here’s a simplified rundown of how to test your O2 sensor.
Step 1: Read the Codes
First, plug in your OBD-II scanner. Turn your car's ignition to the "on" position (but don't start the engine). The scanner will connect and display any stored trouble codes. Write these down! Look for codes that start with "P0130" through "P0167." These are generally related to the oxygen sensor circuit. The specific code will often give you a hint as to which sensor is acting up (e.g., "Bank 1 Sensor 1" or "Bank 2 Sensor 2").

Fun Fact: The OBD-II system was mandated in the United States in 1996, so most cars manufactured after that year will have it. It was a big step towards helping car owners (and mechanics) diagnose issues more effectively.
Step 2: Locate the Sensor(s)
Your car likely has more than one O2 sensor. Upstream sensors (usually Sensor 1) are located before the catalytic converter, and they play a more direct role in fuel mixture. Downstream sensors (usually Sensor 2) are located after the catalytic converter and primarily monitor the converter's performance. Your car's manual or an online search for your specific make and model can help you pinpoint their exact locations. They look like small probes with wires coming out of them.
Step 3: Visual Inspection
Before you go unplugging and testing, take a good look. Are there any obvious signs of damage to the sensor or its wiring? Look for frayed wires, melted insulation, or physical damage to the sensor itself. Sometimes, the problem is as simple as a loose connection or a damaged wire harness. It's like checking for a loose button on your favorite shirt before assuming the whole thing is ruined.
Step 4: Testing with a Multimeter (The Electrical Detective Work)
This is where the multimeter comes in. For most modern O2 sensors (these are typically called "heated oxygen sensors" or HOS), you'll be testing the voltage output. With the engine warmed up (let it run for a few minutes, but be cautious of hot exhaust components!), disconnect the sensor's wiring harness. You’ll be testing the signal wire and the ground wire.
Set your multimeter to measure DC voltage. Probe the appropriate wires in the connector (refer to your car's repair manual for specific pinouts). As the engine runs, the O2 sensor should be fluctuating between approximately 0.1 volts (lean mixture) and 0.9 volts (rich mixture). A steady voltage, or a voltage that doesn't fluctuate at all, can indicate a faulty sensor. It’s like listening for a consistent hum when you expect a lively rhythm.

Some older or specialized sensors might require testing resistance or other electrical properties, but voltage testing is the most common for diagnosing performance issues. If you're unsure, consult a repair manual specific to your vehicle.
Step 5: Removing and Inspecting the Sensor Itself
If the electrical tests suggest the sensor is the problem, it's time to remove it. This is where that special O2 sensor socket wrench comes in handy. Carefully loosen and remove the sensor. Be prepared for a bit of resistance; they can get pretty seized up in the exhaust pipe.
Once it’s out, examine the tip of the sensor. It should be a light tan or grey color. If it's covered in black soot, it might indicate a rich fuel mixture or oil burning. If it looks white or blistered, it could be due to using fuel additives or overheating. These visual cues can provide additional clues, almost like forensic evidence from your exhaust pipe.
Step 6: The "Shake Test" (A Quick and Dirty, but Sometimes Useful Method)
While not a definitive test, some DIYers give the sensor a gentle shake. If you hear rattling inside, it could mean the internal ceramic element has broken, rendering it useless. This is less about precise measurement and more about a quick, intuitive check. Think of it like shaking a maraca to see if it still has its rhythm.
When to Call in the Cavalry
Look, while testing an O2 sensor is totally doable for a motivated DIYer, there are times when it’s best to hand over the reins. If you're not comfortable working with car parts, or if the diagnostic process gets a bit too technical for your liking, there's absolutely no shame in heading to your trusted mechanic. They have specialized tools and years of experience that can quickly and accurately diagnose the issue.

Also, if your car has multiple O2 sensors and the scanner points to a general circuit issue rather than a specific sensor, it might be a sign of a more complex electrical problem that requires professional attention.
A Little About Those Pesky Codes
Those OBD-II codes can feel like a secret language. Here's a tiny cheat sheet for common O2 sensor codes:
- P0130 - P0149: Generally refer to O2 sensor circuits, including issues with their heater circuit, signal, or response.
- P0150 - P0167: Similar to the above, but often relate to the second bank of cylinders (if your car has a V-engine).
The specific wording of the code will tell you more. For example, "P0131: O2 Sensor Circuit Low Voltage (Bank 1 Sensor 1)" means the sensor is reporting a lean condition too often. It’s like a report card for your car's air intake system.
The Ripple Effect: Beyond Just the Sensor
It's important to remember that a failing O2 sensor is often a symptom of another problem. If your car is running too rich (too much fuel), it could be a leaky fuel injector or a faulty fuel pressure regulator. If it's running too lean (too much air), it might be a vacuum leak. So, while replacing the O2 sensor might fix the immediate issue and clear that pesky check engine light, it's always a good idea to address any underlying problems. It's like treating the cough but also finding out why you're coughing in the first place!
A Reflective Drive Home
Testing an O2 sensor might seem like a technical chore, but approach it with a bit of curiosity and patience, and it can be a surprisingly rewarding experience. It’s a tangible way to connect with your vehicle, understand its inner workings, and perhaps even save yourself a few bucks. In our fast-paced, disposable-culture world, there's a certain satisfaction in being able to troubleshoot and maintain the things we rely on. It's a little act of defiance against planned obsolescence, a nod to the days when people knew how to fix things themselves.
And honestly, the peace of mind that comes from knowing your car is running efficiently, breathing clean, and treating the planet a little better? That's worth more than just a smooth ride. It’s about a conscious effort, a small step towards a more sustainable and self-sufficient lifestyle, even if that step is just under your car with a wrench in hand. So next time that check engine light flickers, don't panic. Grab your scanner, take a deep breath, and let’s see what your O2 sensor has to say.