How Do I Make Plaster Of Paris

Ever stare at a lopsided picture frame and think, "You know what this needs? A bit of oomph"? Or maybe you've eyed those fancy decorative bowls at the store and had a sudden urge to whip one up yourself, like a pottery-making superhero? Well, my friend, you're probably staring down the barrel of a project that involves the magical, messy, and surprisingly simple stuff known as Plaster of Paris. And before you picture ancient Egyptians chiseling away at obelisks, let's get real. Making Plaster of Paris at home is less about historical reenactment and more about channeling your inner crafty gnome, with a splash of "oops, I got that on the ceiling."
So, how does one go from a dusty bag of white powder to something that can hold your spare change, or perhaps become the avant-garde centerpiece of your coffee table? It's a bit like making a really thick, lumpy pancake batter, but instead of blueberry goodness, you're aiming for something that solidifies faster than you can say "what did I just do?" Think of it as a science experiment you can actually touch, and potentially wear (if you get really ambitious with it). We're talking about a substance that starts as a powder, gets friendly with water, and then decides, "You know what? I'm done being a liquid. I'm now a rock. Deal with it."
The All-Important Prep Work: Don't Be That Guy
Before we even think about mixing, let's talk about not making a monumental mess. This is crucial. Trust me on this. You don't want to be the person who has to explain to your landlord why the sink is suddenly… solidified. It’s like trying to explain why your dog is suddenly wearing a tiny hat – plausible deniability is key, but in this case, prevention is better than a very awkward conversation.
Must Read
First things first: Gather your supplies. This isn't rocket surgery, but it's also not like whipping up instant ramen. You'll need:
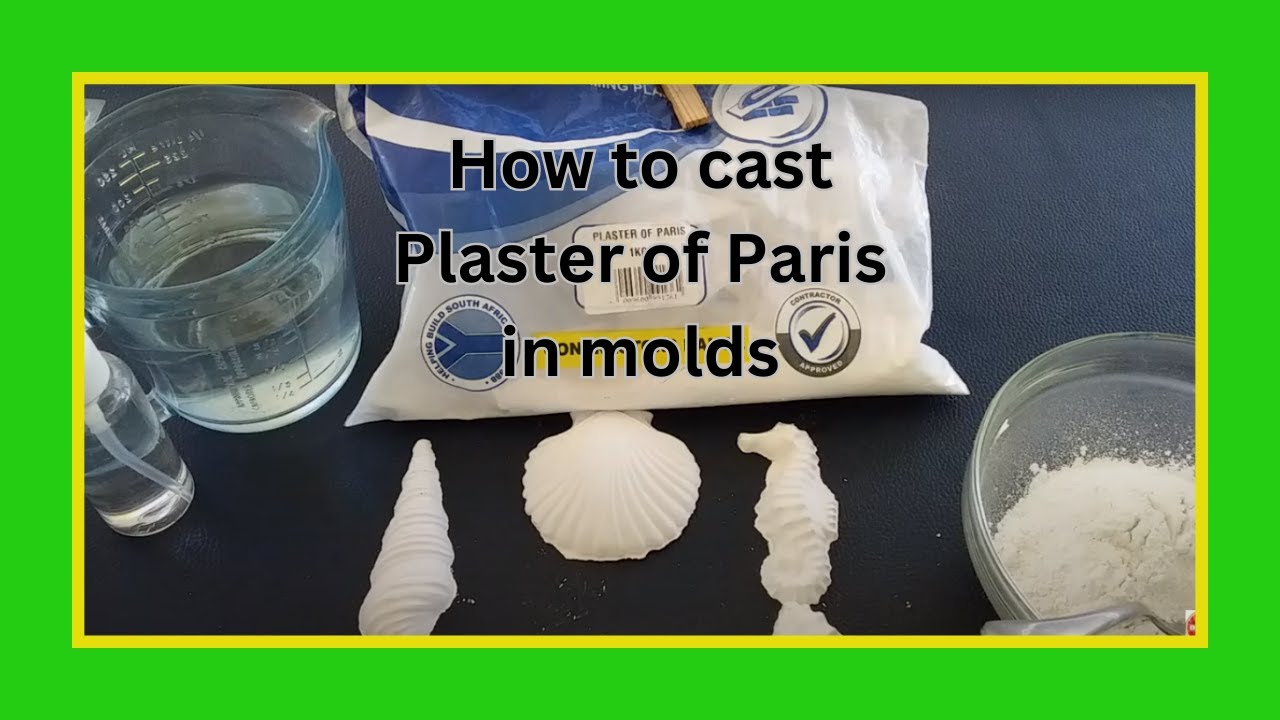
- A bag of Plaster of Paris (duh!). You can find this at any decent craft store or hardware store. It’s usually in the art supplies aisle, looking innocent and unassuming.
- A mixing container. An old plastic bowl, a clean bucket, even a sturdy plastic food container will do. Just make sure it’s not something you cherish for, you know, actual food. We're going for a one-way trip here.
- Something to stir with. A sturdy wooden stick, a strong plastic spoon, a palette knife – anything that won't bend like a cheap straw when things start to get serious.
- Water. This is the catalyst, the magic elixir, the thing that turns your powder party into a solid situation.
- Old newspapers or a tarp. Protect your surfaces! Seriously, your coffee table will thank you. Think of it as putting on a bib for a messy toddler, but the toddler is a chemical reaction.
- Gloves. Optional, but highly recommended. Plaster can be a bit abrasive, and nobody wants prune-like hands after a fun craft session.
Next, protect your workspace. Lay down those newspapers or that tarp. Imagine you’re about to engage in a highly precise, albeit messy, culinary experiment. You wouldn't want to spill flour on your antique Persian rug, would you? Same principle applies here, but with powdery goodness. Cover everything you don't want to become a permanent art installation.
The Big Mix: It's All About Ratios (Mostly)
Alright, the moment of truth. This is where the alchemy happens. The key to successful Plaster of Paris is the right water-to-plaster ratio. Too much water and you’ve got a watery mess that will take forever to set, or worse, never set properly. Too little water and you’ve got a lumpy, unworkable blob that’s about as useful as a screen door on a submarine.

Most Plaster of Paris bags will give you a recommended ratio. It’s usually something like 2 parts plaster to 1 part water, or vice versa. Read the bag, people! It's like a cheat sheet for DIY glory. But let's be real, sometimes you just gotta wing it a little. Think of it like making gravy – you know, that moment when you add a splash more broth or a pinch more flour and it magically transforms from "meh" to "marvelous."
Here's the casual approach: Start by putting some water in your mixing container. Not too much, just enough to get things going. Then, gradually add the Plaster of Paris. Sprinkle it in, don't just dump the whole bag in like you're trying to drown a tiny, white ghost. You want to aim for a consistency that's like thick cream or pancake batter. If it looks like milk, you've added too much water. If it looks like toothpaste, you've added too much plaster. It's a delicate dance, a culinary ballet of sorts.
As you add the plaster, stir gently but thoroughly. You don't want any dry lumps hiding at the bottom, like shy little kids at a party. Get them all involved! Stir until it's smooth and uniform. This is where your stirring implement of choice comes in handy. Imagine you're coaxing a reluctant child to eat their vegetables – gentle persuasion, lots of stirring, and a bit of hope.
Here's a little pro-tip, a secret handshake amongst DIYers: don't overmix. Once it’s smooth, stop. Overmixing can introduce air bubbles, and nobody wants a project that looks like it's been attacked by a tiny, microscopic polka-dot monster. You're aiming for smooth, not aerated. Think of it as making a perfectly smooth buttercream frosting, not a fluffy meringue.

The Waiting Game (It's Shorter Than You Think)
Now, here’s the exciting part, and the part that can catch you off guard if you’re not paying attention: Plaster of Paris sets quickly. We’re talking minutes here, not hours. It's like a pop-up shop for solid objects. So, once you've got that perfect consistency, work fast!
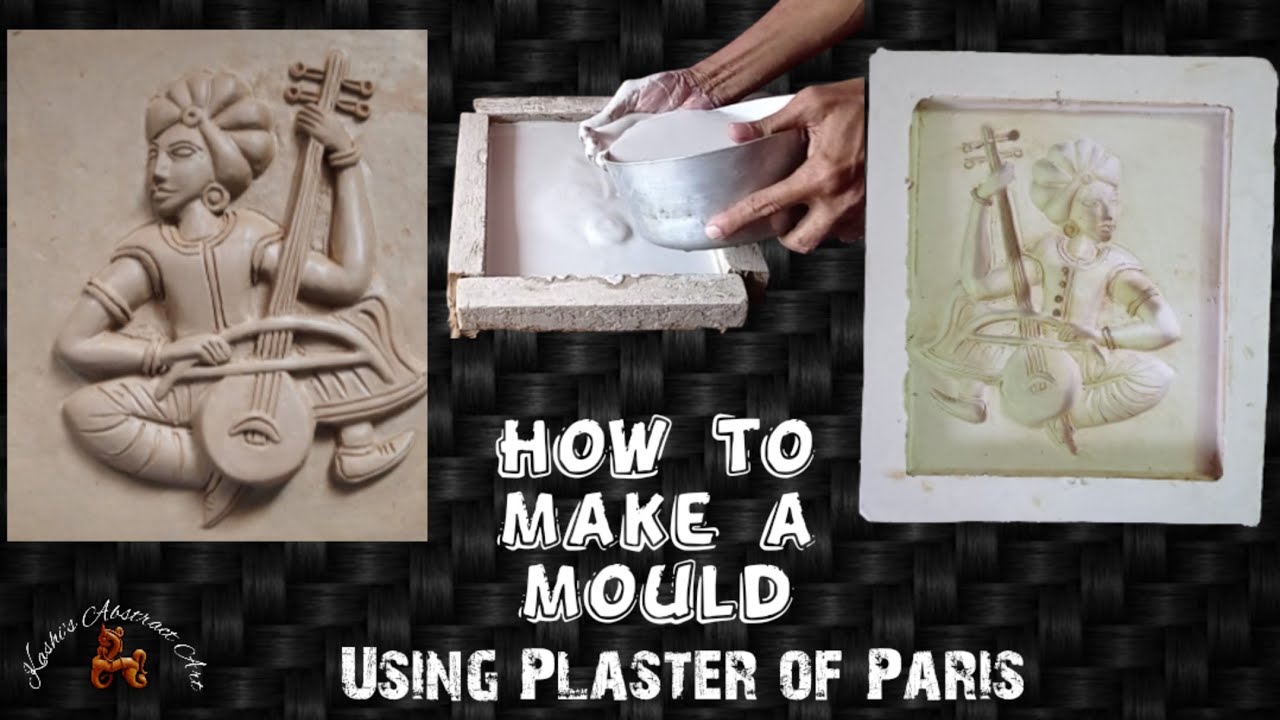
This is where your molds come into play. Whether you're using a silicone mold for a fancy candle holder, a plastic container for a basic block, or even just your hands to sculpt something freeform (brave soul!), you want to get the mixture into it as soon as it’s ready. Don't dilly-dally. Don't go browse social media. Don't ponder the existential meaning of your project. Just pour, sculpt, or shape.
You'll feel it start to thicken in your hands or in the mold. It goes from feeling wet and pliable to kind of warm and firm. It’s almost like it’s thinking, "Okay, my party is over. Time to get serious." You might even feel a slight warmth emanating from the mixture – that’s the chemical reaction doing its thing, the plaster crystallizing. It's like the plaster is giving itself a little hug and saying, "I'm strong now!"
If you're using molds, fill them completely. Tap the mold gently to release any air bubbles that might be lurking. These bubbles are the tiny gremlins that can ruin your smooth finish. Give it a little jiggle, a gentle tap – treat it like you’re trying to get all the air out of a balloon. And then… you wait.

Post-Plaster: The Reveal and the Cleanup
Once it’s set, which usually takes about 20-30 minutes depending on the thickness and humidity, you can carefully remove your creation from the mold. If it’s stuck, a little gentle persuasion with a craft knife around the edges usually does the trick. Be patient. You don't want to crack your masterpiece because you were in a rush. Think of it like waiting for a soufflé to rise – timing is everything.
Now, for the part many people dread: the cleanup. This is where those newspapers and tarps really earn their keep. Scrape as much of the excess plaster as you can into the trash. Never, ever, ever pour excess Plaster of Paris down the drain. Seriously, I can't stress this enough. It will solidify in your pipes, creating a miniature, permanent plumbing disaster. You’ll be calling a plumber faster than you can say "oops." Imagine trying to unclog a drain with actual cement – that’s the kind of pain you're saving yourself.
Wipe down your tools with a damp cloth. If there's a bit of dried plaster on your container, it usually scrapes off pretty easily once it's dry. It's a bit like cleaning up after a very enthusiastic toddler who discovered finger paint. You’ll get there eventually.
Once your creation is out of the mold and any rough edges are smoothed down (a little sandpaper works wonders here, by the way), it’s ready for its starring role! You can paint it, decorate it, or leave it in its pristine white glory. It’s your blank canvas, ready to be transformed into whatever your crafty heart desires.
Why Bother? The Joy of Creation (and Slightly Lopsided Stuff)
So, why go through this whole process? Because it's fun! It’s a tangible way to bring your ideas to life. It’s a chance to get a little messy, to experiment, and to create something unique. Even if your first attempt comes out a little wonky, a little asymmetrical, or a tad… well, lopsided, that’s part of its charm!
Think of it like adopting a slightly imperfect rescue animal. It’s got its quirks, its little rough edges, but it’s yours, and you love it. Your Plaster of Paris creation will have that same endearing quality. It’s a testament to your effort, your willingness to try something new, and your ability to embrace the glorious imperfections of handmade goods.
Whether you’re making a simple mold for a stepping stone in your garden, a quirky little planter for your succulents, or a more elaborate piece of art, the process of making Plaster of Paris is surprisingly accessible. It’s a gateway drug into the world of DIY and crafting. And who knows? You might just discover a hidden talent for turning powdery dust into solid gold (or at least, solid white objects).
So next time you see something at the store and think, "I could totally make that," remember this little guide. Grab a bag of Plaster of Paris, embrace the potential mess, and have a blast. The world needs more handmade charm, and you, my friend, are just a little bit of water and powder away from adding some to it. Happy crafting!