How Do I Format Micro Sd Card

Ever stared at your phone, tablet, or camera and felt like it was giving you the silent treatment? You know, that moment when you try to save a bunch of hilarious cat videos or those epic vacation photos, and you’re met with a passive-aggressive “Storage Full” message that feels like a personal attack? Yeah, we’ve all been there. It’s like trying to cram your entire wardrobe into a tiny carry-on for a weekend trip – just doesn’t work.
And then you remember that little guy, the unsung hero of digital hoarding: your Micro SD card. It’s probably nestled in a dusty corner of a drawer, looking all innocent, just waiting to be unleashed. But sometimes, this little powerhouse needs a good old-fashioned “reset” to get back in tip-top shape. Think of it like giving your favorite comfy pair of shoes a good clean after they’ve seen one too many muddy puddles. That’s where formatting comes in. Don't let the word scare you; it's not some arcane technical wizardry. It’s actually pretty straightforward, and we’re going to walk through it like we’re assembling IKEA furniture on a Sunday afternoon – a little confusing at first, but totally doable with a bit of patience.
So, why would you even need to format this tiny titan in the first place? Well, a few reasons. Maybe it’s been through the digital wringer, bouncing between different devices. It’s like a USB stick that’s been passed around the office like a hot potato; by the end, it’s probably got a little bit of everyone’s digital "stuff" on it, and things can get a bit messy. Or perhaps you’re switching it over to a new gadget, and it’s like introducing a grumpy old uncle to a new family – they need to get acquainted properly, and that often means a clean slate.
Must Read
Another common culprit is when the card starts acting up. You know, files disappearing into the digital ether, or that dreaded “corrupted data” message that makes you question all your life choices. It’s like when your Wi-Fi decides to take a spontaneous vacation, and you’re left staring at a blank screen, wondering if the internet gods have forsaken you. Formatting can often be the digital equivalent of a reboot, a fresh start that can banish those pesky glitches. Think of it as giving your Micro SD card a spa day – a good scrub and polish to make it feel brand new again.
The Grand Unveiling: What Exactly Is Formatting?
Alright, let's break down this "formatting" thing. Imagine your Micro SD card is a tiny library. When it's new, it's pristine, with perfectly organized shelves, ready for new books (your data). Formatting is essentially taking that library, throwing out everything (and I mean everything – bye-bye cat videos, hello blank shelves!), and then reorganizing the shelves so they're super neat and tidy again. It’s not destroying the library; it’s just giving it a massive declutter and a fresh coat of paint.
It also sets up a new filing system. Different devices like different filing systems. It’s like trying to put a square peg in a round hole if you try to use a filing system designed for a fancy filing cabinet on a simple cardboard box. Formatting ensures your Micro SD card speaks the same digital language as the device you're plugging it into. This way, your phone won't be scratching its head trying to figure out where you've hidden that important document.
And here's the really important bit, the one you absolutely must remember, like remembering to breathe: formatting erases everything. I can't stress this enough. It's not a selective deletion. It's the digital equivalent of hitting the "nuke" button on your data. So, before you hit that button, make sure you’ve backed up anything precious. Think of it like packing for a move; you wouldn't just chuck everything into boxes haphazardly. You'd carefully label and pack the essentials. Your digital life is no different!
Prep Work: The Pre-Formatting Essentials
Before we dive headfirst into the formatting fiesta, let’s do a quick safety check. This is the “look before you leap” phase, the “measure twice, cut once” of digital housekeeping. You wouldn’t start renovating your kitchen without clearing out the cabinets, right? Same principle here.
Step 1: The Great Data Migration (AKA Back It Up!)

This is non-negotiable. If there's anything on that Micro SD card that you might want to see again, ever, you need to get it off. Plug the card into your computer or directly into your phone (if it has a slot and supports the transfer). Copy and paste those precious files to your computer's hard drive, an external hard drive, or a cloud storage service. Dropbox, Google Drive, iCloud – whatever floats your digital boat.
Think of it as taking digital snapshots of your memories. You wouldn't want to format your camera's memory card right after a wedding without downloading those priceless shots, would you? That would be a modern-day tragedy, right up there with running out of coffee on a Monday morning. So, take your time. Be thorough. Double-check that everything is where it needs to be.
Step 2: Locate Your Little Buddy
Now, you need to get the Micro SD card into a place where your computer can "see" it. Most laptops have a dedicated SD card slot these days. If yours doesn't, fear not! You'll likely need a Micro SD card adapter (they usually come with the cards, or you can snag one cheaply) that makes it look like a regular SD card. Then, you can pop that into your computer's SD card slot. If your computer is ancient and doesn't have any of those, a USB card reader is your best friend. It’s a little gizmo that plugs into a USB port and has a slot for your Micro SD card.
Some smartphones and tablets also have Micro SD card slots. If you’re formatting the card to use in that specific device, you might be able to format it directly from the device’s settings. This is often the easiest route if you’re keeping the card within the same ecosystem. It's like saying, "Hey, phone, can you just clean up this little guy for me?"
The Formatting Funhouse: Let’s Do This!
Okay, deep breaths. You’ve backed up your data, and your Micro SD card is connected to your computer (or you're using your device's built-in option). Now for the main event!
Method 1: The Windows Way (for our PC pals)
If you’re a Windows user, this is pretty straightforward. You're essentially talking to your computer’s file explorer.

1. Open File Explorer: Hit that little Windows icon in the bottom-left corner, or press the `Windows key + E` on your keyboard. It’s like opening up your digital filing cabinet.
2. Find Your SD Card: Look in the "This PC" section (or "Computer" on older versions). Your Micro SD card should show up as a drive, usually with a letter like D:, E:, or F:, and it might have a name or just say "Removable Disk." Treat it with respect; it's about to get a makeover.
3. Right-Click for Glory: Right-click on the icon for your Micro SD card. A context menu will pop up. Don't be alarmed by all the options; we're only interested in one.
4. Select "Format...": Yep, it’s right there. Click it. This is the point of no return, so make sure you've done your backup dance.
5. Choose Your Settings: A formatting window will appear. * File System: This is where you choose the filing system. For most general use (phones, cameras, etc.), you'll want to select exFAT or FAT32. * FAT32 is older and more compatible with really old devices, but it has a 4GB file size limit. So, if you have huge video files, this might not be your best bet. It's like having a shoe box that can only hold one pair of shoes at a time – inconvenient for a large collection. * exFAT is the newer kid on the block. It's designed for flash drives and memory cards and doesn't have that pesky 4GB file size limit. This is usually your go-to for modern devices. Think of it as a larger, more flexible storage container. * Allocation Unit Size: You can usually leave this at the "Default allocation size." It’s like choosing the size of the shelves in your library; the default is usually pretty sensible. * Volume Label: This is the name of your Micro SD card. You can name it something fun, like "CatVids_Backup" or "Vacation_Pics." Or just leave it as is. * Quick Format: For most cases, leave the "Quick Format" box checked. This is like a fast cleanup. If you suspect your card has serious issues or you want to be absolutely sure no data can be recovered (though formatting isn't a foolproof data wiping method), you can uncheck it for a full format, which takes much longer. Quick format is usually sufficient for giving it a fresh start.
6. Start the Show: Once you've selected your options, click the "Start" button. You'll get a final warning that everything will be erased. If you’re absolutely, positively sure, click "OK."
7. The Waiting Game: Windows will format your card. It usually takes anywhere from a few seconds to a minute or two for a quick format. You'll see a progress bar. When it's done, you'll get a little "Format Complete" message. Ta-da!

Method 2: The Mac Maneuver (for our Apple aficionados)
Mac users, don't worry, your machines have their own way of doing things, and it’s just as straightforward.
1. Open Disk Utility: You can find this by going to Finder -> Applications -> Utilities -> Disk Utility. Or, you can use Spotlight search (Command + Spacebar) and type "Disk Utility." Think of this as the Mac's central hub for all things storage-related.
2. Select Your SD Card: In the left-hand sidebar of Disk Utility, you'll see a list of drives. Look for your Micro SD card. It might be listed under "External" and will have a name that corresponds to its capacity (e.g., "256 GB SD Card"). Be careful here to select the correct drive! You don't want to accidentally format your main hard drive, which would be a catastrophe of epic proportions. It's like trying to cut your nails with a chainsaw – generally not recommended.
3. Click "Erase": With your Micro SD card selected, click the "Erase" button at the top of the Disk Utility window. This is the Mac equivalent of Windows' "Format."
4. Choose Your Format and Scheme: A dialog box will appear. * Format: For most modern uses (phones, cameras), you'll want to select ExFAT. If you need compatibility with older Mac-only devices or specific systems, MS-DOS (FAT32) might be an option, but be aware of its limitations. * Scheme: For Micro SD cards and external drives, you'll almost always want to choose GUID Partition Map. This is the modern standard for partitioning disks.
5. Name Your Card: In the "Name" field, you can give your card a label. Again, something descriptive or fun works. "MyPhotos" or "TemporaryStorage" are good options.
6. Erase! Click the "Erase" button in the dialog box. You'll get a confirmation warning that all data will be lost. Click "Erase" again to proceed.
7. All Done! Disk Utility will format your card. Once it’s finished, you’ll see a confirmation message, and your card will be ready for action.
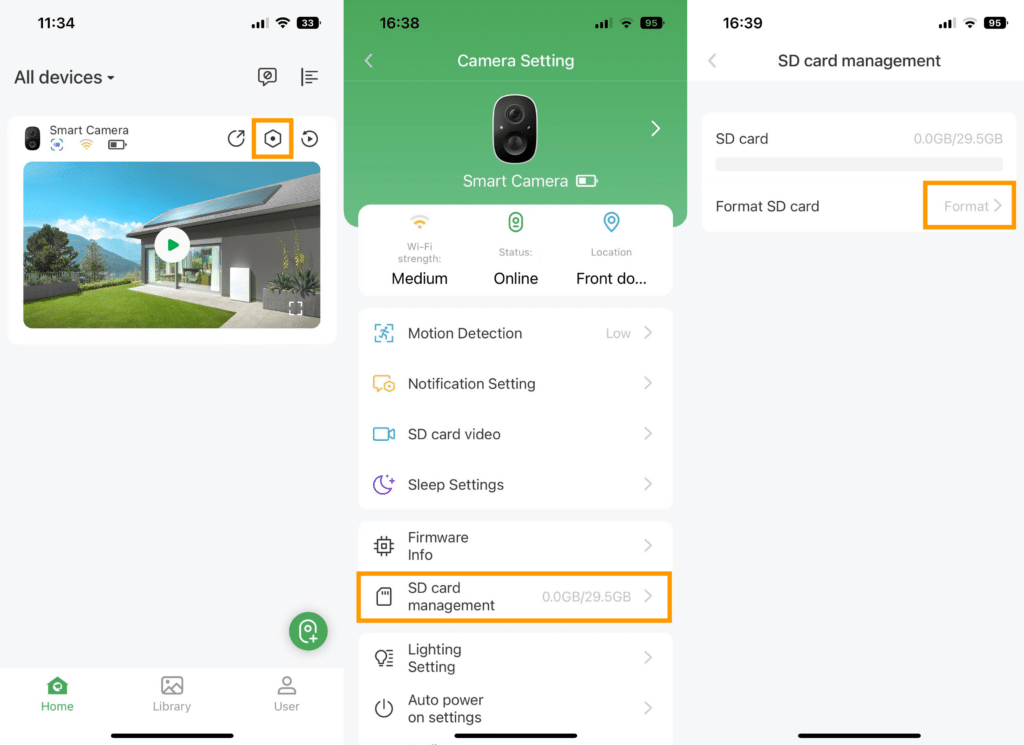
Method 3: The Device Dance (for phones and cameras)
If you’re formatting the card to use specifically in your phone, camera, or other device, you can often do it right from the device's settings. This is usually the simplest method.
1. Insert the SD Card: Make sure the Micro SD card is inserted into your device.
2. Navigate to Settings: Open your device's settings menu. * For Android Phones: Go to Settings > Storage (or similar, it varies by manufacturer). You should see an option for "SD Card" or "External Storage." Tap on it, and you should find a "Format" or "Erase SD Card" option. * For Cameras: The exact steps will vary by camera model. Look for a "Setup," "System," or "Tools" menu. There should be an option for "Format Card," "Initialize Card," or something similar. Consult your camera's manual if you're unsure. It's like finding the instruction booklet for that tricky blender you got for Christmas.
3. Confirm and Format: The device will prompt you to confirm that you want to format the card and that all data will be erased. Confirm, and the device will handle the rest. It's like asking your device to do the heavy lifting for you.
Post-Formatting Perfection: What Now?
Congratulations! You’ve successfully formatted your Micro SD card. It's now a blank canvas, ready to be filled with all your digital delights. Pop it back into your device, and it should be recognized as a fresh, clean storage space. You might even notice your device feels a little snappier because it’s not struggling with a cluttered or confused card.
Remember, this process is your friend when your digital storage starts acting up or when you're migrating between devices. It’s not a sign of failure, but rather a smart way to keep your tech running smoothly. So, the next time you’re met with that dreaded “Storage Full” notification, don’t despair. Just grab your Micro SD card, and give it that refreshing spa treatment. Your digital life will thank you for it!