Best Way To Seal A Shower Tray
So, there I was, knee-deep in a plumbing disaster of my own making. You know that feeling, right? The one where you’ve just bravely (or perhaps foolishly) decided to tackle a DIY project, and suddenly your bathroom resembles a scene from a budget horror movie? Yeah, that was me. I’d been staring at a tiny, almost imperceptible drip coming from the edge of our shower tray for what felt like weeks. “It’s probably nothing,” I’d tell myself, while secretly picturing water seeping into the floorboards, then the downstairs ceiling, then… well, you get the picture. Eventually, the drip became a trickle, and the trickle became a mini-waterfall. It was time for action. And that, my friends, is how I learned the absolute, non-negotiable, crucial importance of a properly sealed shower tray.
Honestly, I thought it was just a matter of squirting some sealant around the edges. How hard could it be? Turns out, very hard if you don’t know what you’re doing. My first attempt looked… well, let’s just say it resembled a slug’s highway rather than a neat, professional finish. The water, bless its determined heart, found every single microscopic gap I’d left. It was a humbling experience, to say the least. But after a few more attempts, a lot of YouTube tutorials, and a healthy dose of pure grit (and maybe a tear or two), I finally cracked it. And today, I’m going to share my hard-won wisdom with you, so you don’t have to suffer the same soggy fate.
The Great Seal Escape: Why Your Shower Tray Needs Some Serious Love
Let’s talk about the humble shower tray. It’s the unsung hero of our bathrooms, right? It contains all the watery chaos we unleash upon ourselves daily. But if it’s not sealed properly, it’s not containing anything except your mounting anxiety about structural damage. Think of it as the watertight moat around your bathroom castle. If there are even the tiniest breaches, the enemy (water!) is going to infiltrate.
Must Read
The primary culprit for leaks is almost always the seal between the shower tray and the surrounding walls or floor. This is where the magic (or the mayhem) happens. Over time, seals can degrade, crack, shrink, or just never have been applied correctly in the first place. And before you know it, you’ve got yourself a genuine water problem. It’s not just about the aesthetics; a leaky shower tray can lead to mold growth, rot, and seriously expensive repairs down the line. Nobody wants that. Trust me, I’ve been there. The smell of damp is not the signature scent you want for your sanctuary.
So, the best way to seal a shower tray isn’t just about slapping on some silicone. It’s about a methodical, careful, and thorough process that ensures a long-lasting, waterproof barrier. It’s about peace of mind. It’s about not having to check under the bath every single time you have a shower. Pure bliss, right?
Prep is King (or Queen!): Don’t Even Think About Sealing Without This
Okay, before we get to the actual sealing, can we just take a moment to appreciate the unsung hero of any DIY job? Preparation. It’s the bit most of us want to skip, but oh boy, is it important. If you skimp on prep, your sealant job will be as effective as a sieve in a rainstorm. You’ve been warned!
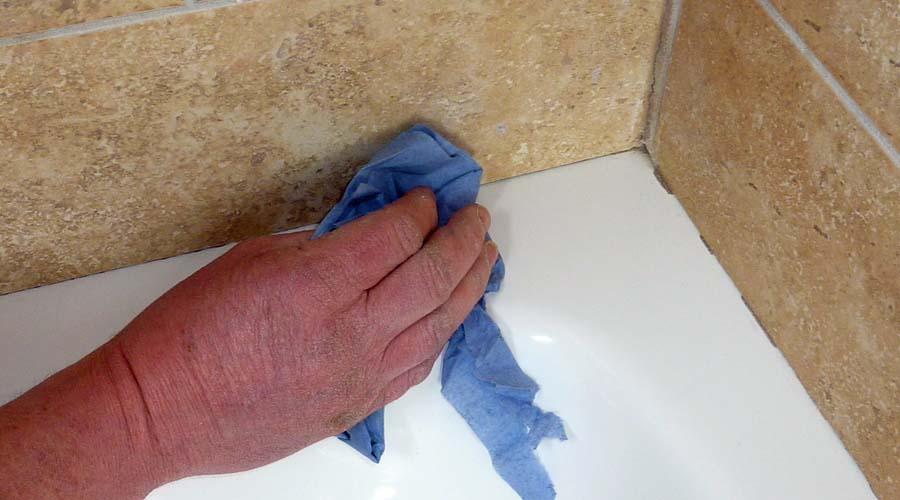
First things first: cleanliness. You need to get rid of all old sealant, grime, soap scum, and anything else that might be clinging to the area. This is not a job for a gentle wipe with a damp cloth. You need something more… aggressive. A utility knife or a dedicated sealant remover tool is your best friend here. Take your time, be patient, and get every last speck off. Think of yourself as a forensic cleaner, meticulously removing all evidence of past leaks (or sloppy sealant jobs).
Once you’ve scraped away the old gunk, you need to ensure the surface is completely dry and free from dust or any oily residue. A good quality mold and mildew remover can be a lifesaver here. Wipe it down thoroughly, and then let it air dry. Like, really air dry. Maybe even a quick blast with a hairdryer if you’re impatient like me. A damp surface is the enemy of good adhesion. Sealant needs a clean, dry canvas to work its magic. Seriously, don’t rush this bit. I know you want to get to the fun part (applying the sealant!), but trust me, the foundation needs to be perfect.

Tools of the Trade: What You’ll Need to Get This Done
Before you even think about grabbing that tube of sealant, let’s make sure you’ve got your toolkit sorted. You don’t need a professional plumber’s arsenal, but a few key items will make your life infinitely easier and your finish look a million times better.
- A good quality sealant gun: Don’t go for the cheapest one you can find. A decent one will have a smoother trigger action, which is crucial for controlling the flow of sealant.
- Silicone sealant: This is your main weapon! Make sure you buy a sealant specifically designed for bathrooms and kitchens. These are usually anti-mold and waterproof. White is classic, but clear can be great for certain looks.
- Masking tape (painter’s tape): This is your secret weapon for getting super neat lines. Trust me on this. It’s a game-changer.
- A sealant smoothing tool or tool kit: These little gadgets are inexpensive and make a world of difference in achieving a professional finish. Alternatively, you can use a damp finger (with a glove on, of course!) or a damp cloth, but a tool gives you more control.
- A sharp utility knife or sealant removal tool: For getting rid of that old, nasty sealant.
- A spray bottle with water and a drop of washing-up liquid: This is your secret sauce for smoothing.
- Gloves: Sealant is sticky. And a bit gross to get under your nails.
- Plenty of old rags or paper towels: You’ll be using these a lot.
Got it all? Good. Now, let’s move on to the actual application.
The Art of the Bead: Applying Your Sealant Like a Pro
This is where the magic happens. Or, if you’re not careful, the mess. But don’t worry, we’re going to break it down step-by-step.
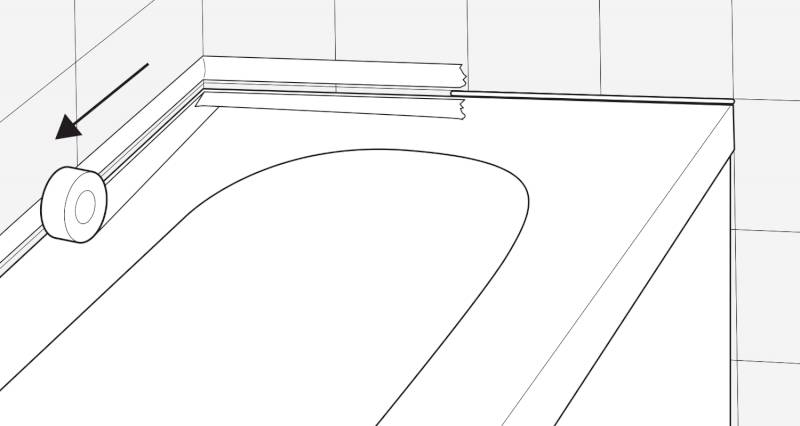
Step 1: The Masking Tape Masterclass
This is where that masking tape comes in. For super neat lines, you’ll want to apply tape along both edges of the gap you’re filling. So, one strip of tape on the shower tray, and one strip on the wall or floor, leaving a consistent gap where the sealant will go. Make sure the tape is pressed down firmly, with no air bubbles. This is your guide. It’s like drawing within the lines, but for adults, and with caulk.
Pro tip: Leave a small gap (about 1-2mm) between the edge of the shower tray and the wall. This slight recess helps the sealant to adhere better and creates a more durable seal. Don’t make it too big though, or you’ll be fighting a losing battle.

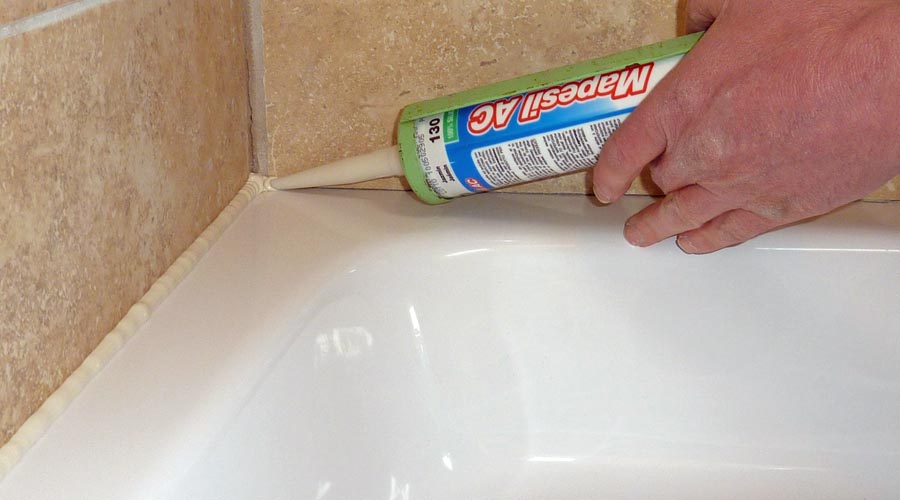
Step 2: Cutting the Nozzle (The Sneaky Bit)
Now, for the sealant tube. You need to cut the nozzle at a 45-degree angle. The size of the cut will determine the width of your bead. For a standard shower tray seal, a relatively small cut is usually best. You can always cut more off if you need a wider bead, but you can’t put it back! It’s a bit like cutting your hair – measure twice, cut once.
Make sure the cut is clean and smooth. A jagged cut will result in an uneven bead. If you’re unsure, practice on a bit of cardboard first. Seriously, it’s a thing.
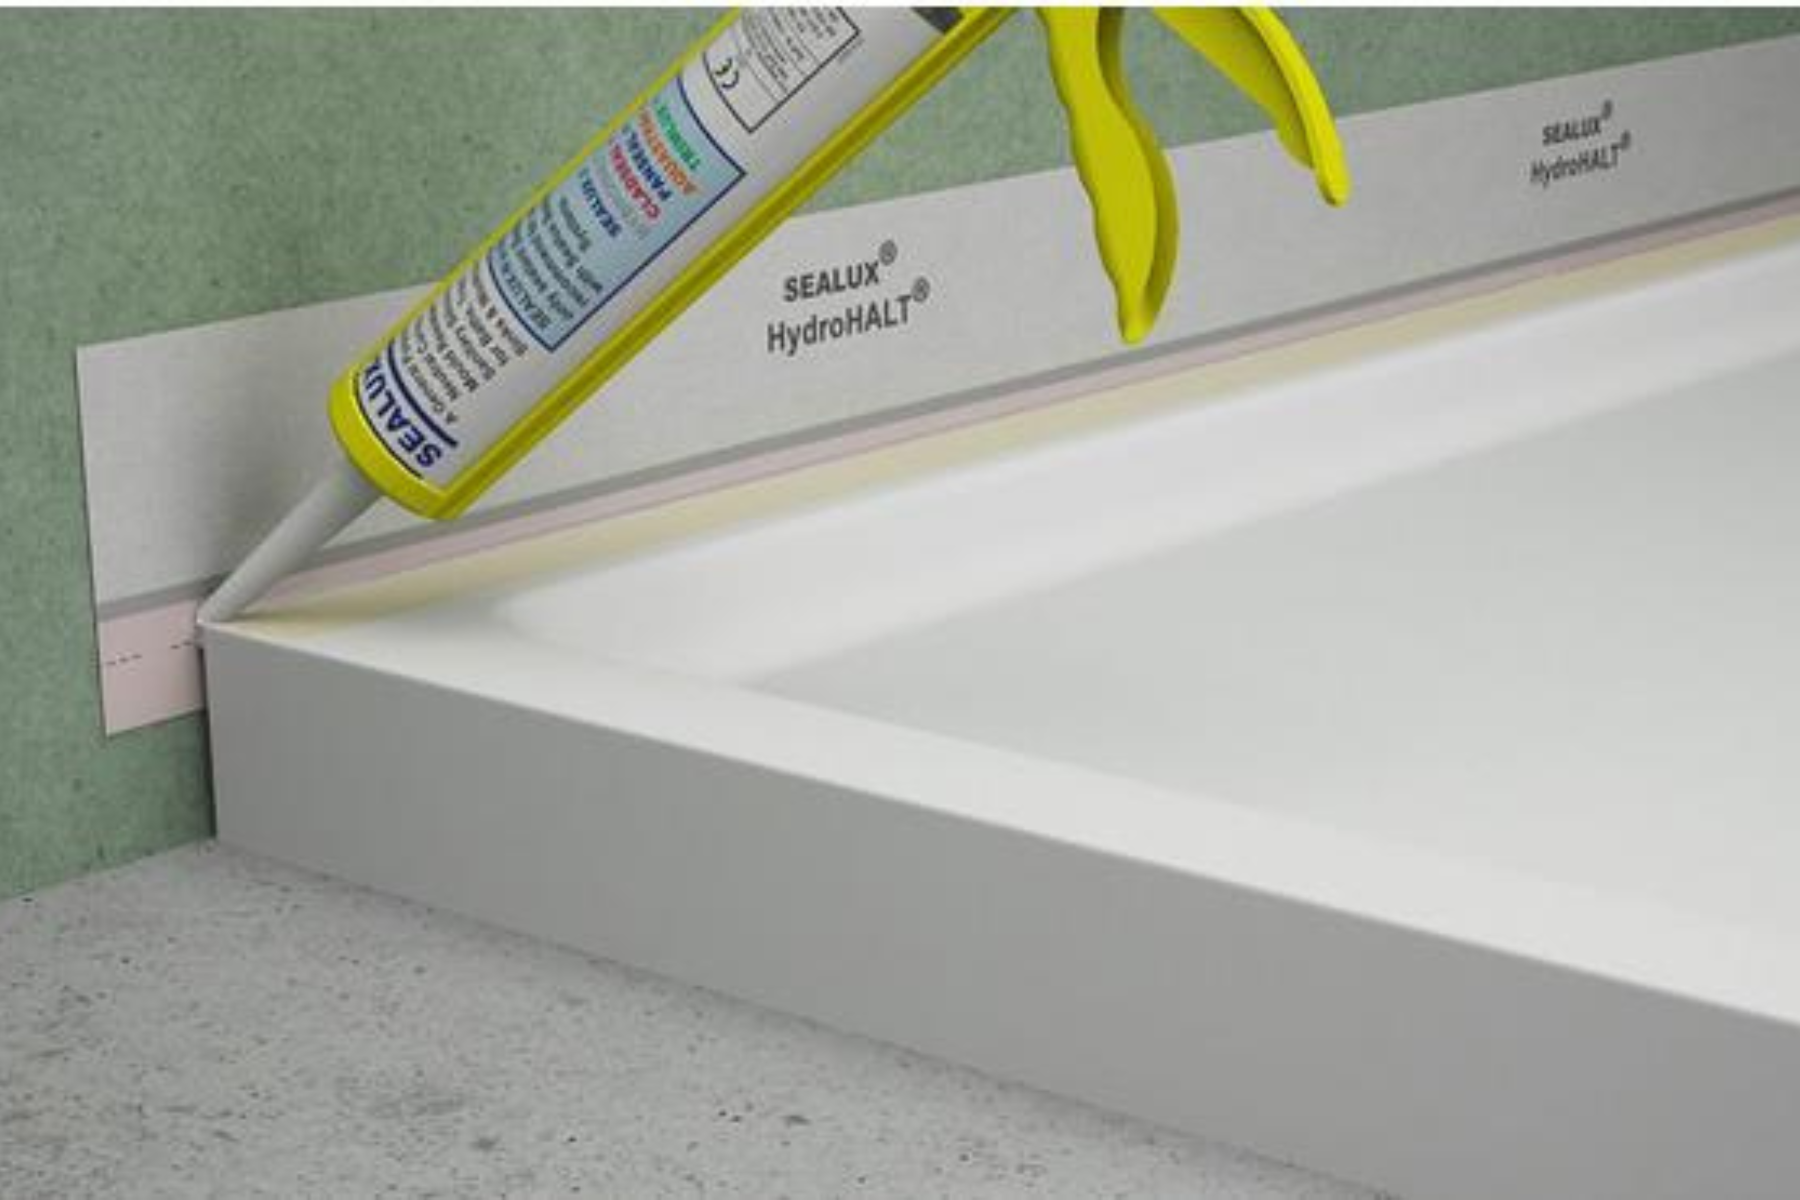
Step 3: Loading the Gun and Dispensing the Sealant
Insert the sealant tube into your gun. Pull back the trigger mechanism slightly, then press the trigger to dispense a small amount of sealant onto a rag or piece of cardboard to ensure it flows smoothly. Then, holding the gun at that 45-degree angle, apply a continuous bead of sealant along the gap. Aim for a consistent pressure on the trigger. Don’t stop and start too much, as this will create weak points in your seal. Think of it as drawing one smooth line. Go around the entire perimeter of the shower tray, ensuring you overlap slightly where you finish and start.
Crucially: Don’t overfill. It’s tempting to put a massive amount of sealant in there, thinking more is better. It’s not. It’ll just make a mess and be harder to smooth. Aim for a neat, consistent bead that will fill the gap effectively.
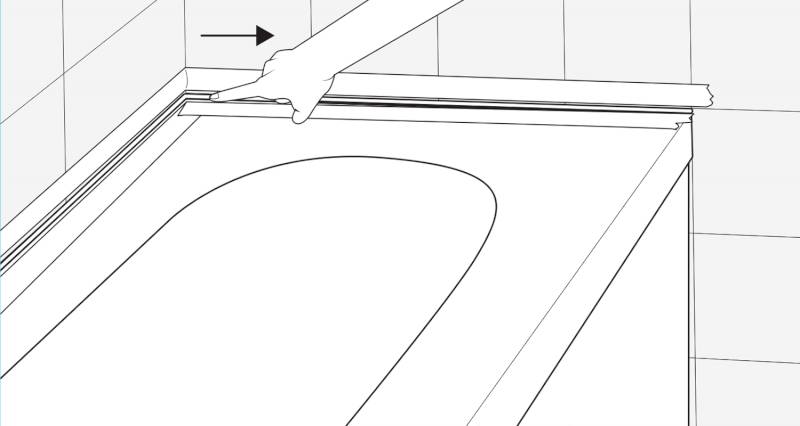
Step 4: The Smoothing Ritual
This is the moment of truth. As soon as you’ve applied your bead, you need to smooth it. Don’t wait too long, or the sealant will start to skin over, and you’ll end up with a rough finish. This is where that spray bottle with water and a tiny bit of washing-up liquid comes in handy. Dip your smoothing tool (or your gloved finger) into the soapy water, and then run it along the bead of sealant. This helps to create a smooth, concave finish, pushing the sealant into the gap and creating a neat, professional look. Wipe off excess sealant from your tool frequently onto a rag.
The goal here is to create a nice, even cove shape that effectively bridges the gap between the tray and the wall. You want it to look like it was done by a professional, not a badger with a tube of goo. If you’ve used masking tape, this is where it really pays off. The smoothing tool will create a perfect line right up to the edge of the tape.
Step 5: The Grand Reveal (and Cleanup)
As soon as you’ve smoothed your bead, carefully peel off the masking tape. Do this at an angle, away from the newly applied sealant. If you wait too long, the sealant can adhere to the tape, and you’ll ruin your perfect line. Go slowly and steadily. Voilà! You should have a beautiful, clean, and perfectly sealed edge. Step back and admire your handiwork. You’ve earned it!
Now, for the inevitable cleanup. Wipe up any excess sealant immediately with a damp cloth. Once silicone has dried, it’s a nightmare to remove. So, be diligent. Dispose of your used rags and tools properly.
What Kind of Sealant Should You Be Using?
This is a question that trips a lot of people up. There are so many types of sealant out there! For shower trays, you absolutely, positively need to be using 100% silicone sealant. Why? Because it’s waterproof, flexible, and durable. It can withstand the constant changes in temperature and humidity in a bathroom without cracking or degrading.
Avoid acrylic or caulk sealants for this job. They might be okay for some indoor applications, but they’re not built to handle the constant moisture in a shower environment. They’ll likely fail, and you’ll be back to square one (or, more accurately, square damp).
Look for sealants that are specifically labelled as “anti-mold” or “bathroom and kitchen” sealant. These contain fungicides that will prevent the dreaded black mold from growing in the sealant itself. Nobody wants to scrub mold off their pristine new seal, right? It’s like trying to clean a blackhead from a tiny, unscratchable pore. Just… no.
Clear vs. White: The Great Sealant Debate
This is a purely aesthetic choice, but it’s worth considering. White sealant is the classic choice and looks very clean and crisp against white tiles or trays. It can help to make the seal look like a seamless extension of the tray. Clear sealant can be a good option if you have patterned tiles or if you want the seal to be less visible.
However, clear sealants can sometimes yellow over time, especially if exposed to direct sunlight (which, thankfully, most shower enclosures don't get). White tends to be more forgiving in the long run. Ultimately, it’s personal preference, but make sure it’s a good quality bathroom-grade sealant regardless of color.
Common Mistakes and How to Avoid Them
Even with the best intentions, it’s easy to make a few slip-ups. Here are some of the most common mistakes and how to sidestep them:
- Skipping the prep: We’ve covered this, but it bears repeating. Never skip the cleaning and drying.
- Using the wrong sealant: Stick to 100% silicone for bathrooms.
- Cutting the nozzle too wide: Start small. You can always go bigger.
- Applying an uneven bead: Practice makes perfect with the sealant gun. Keep that pressure consistent.
- Not smoothing immediately: Silicone skins over quickly. Work fast!
- Peeling tape too late: Get that tape off while the sealant is still wet.
- Not allowing enough curing time: This is a biggie. Check the sealant tube for drying times. Most will need at least 24 hours before being exposed to water. Resist the urge to test it out too soon! It’s tempting, I know. The temptation to run a bath and stare at it suspiciously… it's real. But patience is key here.
Getting these right will massively improve your chances of a successful, watertight seal. It’s a bit like baking a cake – follow the recipe, don’t try to sneak in too many extra ingredients, and give it enough time to bake properly. Otherwise, you’ll end up with a soggy bottom.
When in Doubt, Call a Professional!
Look, I’m all for DIY. I love the satisfaction of fixing things myself. But there comes a point where you have to be honest with yourself about your skills and the potential consequences of a botched job. If you’ve tried, and you’re still battling leaks, or if you’re just feeling completely overwhelmed by the prospect, there is absolutely no shame in calling in a professional. A plumber or a handyman will have the experience and the tools to get it done right the first time. Sometimes, paying for expertise is the cheapest option in the long run, especially when structural damage is a risk.
But for those of you feeling brave and ready to tackle it, remember these tips. Take your time, be methodical, and don’t be afraid to make a few mistakes along the way. That’s how we learn, right? And the reward of a perfectly sealed shower tray, free from the menace of dripping water, is totally worth it. Now go forth and seal with confidence!